|
Ceiling Tiles
Styrofoam or Extruded Polystyrene Foam Tiles |
|
Styrofoam ceiling tiles have
become more popular in the past five years.
With metallic paint, the tiles can mimic the look of
the old fashion tin tile ceilings. It is also
a quick and decorative solution to covering up hideous
pop-corn ceilings.
I first came across the styrofoam ceiling tiles when
I was looking for something to cover-up the popcorn
ceiling over my
front entrance (foyer) in 2013.
This ceiling section is only 82 inches high. We were
always brushing something against the ceiling
knocking off the texture.
When I say styrofoam, think of the more modern
styrofoam egg cartons. These tiles are made of
the same stuff. It is lightweight and can be
easily gouged or dented. On an average height
ceiling or higher, this should be a non-issue.
If your family is constantly scrapping the ceiling
with long objects, this may not be a good option for
you.
This page will highlight my experiences purchasing
and installing the ceiling tiles on both inside and
outside surfaces. |
Where to Purchase Tiles
There are numerous websites that sell these tiles.
Hardware stores do sell these tiles BUT, the
designs are limited AND they are very expensive.
Stick to an online store for a better selection and
cheaper prices. I have used two different
companies:
Ceiling Tiles By Us
http://www.ceilingtilesbyus.com/
Antique Ceiling Tiles
http://www.antiqueceilings.com/
I do not recommend one website
over the other. They both shipped the items
promptly and the items were received within one week,
undamaged. |
Size
of the Tiles
Some websites give the dimensions 20" x 20".
Some say 19.5" x 19.5". They are neither.
The tiles are manufactured somewhere in Europe or Asia, so
they use the metric system. They are 50 x 50
centimeters. The tiles are closer to 19 5/8" x
19 5/8". or 19.625".
When determining how many tiles you need, and you
are using inches, use 19.625 in your calculations.
This will get you closer to exactly how many you
need. |
Painted or Un-Painted
Whether you purchase painted or unpainted tiles,
this your personal design choice. I purchased
un-painted or white. I wanted to make my tiles
a specific color to match the paint in my home.
If you paint your tiles:
- Use water-based paint only - If you plan to paint
your own tiles you can only use water-based paint.
(latex, acrylic). Oil based paint or spray
paint may damage the styrofoam by dissolving it.
- Spray painting is faster - If you have a spray
painting machine and a large open area to spray,
this will be the faster method. In my case, I
brush painted the tiles two coats of paint. If
you are painting a real dark color, you may need
three coats of paint to go over the slick white
surface.
- Paint the tiles before you install them. It
is a whole lot easier to paint something at ground
level than to paint upside down on a ceiling.
In my foyer, I installed the tiles before painting.
I regretted this afterwards. |
What
Glue to Use
All of websites
recommend using just regular old mastic. The
same stuff you use for installing tile on a floor or
shower stall wall. There is a difference
between the brands of mastic. The difference
being the firmness of the mastic.
Placing the ceiling tiles on the ceiling and pushing
up to smash the mastic flat between the tiles and
ceilings is hard physical work. Your neck,
arms, and shoulders will tire easily if you are not
used to doing this work.
If the mastic is real firm, the harder time you will
have to push up, to smoosh the mastic flat. The tile
websites recommend AcrylPro which is thick. I
used the generic mastic I bought from a big box
hardware store. This mastic is less firm than AcrylPro. So far, the tiles have stayed put just
fine. In fact, where I had to remove tiles a
few weeks later because I had damaged them with my
scaffolding, it was very hard to remove. I had
to break off the tiles in little pieces to get it
all off.
I bought some AcrylPro when I was
at a smaller hardware store and tried it out.
After 10 tiles, I was exhausted from pushing up
harder than I was used to. You can tell that
AcrylPro is the better mastic, BUT you will have to
put more physical effort
into installing the
tiles. I am saving my partially used AcrylPro
mastic for some floor tiles. |
Other Issues with Tiles
- Some of the tiles still had the perforated
edges. If not smooth, you can sand
them off if you want to.
- The depth of the design varied with every
order of 100 that I placed. Meaning,
it was higher on the first tiles I ordered
and got flatter. Like the die was not
pressing as hard. Or the styrofoam was
a little thinner.
|

Perforation on edge |
|
|
Front
Entrance Tiles - June 2013 |
If you are installing the
styrofoam tiles over a popcorn ceiling, you do not
need to remove the popcorn all the way. Just
rub over the pop-corn with a firm brush to remove
any loose pieces. When doing this, you will
make a big mess. Cover your hair, put drop
cloths down, etc.
If you have a lot of humidity in your home, like I
did from a swamp cooler, you may have an even bigger
mess. See below. The entire textured
section came off without much work. |
|
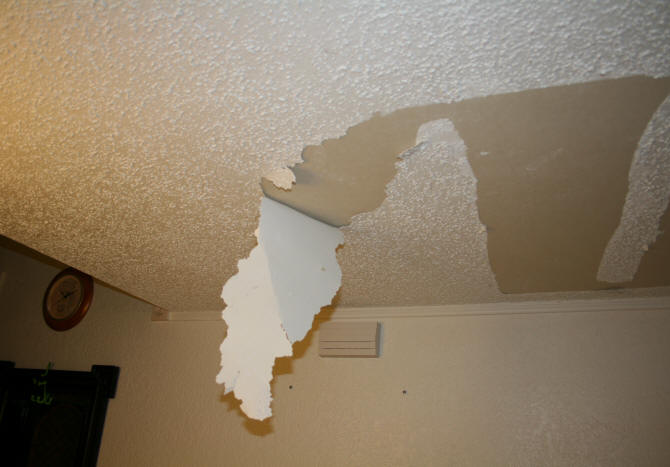
Popcorn texture with paint, peeled off easily from
the ceiling of
entrance way because of humidity |
Because
this whole area, including the paint, was
loose, off it
came.
For this ceiling I ordered the ceiling tile
shown below by Ceiling Tiles By Us. I wanted a
small scale simple design because the area was so
small.
Total cost for this section was $66 for
the tiles. |

Ceiling stripped down to drywall |
|
|

R-55 Modern
style ceiling tile |
First, you find the
center of your ceiling and place the first
tile there. This is the most crucial
tile. It needs to be straight and
centered exactly. All of your other
tiles will be placed against it as you work
towards the edges.
Once you get to the edges against the wall,
you will most likely need to cut your tiles.
Use a sharp blade and a good straight edge.
Once the blade gets dull, change it.
|
|
Once all of the tiles
have been placed on your ceiling, you caulk all of
the seams. Smooth out the caulk with your
finger. I found you get a cleaner caulk line
if you do a whole section going horizontally over a
whole row. Wait an hour or so until the caulk
dries. Then do the the rows vertically.
Once the caulk dries, you can paint your seams.
If you decided to paint your tiles on the ceiling
then you paint everything. If you painted your
tiles before installing, then you just paint your
seams with the same paint.
If your ceiling tiles are being installed in a room
that is being totally renovated and you are
installing moulding on your walls next to the
ceiling, like crown moulding, you will get a cleaner
line if you install the tiles first, then put on
your moulding. You can actually do it either
way. |
|

Ceiling tile after installation |
|

Entrance way two years later, November 2015 |
As of
2018, the tiles in the entrance way have
held up fine.
Nothing is pealing off, no cracks in the
caulk. No humidity problems.
Because this ceiling is so low, there have
been a few hits to the ceiling, but no
damage or noticeable dents.
|
|
|
Outdoor Ceiling and Roof Soffit Tiles - March
13 - August 22, 2015 |
Before placing the styrofoam
tiles on outdoor areas, I researched all over the
web for someone else who had placed these tiles in
an outdoor area. There
were a few who had installed tiles on an enclosed
porch area. That was it.
Because the tiles can be damaged easily by something
hitting them, you really have to think about this.
How will they also stand up to rain, wind, sun,
extreme temperatures, etc? I decided to take a
chance with this. Consider my house the test
house. (As of 2018, no
problems with tiles. On some of the seams,
there was a little splitting due to the expansion
and contraction of the soffit boards. The
seams were easily sealed and repainted.)
The reason why I wanted to do this was the ugly
patio ceilings and roof soffit. Some of the
materials used for the ceilings and soffits were
Hardie board (compressed cardboard) or plywood.
For the seams, they were covered with a thin piece
of moulding that over time, pops off. The
areas with plywood replaced the Hardie board that had been
damaged by rain.
Placing the styrofoam tiles outdoors was part of an
overall outdoor renovation and repair project that
is shown on the Raising the Roof page
here... |
The
hardest decision to make was the style of
tile to use. Since I would be
installing this tile on my roof soffit,
which has various widths, I needed to select
a pattern that could be trimmed a few inches
and not "look" like it was chopped off.
Fortunately the width of the soffits going
around most of the house was close to the
width of the tiles. So very little
trimming, as you will see, was needed.
The style of tile I chose is shown to the
right. One company calls it Malta.
I ordered from both companies mentioned
above. Whoever had the cheaper price
at the time. |

Malta ceiling tile |
|
Since I had no idea how many
tiles I would need for this entire project. I
ordered 100 at a time. Yes, I could have
measured everything to get an estimate but I decided
to just order as I needed them. I had a lot of
other work to do besides placing the tiles on.
I set up a paint station in my garage and would
paint about 20 tiles at a time over a period of several
months.
Outdoor Front Entrance Ceiling Tiles
The first outdoor tile installation was done under
the roof that covers the front patio. During
the garage roof construction, the water damaged Hardie board ceiling
was removed and replaced with plywood. |
|

Damaged Hardie board ceiling removed |
|

New plywood ceiling installed |
During the construction I asked
the workers NOT to put on the trim to cover the
plywood seams. I knew the styrofoam tiles would
cover the plywood seams.
I could have just placed the tile on the bare wood.
But I wanted a smoother surface so the tiles would
stick on the surface better. So the plywood
was primed with an oil based primer. After
waiting a couple days for the primer to dry, I placed
the tiles on ceiling, starting in the center.
The moulding along the top of the walls was left
off. A hole was cut for the light fixture. |
|

Tiles being installed on ceiling outside front
entrance on primed plywood. |
|

Ceiling
tiles complete and moulding added at top of brick
wall front entrance |
|

Front
entrance ceiling and adjoining soffit area completed
up to the first decorative wood beam |
|
To have the adjoining soffit area
match the ceiling, I continued the tile pattern down
the side of the soffit and underneath. Besides
the trim that was added at the top of the walls, I
added trim along the edges of this soffit. The
reason for this was to seal the tiles edges from
water and to make it look better aesthetically.
This vertical edge of the soffit does get hit with
rain. |
Garage Roof Soffits
After the front entrance area was
completed, I shifted to the front of garage. I
needed to finish placing tiles on the soffit on the
front garage roof so I could finish up the soffit that led to
the front entrance.
Since all of the garage roof was new construction
with fresh plywood, it all received a coat of oil
based primer. When the paint had dried, I
started placing the tiles on.
The important part of this section of the
installation was the corner piece. It
had to be trimmed and centered so the
pattern matched up to the tiles going in two
different directions.
So I started on the lower corner of the
soffit where the front entrance soffit and
the front garage soffit meet and worked my
way up.
When I got to the top of the roof, I left
the center piece of wood trim on, and cut
the tile where it met the trim piece of
wood.
I cut the first tile going back down the roof in the
same place the other tile was so it would match.
See photo below.
With this particular pattern of tile, the pattern
matches, even though it was trimmed. |

Started on lower corner and worked
my up garage front soffit |
|
|

At the
top of the roof, the tiles on either side of trim
was made equal so the tile pattern would match |
After
completing the front of the garage, I was
then able to complete the rest of the soffit
from the front entrance along the east side
of the garage roof.
Because this was a shorter area, I did some
measurements. I discovered that I
would be able to fit almost 10 tiles in this
area. It was about 1.5 inches too
long.
To cut one tile 1.5 inches shorter than all
the others would have looked odd. So I
spread the 1.5 inches over the 10 ten tiles.
I trimmed off about 1/16" on each end (1/8"
per tile) which did not cut into the design.
Over the distance, it
came out to 1.5" with a little bit of
tweaking. Overall, it worked out.
After caulking and painting and the
installation of the soffit vent covers, you
cannot even tell.
With some scrap pieces of tile I also
covered the fascia on this section between
the wood beams. This was because the
old fascia took a real beating during
construction and looked awful. |

Soffit
under front garage roof caulked and painted |
|
|

Completed
soffit and fascia area on east side of garage with
the slightly shortened tiles |
|

Completed
soffit and fascia area on east side of garage with
the slightly shortened tiles |
|
Now that the front entrance and
two sides of the garage soffits were finished, I
continued working on the soffits around the garage. |
|

Completed west side of garage |

Completed back of garage |
|
|
After I completed installing the
styrofoam tiles on the garage roof soffit, I was
back to the front entrance area where I had the roof
extended to cover stairs that led to the stucco wall
patio. |
|

Roof
section that was extended over stucco stairs |
|

Extension
over stucco patio stairs tile installation and
painting complete |
House
Roof Soffits
For the
house roof soffit over the stucco patio and
the west side of the house, I am dealing
with old sheet rock (stucco patio) and old
Hardie board (west roof) in addition to the
newer plywood which replaced damaged areas.
Because I was tight on funds, I only had the
damaged areas repaired during construction.
For the stucco patio I needed to make sure
the area where the plywood met the piece of
sheetrock was level in preparation for the
ceiling tiles. There were some damaged
areas on the sheetrock that needed to be
filled in.
The stucco patio soffit is about 36" wide.
So I centered the ceiling tiles and made
cuts on the inside and outside pieces
working from the front entrance to the
corner. |

Stucco patio soffit with a piece of
sheetrock and new plywood |
|
|

Ceiling
tiles on soffit over stucco patio |
|

West side
of house with new fascia, new plywood, and old
Hardie board |
|

Tiles
being installed over old Hardie board |
|

West side
of house with ceiling tiles and paint job complete |
|
After working on the west side of
the house, I moved to the a small section in the
front of the house. This small section only
took a few hours to tile and paint |
|

Small
portion of roof over front patio |
|

Small
portion of roof over front patio after installing
ceiling tiles, painting fascia, and
putting moulding
on brick under soffit |
The next
section of the house was the east side roof
soffit. Most of this section was not
touched during construction. As I did
repairs along the roof, I added the tiles.
The one section of the east roof that had
new wood was the soffit over the kitchen
window. The entire soffit was ripped
out and replaced.
This wider section of the soffit was
measured to find the center and the tiles
were placed on after the new plywood and
fascia were primed.
After caulking and painting this section, I
continued up the soffit of the east roof. |

East house roof |
|
|

Extended
east roof area over kitchen window with new
construction painted with primer |
|

Tiles
going on soffit over kitchen window on east house
roof |
|

Soffit
above window area complete except for corner where
electrical wire is.
Still need to add moulding against brick. |
Besides
the ceiling tiles, I was also stripping
paint off the wood beams, covering old
siding with new siding, and sanding wrought
iron along the way.
If you are only installing the ceiling tiles
on your soffits it should be very quick.
You can see the dramatic difference in a
section of this roof in pictures below.
Of note on the soffit vents...the former
covers for the vents were these round
plastic covers that you pop in over the
hole. The problems with the plastic
covers are that they get brittle after a few
years, break apart, and fall out.
To reach most of these
vents on the high sections of the roof is
dangerous with a ladder. So I bought
aluminum vent covers that can be nailed or
screwed in. I nailed them. Now I
will not have to worry about the covers
falling out like before. |

Section of east roof between first and
second decorative
beam above dining room window being worked on
|
|
|

Section between the first and second
decorative beam above dining room window complete |
If you
are doing any repairs around your roof
soffits, like I did, it is highly
recommended that you do all the other work
first and only install your ceiling tiles
last to avoid damaging them.
I needed to remove old caulk, sand the old
fascia down, remove old moulding, strip the
old paint off the wood beams and sand them,
install new siding above windows, etc.
All actions that might have accidentally
damaged the tiles. |

Soffit, fascia, siding, and wood beams up to
chimney done |
|
After the east side of the house
soffits were complete, I moved on to the back of the
house. The roof edges here at some extensive
damage that needed to be repaired. Old fascia
board and the fascia was removed and replaced with
new lumber. After watching the construction
crew repair other areas of the roof, I knew what to
do. I had my husband help me with the
demolition in this area.
If you have damaged areas of your roof, you will
need to repair it before you place any ceiling tiles
on. |
|

Damaged
area of roof on the back of the house being
repaired.
New fascia, fascia board, and flashing being
installed. |
|

Ceiling
tiles in place on this section along with repairs
done on side of house |
The back
of the house has two ceilings besides the
soffits. The balcony ceiling and the
ceiling under the balcony. I will deal
with those last.
I had one more section of the back roof
soffit. There were also a bunch of
unruly cable wires that needed to be dealt
with.
After repairing the damaged fascia and
building a box to hide the cable connector
in, I installed the ceiling tiles.
After installing the tiles, I ran the cable
over the top of the tiles to the side of the
house and painted the cables the same color
as the tiles to camouflage them.
|

Last
section of the roof to work on |
|
|

Cable box
mounted on fascia. Cables painted to
camouflage them. |
Ceiling
tiles were placed on the ceiling of the
balcony next.
For the ceilings in the back yard I laid the
tiles out differently. I did each side
of the wood beam separately. I first
found the center and then worked out from
the center.
|
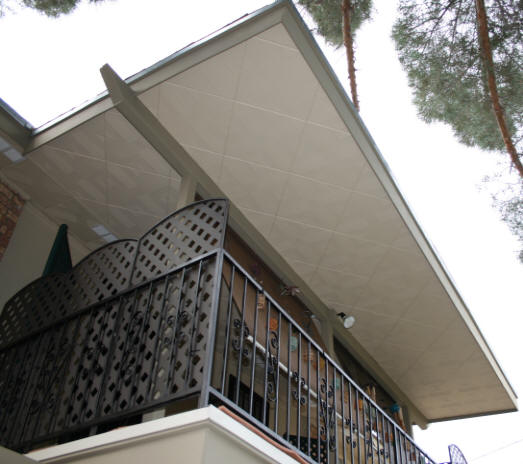
Ceiling tiles placed on balcony ceiling |
|
|

Ceiling tiles placed on back porch ceiling |
Now every outdoor area of this
house has ceiling tiles covering the ceiling or
soffit. How has it stood up to the weather so
far as of November 2015? After a few hard
rains, two days with nickel sized hail, and wind
with gusts up to about 60mph, no damage. The tiles
are, after all, on the underside of the roof.
How many tiles did I end up using for the entire
house? About 370. This includes tiles
where I messed up. I have about 30 left over.
Each tile was hand painted twice. Total cost,
around $1000. Yes, this was very labor
intensive. But I now have soffits like no
other house.
If I have any problems with these tiles, I will let
you know on this web page. If you come across
this web page several years later and I have not put
anything else here, you can assume the tiles are
doing just fine outdoors. |
|
Main Bath Shower Area - November 22, 2015 |
There is
a ceiling area above the Main Bath bathtub
that has been bothering me for years.
Nothing was falling off, but you could tell
where the ceiling had been patched before we
had moved in. I should have had it
re-textured when the outer part of this
bathroom was renovated in 2013.
This is a small area that only measures 61"
x 58". I only needed 9 full tiles plus
1" edges on the 61" side if I do the
measurements from the center out.
|

Patched area on ceiling |
|
|

Ceiling
area of Main Bath |
I had some leftover tiles from
outside tile project.
I pre-painted the tiles the white color used on the
walls. The only thing I removed was the light
fixture. |
|

After
tiles installed on ceiling in Main Bath |
|

Ceiling
tiles on ceiling in Main Bath |
|
Master Bedroom Ceiling - January 2018 |
As of Spring 2018 this house will
be on the market. The decision to sell this
house, after all of the hard work and personal
touches, was not an easy one.
While I was in the months long process of preparing
this house for sale, I decided to cover the popcorn
ceiling in the Master Bedroom. My rationale
for this, was the high probability that the future
owner of this home would most likely be sleeping in
this room. After almost 20 years of laying on
my bed looking at this ugly ceiling, the ceiling
tiles would be a nice touch and increase the appeal
of the room. The ceiling in
this bedroom is vaulted, which means the popcorn had
also collected dust. It was gross.
New carpeting for the house was already ordered.
The scraping and cleaning of the ceiling in
preparation for the ceiling tiles had to be done
before any new carpeting was installed, because of
the amount of dust.
This room of the house is also the hottest during
the summer months. The afternoon sun hits the
roof of this room heating it up. The extra
insulation that the styrofoam will provide will
lower the temperature a couple of degrees. The
styrofoam will also protect the sheetrock ceiling
from the moist blast of the swamp cooler. |
|

Popcorn
ceiling in Master Bedroom (from bathroom area) |
|

Popcorn
ceiling in Master Bedroom (from entrance) |
In the middle of the vaulted
ceiling is a beam. I suspect that this beam
had probably been covered by the faux wood beams
that exist in the living room, dining room, and
downstairs recreation room of this house. If
it had been there, it was removed before we moved-in
in 1998. I thought about placing a faux wood
beam up matching the other beams in the home.
However, I would need someone to help me do this.
I was doing this work without a helping hand, so I
ruled out this option.
Also, I was a little afraid of doing a whole lot of
hammering or screwing on this ceiling and beam
because it is 40 year old sheetrock, which might
crack.
At this point I am trying to get rid of as much
stuff I have for the move, which includes any
moulding I had bought and not used for years.
What I had on-hand were 6 pieces of pvc lattice
moulding, that I ended up not using for another
project. I
discovered that the moulding was just the right size
to fit on the vertical sides of the beam without any
cutting. The lattice moulding also went up
easily with just finishing nails which went in
without causing too much stress on the beam..
At this point, I still had no idea what to cover the
underside of the beam. |
|

Side of
ceiling beam covered with PVC lattice moulding |
Before placing the pvc
lattice on the beam, I carefully measured
the room and laid out the tiles in my
computer graphics program. I needed to know
exactly how many tiles I would need. I
needed 76 tiles so I ordered 80....just in
case I messed up.
I decided on a more traditional design and
chose the Lima pattern from Antique Ceiling
Tiles. They were on sale at the time.
Cost for 80 tiles including shipping was
$216. I already had some mastic and
white caulk on-hand.
The tiles are white and will not be painted.
When the tiles arrived, I found the center
of the room and started laying the tiles. |

Lima pattern from Antique Ceiling Tiles
|
|
|

Amount of mastic used on each tile |
Because of the beam, I needed to
treat the room as two ceilings. I wanted whole
tiles at the beam. The partial tiles will be
at the walls.
Working from the center I worked on the bathroom
side of the ceiling first. |
|
|

Ceiling
tiles placed from the beam to ceiling over the
bathroom sink area |
|

Half of
the room done |
After
finishing the bathroom side of the ceiling,
I worked on the other side of the beam.
Polystyrene chair moulding (I wanted
something thin but a little decorative) was
placed against on the top of the wall and
the ceiling tiles to give it a more finished
look.
The tile seams were sealed with white caulk.
Because I was not planning to paint the
tiles, extra care was given to make sure any
excess caulk or mastic was cleaned from the
tiles because it would show up.
It took me a week to get up the tiles and
the moulding around the room.
After the tiles were installed, I added a
new fan and light fixture to the bathroom
sink area. |

Starting on the other side of the beam |
|
|

Ceiling
tiles up and new fan installed |
I still
had not found a solution to cover the
underside of the ceiling beam.
The material had to be lightweight. I
thought about using the ceiling tiles I used
for the ceiling but cutting a 5.25" width
section would look awkward.
The same company had polystyrene wood look
planks, which would have worked, but they had
a minimum order requirement for these.
I only needed a few planks to cover the 14
feet of beam. I could find nothing at
the hardware store......AND I walked through
all of the isles.
The idea I came up with, came to me in the
middle of the night. Hey..... what
about the material I used for my
kitchen backsplash?
They had tile patterns that might fit my
5.25" width requirement. I went online to the
DIY
Decor Store website to see what
patterns they had. |

New light over sink |
|
Besides backsplash
materials, they also have ceiling products.
I ended up buying one of the 2 x 4 feet
white traditional tile pattern ceiling
panels and 8 of
the J-trim pieces. The ceiling panel would be
cut in four long sections. The J-trim would be
used to hold the panel to the beam and cover the
edge. |

Underside
of beam |
|
|

One
ceiling tile and 8 J-trim |
I
re-measured the underside of the beam to see
what variations I had in the width. It
ranged from 5.25" to about 5 3/8".
With the J-trim attached, each strip that I
cut, had to be 5 3/8".
The ceiling panels are made of thin plastic,
so cutting them was easy with regular
scissors.
With the J-trim attached to the cut ceiling
panel strip, the strip measure 5 3/8".
|

Deciding
where to make cut |
|
|

Strip
easily cut with regular scissors |

With
J-trim measure 5 3/8" wide |
|
|
I planned to glue only the J-trim
to the edge of the pvc strip on the beam.
Which means the panel strip would be able to slide a
little if needed. To glue the j-trim, because
it was light, I just used caulk. The caulk was
placed on the ceiling and the J-trim. I let
the caulk set a little for about 20 minutes and then placed
the strip on the beam. |
|

Caulk
placed on edge of pvc lattice moulding |
|

First 4
foot strip in place |
|

Caulk
setting for next strip |
|

Beam now
covered in master bedroom |
I continued along the beam until
it was covered. I had a strip a little under 2
feet left over.
|
February 20, 2018
https://laurellynn.com/KidsZone/ |

