|
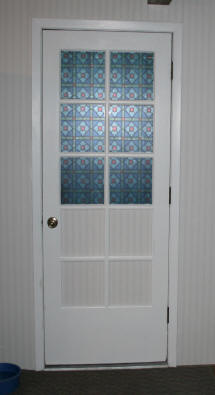
Doors |
|
While working on the
man
cave I needed to paint a 6-panel door
white. This door that leads to the laundry room, 4th
bedroom, and closet, was a replacement for a plain brown
door that had been chewed up by one of our dogs.
When my husband installed it, I wondered why he had
replaced the plain door with the 6-panel door.
When I started looking at doors, I found it is
easier to find the 6-panel doors than the flat
surface doors. The hollow core doors are also
very inexpensive. Which answered my question
as to why he had bought the 6-panel.
I thought about painting all of the brown doors in
the house white. Many of these doors though
were damaged in one way or another. So I
decided to replace all of the doors with the 6-panel
doors. At an average cost of around $25, I
felt it would be a worthwhile investment and would
brighten up the house considerably.
The exterior doors (those leading to the outside)
were another story. These doors are solid wood
which are much more expensive to replace.
There was nothing really wrong with these doors
except for a little water damage on the two French
doors, old paint, and dog scratches. These
would be repaired and painted. |
|
The first step was to go around
the house and measure the width of the doors that
needed to be replaced. Not that any of the
doors were exactly the standard width. I knew
I would need to cut down the standard sizes to match
the existing doors. I also planned to purchase
the doors with the door knob hole already bored in
the door. |
|
24" Door |
6 |
|
30" Door |
2 |
|
36" Door |
1 |
|
40" 2 piece door
|
1 |
|
Total |
10 |
|
 |
I also needed to buy new hinges. The
old hinges were a tarnished brass finish and
some were pretty nasty with paint on them.
I bought what I needed, plus a few extra,
from the same company I purchased my door
knobs,
eBuilderDirect.com. Their
price was much cheaper than the big box
hardware stores.
The hinges are of good quality and come with
the matching screws.
|
|
Since there was no way my SUV
would fit all ten doors, I bought them as I needed
them. The first set of doors I started on was the
main hallway.
The first thing I did before removing any door, was
note any problems with the existing door I had.
Like whether it was sticking in any areas.
This way when I trimmed the new door I could cut an
extra 16th of an inch off the edge to avoid the
sticking the old door had. If the door had too
much of a gap on the bottom. I adjusted this
also.
I placed the new door flat down on a set of work
horses. The old door was placed on top of it.
The side with the door knob hole was aligned.
I then drew lines on the hinge side, top, and bottom
of the doors where I needed to trim off excess so
they would fit in the opening.
After cutting them on my table saw, I placed the old
door back on the newly cut door to make sure it was
cut correctly.
I then marked the location of where I would need to
chisel out the hinge recesses. With one of the
new hinges I had, I traced the outline of the hinges
onto the side of the door.
I then cut each outline of the hinge recesses with a sharp
blade in my cutter. Going as deep as the
thickness of the hinge. I then took my chisel
and hammered a wider dent along the edge of this
outline. I used a flathead screw driver instead of a
chisel around the hinge corners. With the
outline of the hinge clearly marked, I held my
chisel at an angle and tapped the end with a hammer
to remove the wood as thick as the hinge between the
carved hinge markings. I used a new hinge to make sure I
went deep enough.
After cutting the door hinge recesses I took the
door to it's new home and attached the door with the
new hinges in place to check the fit. You
would think, that after all the steps I made to make
sure the door was exactly the same size as the
previous door, it would go up easy as could
be. Not! Something always had to be
tweaked. Some of the problems were with the frames.
Like the recess in the frame was set a little too
forward or back. Each door and door frame
presented different problems that were fixed.
When the door finally fit properly, like it should,
it was then painted with the same white as the walls.
I also painted the door frame where the old hinges
and door knob strike plates were. The house
had been painted a few times over the years
around all of this hardware. The frame
just looks cleaner when you paint these areas BEFORE
you place the hardware on. |

Hall closet was the first door replaced |

After main bathroom door was replaced |
|
|
The brown louvered door is the
closet for our gas furnace. It has not been painted
or replaced. I am hesitant to do anything to
this door. It is made of good solid hardwood
and has a decent stain on it. I did replace the door
knob with a matching dummy knob and the hinges.
The louvered door has a spring roller touch catch
which is why I only needed a dummy knob. |
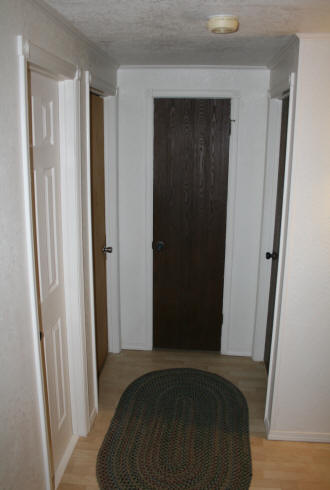
Hallway before, with bathroom door replaced |

Hallway after, with all the doors replaced |
|
 |
I purchased door stops also. Many of
the old doors did not have any stops. Which
means, there were areas in the drywall that
show where doorknobs had hit the wall in the
past.
I needed 2 lengths of doorstops. I purchased
a
4" rustic door stopper and the
3 1/4" door stopper both from
eBuilderDirect. Most of the doors that open
up with a wall behind them used the 3 1/4".
The 4" was used in odd areas like the closet
door in the center of the photo above.
When this closet door is opened all the way,
it hits the door stop moulding on the right
door. Gouging the moulding.
|
 |
|
|
The door stops were also placed
at the top of the door instead of at the bottom of
the door or on the wall. The dogs just love to
chew on the door stops. Up high, they can't
touch them. |
The door that provided a challenge was the master
bedroom door. It is actually two doors that
cover a 40" opening. They do not make the
6-panel doors in a 40" width. Nor do they make
a 20" 6-panel door. Both are not standard sizes.
There was the option to have a custom made door
made, but that would have been too expensive. So
what did I do?
I did some measurements on all the doors I had
already installed
to see where 20" would hit on the doors. On
the 36" door, it measured just 20" from the edge to
where the moulding was on the second column of faux
panels.
So I purchased two 36" doors. I then ripped
both of them with my table saw through the center at
the 20" mark. I then cut of the ends of the scrap
piece to get the edge which I glued with wood glue
into the gaping hole on the now 20" door. I
now had two 20" doors. |

Completed master bedroom doors |

With one door locked at ceiling |
|

Sliding door lock |
I added a piece of moulding,
to the door that locks into the ceiling, on
the side that faces the hallway.
Photo on the left shows how the door slide
locks into the top of the door frame.
After you lock this door into place, you
close the side with door knob.
The photo on right shows one of the scrap
door piece after I ripped off 20" and the
end. I saved them for no known
reason at the time. I did end up using
one of the door pieces for the main entrance
door. |

Scrap door piece |
|
As of September 2013, there are two
more doors I have yet to replace. The master
bedroom closet doors. I need to work on this
whole wall removing the cable lines that go up and
down around the door frames. I also want to
replace the moulding around the door. I have
been holding off on this until I work on the master
bedroom. I want to tear out the carpeting and
replace it with laminate flooring. |
|
I want to place the new door
moulding right on top of the new flooring for a
finished look instead of trying to cut the laminate
around the moulding.
So this job is
waiting until I have enough energy and my hands are
in better shape to do all of the ripping AND I have
the money to buy all of the laminate I need to
replace the remaining carpet in the house.
However, In November 2013 I replaced the master
bedroom closet doors. I had to keep moving the
doors around in the garage and I was afraid I would
eventually damage them. I decided to install
the doors before they were damaged. |

Master
bedroom closet doors to be replaced |

Master bedroom closet doors replaced Nov 2013 |
|
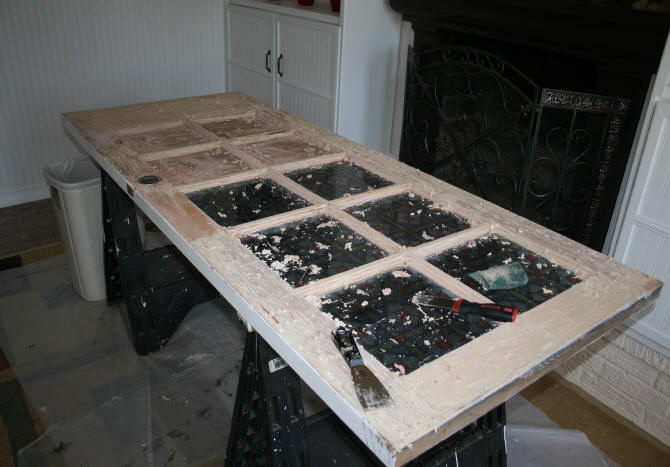
The
French doors that are in the living room and
master bedroom, that lead to the balcony, were removed and repaired.
Each door took about two
weeks to strip, repair, and paint.
The solid wood doors were still structurally
sound. None of the glass was broken
and all of the moulding between the glass
was still there.
However, these doors took a couple of
decades of punishment from the sun and rain
before the balcony roof was added
The paint was peeling and there was water
damage. The inside paint was also
discolored and needed to be painted.
The photos below show the bedroom door after being
repaired and painted. |

Inside of French door in bedroom to balcony |

Outside view of French door from balcony |
|
|
The French doors were taken off the hinges and
placed flat on work horses. The
stripping of the paint took a while. All of
my previous strip and paint projects were
done using metal scrappers and sandpaper.
In this case, I was having a hard time getting the paint
off around the glass. |
|
 |
I decided to try out a chemical stripper to
at least soften the paint so I could get it
off easier. I did a little research on
paint strippers and came across
Citristrip which is more
environmentally safer than the older
strippers.
It does work. The key is to put a
lot on. Do your scrapping while
the product is still damp. It will
work better on latex paint than oil paint.
I also had to apply and scrape a few times
in some areas. The odor it has is a light
orangey smell, but you get used to it.
I did this work in the middle of the living
room and the odor was not overpowering.
After the paint was removed, the doors were
sanded down to fresh wood. I had to
use a power sander for this. |
|
I used wood filler to help smooth
out areas that were a little warped and then sanded
again to make the surface flat and smooth. The
doors were then given two coats of oil primer and
then two coats of latex paint.
A couple of weeks after the paint had cured on the
door, I sealed the windows panes on the outside with
clear silicone to keep any water from getting
between the wood and the glass. |
The front entry door I worked on was completed August
of 2013 while I was working on the
front
entrance. Actually, I started
working on the door and that job evolved into the
main entrance remodel.
I did not take a picture of the outside of this door
but it was the same orange color shown in the
backyard photo below. The inside of the door was the
flat brown that matched the doors in the rest of the
house. |
|
The
entrance door also had the usual dog
scratches. The front door was removed from
the hinges and placed on a set of work
horses on the front patio. I sanded
off all of the paint on this side of the
door down to the bare wood. The other
side of the door took a lot more work.
|

Front door sitting on work horses |

Inside of main entrance door - before |
|
The door on the outside had some
unique moulding that I wanted to keep. With
all of this moulding it took a while, even when I
used the stripper, to remove all of the old paint
and then sand the door down.
When the door was finally stripped, I used the
outdoor oil based primer and then the latex top coats.
White on the inside and the new outdoor color I used
on the
balcony on the outside of the door. |
|

Finished front door - outside |
The completed outside of
the front door is shown on the left.
The door was previously painted one color,
orange.
I painted the entire door, after stripping
the old paint, with the new outdoor
color I am painting the exterior with.
For the moulding, I added a little bit of
black to some of the paint to get a darker
color. I used the darker color to
paint the moulding and added the gecko
motif.
The inside of the completed door is shown
below.
Now that I had 6-panel doors
throughout the house, I wanted this door to
look like it was a 6-panel door. But I was
not going to buy a new door.
What I did have were the two scrap pieces from
the two 36" doors I chopped in half to make
my master bedroom doors.
With one of these scrap pieces, I cut out
the six panels along their edges. I then glued them with
wood glue on top of the sanded door after
measuring and marking where to put them.
|
|
Along
the edges of the faux panels I used quarter
round moulding. I then used wood filler to
put in the crack between the seam of the
faux panels and moulding, sanded it smooth
and then caulked around the outer edge of
the moulding.
I guess I could have just used
moulding to make the faux panels, but I
wanted this door to match the other doors as
close as possible.
The photo below shows a close-up of the faux
panel and moulding.
And yes, when I renovated this entire area I
got rid of the hideous gold colored plexi-glass.
I will cover this topic on the
house entrance page.
The only doors I have left to do are the two
in the master bedroom and the outside of the
backyard door. |

Finished front door |
|
|

Close-up of entrance door faux panels and moulding |
|
One thing I have noticed this
past summer (2013), was the amount of swelling the
wood and doors in this house undergo when the swamp
cooler (evaporative cooler) is being used. I
thought I had all the doors working good, with no
sticking. This summer the humidity level made
many doors stick to the point where they could not
even be opened. So I have had to go back and
further shave down some doors. |
What
did I work on after the front entrance door?
The whole front entrance... |
|
The outside door that leads to the backyard at the
lower level of the house has only been done on the
inside. The inside of the door was done when I was working on
the
man cave.
This door is pictured below. |
Inside backyard door before |
Inside of backyard door after |

Outside of backyard door |
|
Between May 16 - 21, 2014 -
I finally completed the
outside of the backyard door. This was the
last outside house door I needed to complete.
I worked on this door after I finished working on
the backyard wrought iron door that needed a new
doggy door.
See
this project here...
After removing the door, I applied my stripper to
remove the orange paint. Fortunately, this
door only had three coats of paint. The orange, then
beige, and the white primer.
After stripping most of the paint, the door was
moved outside for the sanding. After the door
was sanded down smooth, I cut some of the left over
ABS sheet I had used on the
backyard wrought iron door to cover the
four sections on the bottom.
The plywood on the bottom was very thin and damaged.
The ABS would also give an additional layer of
insulation to the door in addition to protecting the
door from dog scratches. The ABS sheets were
glued on with Liquid Nails and weighed down with a
brick for a day. |
|
Backyard
entry door being stripped |
|
Backyard
entry door paint stripped and sanded down |
|

Black
ABS sheets glued onto lower four panels and door
primed |
|

Second
layer of primer applied to backyard entry door |
|

Backyard
entry door moved inside for final coats of paint |
|

Backyard entry door now complete |
The entire door was then primed with oil based
paint. Sanded with a 200 grit sandpaper,
then primed again. I let the door sit for
a couple of days. After the second coat of
primer was thoroughly dried, I sanded the door
again with 320 grit sandpaper. The door
was then moved inside for the final coats of
latex paint.
New hinges were installed and the door hung.
The
weather stripping I had installed on
the other entry doors in the house and
storage shed were added to this door
stop. |
|
|
|

