|
House Entrance / Foyer |
|
The idea to re-model our house
entrance was not on my schedule of renovations.
It was not until I was working on the front door in
June of 2013 as
part of my
doors project, that I started thinking
about changing some things around the front door.
The house entrance project just took on its own momentum.
One thing turned into another and so forth. If
I was painting the door, I needed to paint the door
frame. If I do that, then I need to update the
moulding. While I am doing that, I might as
well update the window, which leads to fixing the
ceiling above everything, and so on, and so on.
Our front entrance is very small. The actual
square footage of the area is 5 1/2' x 6 1/2'.
The area even feels smaller because the ceiling is
only 82" high. The ceiling could also be
called soffit. It hides the duct that goes
into the kitchen. The top of the door just
misses hitting the ceiling.
The photograph below shows the entrance area before
I did the most current renovation.
When we
purchased the house, the wall with the door and wall
with the light, had peeling wallpaper on it. I
had removed the wallpaper, used textured, and
painted the walls. The light fixture was
updated a year ago and matches the wall light
fixtures
throughout the home. The opening on the right
leads to the kitchen.
What I have always hated, were the tiles on the
floor. They are at least 1" thick marble tiles. To
remove them I will need something like a jack
hammer. So they will stay put for now.
The door of course, was an eye sore. Then
there is the window. The "lovely" gold plexiglass
that you cannot see out of. To see who was at
our front gate, which is kept locked at all times,
you have to open the front door. I wanted to
be able to see who is at the gate before
I open the front door. There is also a large chunk
of the window sill that had been chewed on by our
dogs that needed to be repaired.
The moulding to the left of the front door and to
the right of the window ends one inch before it hits
the wall. What bothered me about this, was the
fact that dust loved to collect in these one inch
spaces. It was also hard to clean.
I also hated the popcorn ceiling. Something I have
been removing from a room when I start renovating
it. The popcorn has so far been removed from
the laundry room, bathrooms, and main hallway.
The other hassle with the popcorn on this low
ceiling is that it gets hit a lot if you are
carrying something through the area. It is
easy to forget that the ceiling is lower, and whack,
you hit the popcorn and there is white stuff all
over the floor. |
|

Front
entrance before renovation |
The first thing I started working on was the front
door. This took a few weeks of stripping and
sanding. The photos for the completed front door are
below. Yes, that is the same front door
finished with faux panels on the inside. I
explain how I did this on the
doors
page.
The outside of the door
already had the decorative moulding on it and was
originally painted a solid orange color. I
painted the outside of the door with the new outside
paint color with a darker shade used for the
moulding and the gecko motif that I added. |
|

Finished front door - outside |

Finished front door - inside |
|
While I was working on the front
door, I started working on the demolition of the
area. I needed to remove the existing moulding
along the walls. Repair the window sill.
Look for a replacement for the gold plexiglass.
Shop for new moulding. Purchase and cut to size a
new threshold for the door. Remove the popcorn
ceiling. Find one rug that covered the ugly tile
floor.
The first thing I tackled was the replacement for
the gold plexiglass. I knew this would have to
be something I had to special order to fit this
spot. The size of the existing plexiglass was
15" x 56 1/2". Glass in the window is not a
good option when you think from a burglar's point of
view. Break the glass, slip the hand through
to unlock the door. I did not want to use plexiglass
again. So I looked on the internet for other
inexpensive materials that were out there, as a
replacement for glass or plexiglass. I finally came
across polycarbonate sheets as a tough clear
alternative to glass or plexiglass.
I found a few websites where they sell a vast
selection of polycarbonate sheets in a
variety of thicknesses. |

Detail of gecko motif on front door |
|
|
Some companies will even cut them to the exact size you need.
It was the price that kept me from ordering from
them.
By the time that shipping was added on to the cost
of the polycarbonate sheet, it was costing me more
than $200 for this one window. The shipping
for one company was more than the item itself.
Forget that! |
|

Lexan polycarbonate wire shelf liner |
So I looked for another
option and I finally found it on the
Home Depot website. Clear
polycarbonate sheets that are sold as shelf
liners for wire shelving.
The size they had that I needed was, 16" x
72" with a thickness of .006". The liners
came as a four pack. I would not need
all 4 sheets, but at $76.18 this was a deal,
compared to the other websites that
specialized in polycarbonate sheets I
figured I would place two sheets on top of
each other in the window. For a total
thickness of .012, which would be about the
same thickness as the plexiglass I was
replacing. |
|
I went ahead and ordered online.
This item was something that the El Paso stores did
not keep in stock. This order took almost a
month. Sigh... The first order that came
was the wrong size. They sent me the 14"
width. It would have worked for a shelf, but
not for my window. Besides, I paid for the 16"
gosh darn it! The
fastest return option was to return it in person for a
refund. Then they told me I needed to place a
whole new order, which I did.
I finished
everything around the window in the meantime.
When I started to remove the popcorn texture from
the ceiling, my plan was to scrape it off.
What has happened in the past when I have done this,
is that I am left with a texture that is similar to what
is on the walls. When painted, you cannot even
tell it had a popcorn texture before.
What actually happened instead, was that the
whole paint came off in big sheets. Thanks in
part to the extra
humidity that the house had in it. This humidity came from the swamp cooler
(evaporative cooler) that had been running non-stop
most of the summer.
So much for having a
textured surface! I now had a ceiling stripped
down to the drywall surface. |
|
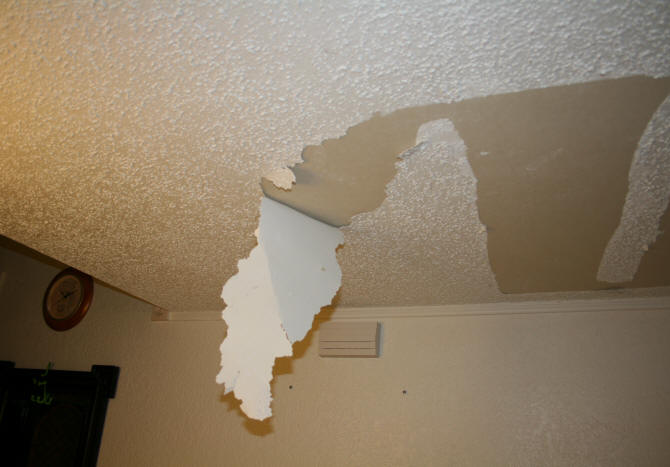
Popcorn texture with paint, peeled off easily from
the ceiling of
entrance way |
|
The
photograph at the right shows the entrance
area after the ceiling popcorn was removed.
The moulding around the door and window had
also been removed.
Plastic was on the screen door to keep the
heat out. It was in the upper 90's and
100's while I was working on this. The
door was still being worked on outside.
I had also started to peel the paint off of
the left wall. So many coats of paint
had been added to the walls by the previous
owners, it came off that easily. I
ended up peeling this whole wall down to the
drywall and repainted it. There was
also a raised area on the wall where the
door knob had gone through the wall. I
needed to level this lousy patch job.
I still needed to remove the floor moulding
and moulding around the kitchen entrance. |
 |
|
|
For the ceiling
I thought about spraying texture on the ceiling. I
then remembered seeing ceiling tiles before
in catalogs and online and decided to research this option instead. I
came across the website
Ceiling Tiles By Us that offered
styrofoam and PVC ceiling tiles. Styrofoam you
ask? Like egg cartons? Yes, just like
the styrofoam used in egg cartons. |
|

R-55 Modern
style ceiling tile |
They had a lot of different styles.
But I wanted a
small scale simple design because the area I had to cover
was small. I also worried about the
installation, but I found an
installation video on the Ceiling Tiles By
Us website that showed exactly
how to do it.
They used Acrylpro
mastic in the video, but this product is not
available at the Lowe's in El Paso. I
picked up a quart of Type1Mastic for ceramic
tiles, which is
basically the same thing. Cutting the
tiles was very easy. Just use a new
blade in your cutter.
|
|
The only problem with the
tiles was the size. The website says they are
20" square. The tiles that I ordered were actually
19 3/8" square. This was a slight problem for
me because I ordered exactly what I needed, 16
tiles. I did have some extra strips after
cutting the pieces that went along the wall. I used
these to fill in the 1 1/2" space I had on the
ceiling by the door. If the website had given
the actual size of the tile, I would have ordered 4
more. I do not know why they rounded up to the
nearest inch. It would be better to just give
the actual size, even if it is an odd one.
Other than this size issue. The tiles
did go up easily and have stayed put.
They are styrofoam, so they will dent or
scrap easily. For my entrance ceiling
I need to be extra careful. For a
ceiling at the normal height of 8' or more,
there should be no problem with this.
When the tiles are painted, you cannot
really tell that they are
styrofoam. My husband had to touch them to be
convinced.
Some tips when installing the tile. If you are
going to paint them, do it before you install them.
I originally was not going to paint them but then I
decided to, after I installed them. Use caulk
to seal the seams. It gives the tiles a more
finished look. If you painted the tiles before
hand, then you only have to paint the seems after
you caulk them.
For a $66 investment, the ceiling tiles came out nice. I was
pleased at the end result. |
|

Finished styrofoam tiles on entrance ceiling |
|
The other thing I had to tackle was the moulding
around the door and the window. I did not like
the one inch on the sides where the moulding
stopped. The best way I came up with to fix
this was to find a wider moulding that matched my
existing moulding around the door, which I did find.
The photos below show how this worked. Now I
don't have to squeeze a rag into the corner to clean
out the dust. No bumpy surface for the dust to collect
on. |
|

Detail of left corner of front entrance |
|

Detail of right corner of front entrance |
|
I had also decided to add some of
the left over fossil green textured wallpaper I had
used in the
main
bathroom on the front and right wall
covering up the terrible texture job I had done 10
years ago. This textured wallpaper went over
the uneven surfaces easily. |
The photograph on the right
shows the entire entrance area completed,
except for the window. I was still
waiting on the polycarbonate sheets.
The only moulding left to install was the
moulding around the window that would be
used to hold the polycarbonate sheet in
place.
A wider moulding had also been added to the
wall along the ceiling and floor. The
same moulding that I had just added during
the renovations of the
man cave,
main bath,
and
master bath.
I could not find an area rug at a reasonable
price that fit this space exactly. It
had to be inexpensive because of the dogs. I
did find a cheap 5' x 7' rug at Lowe's
for $19.99. |

Finished, except for the window |
|
|
These rugs appear to be remnants
left over from some large commercial job. They
finish the edges and wa-la, area rug.
It hangs over a little at the transition between the
tile and laminate flooring. We are so used to this
hump after 15 years, that we do not trip on it. So
far the rug is holding up
good. |

New
polycarbonate window with window film |
By the
end of July 2013, my polycarbonate sheets finally
arrived.
I then had to deal with how to cut them.
The material is tough! I would first
try cutting them with a sharp blade and then
snapping off the excess. If I was not
able to do that, I would try my table saw.
I was able to cut them with a blade. I first
clamped my stainless steel cutting edge on
both ends to keep it stationary and then
made the cuts. With my weak hands it
took several passes but I was able to do it.
There is a protective film on both sides of
the sheets. Keep it on until you are
done cutting.
Since I was going to put two sheets on top
of each other I especially did not want to
get any finger prints or dust on the inside
of the two sheets, where they might be
visible for decades. |
|
The window came out looking
great. The polycarbonate is very clear and
looks like glass until you touch it. The two left
over scraps I had were large enough to fit on two
small skylights in the house. I replaced the acrylic
sheets that were covering the skylights with the
polycarbonate adding the window film that I used on
the window.
About the window film. Now that I had a window
that I could see through, people at night could see
into the house if a light was on. I needed to balance this a
little. I have used window film before. So I
thought this would be the perfect solution.
Some of the film allows you to see out, which is
what I wanted.
When I went on the internet, I was pleasantly
surprised to see that the window film market has
greatly improved over the last 5 years with many
more designs and sizes than were previously
available. |
I came across an etched glass design that has clear
areas. This would allow me to see who was at
the front gate without them seeing me during the
daytime. During the day all you see is a
reflection on the outside anyways. You cannot see
in. At night with a light on in the house, you
have a distorted view. Plus, the etched glass
style let a lot more light in than the stained glass
window tints.
I ordered the
Etched Glass Tropical Leaves film from WindowFilmWorld.com. They had a sidelight width
close to my dimensions. The left over film was used
on my skylights.
The other thing about this window film? It is removable.
So if I decide to remove it or change styles, I can
do so without damaging the polycarbonate window.
The finished front entrance is
pictured at right. With Satin our black Shar-Pei
sitting guard.
I am still looking for a replacement for the
ugly console table in the picture. |

Finished front entrance |
|
|

One-of-kind, custom made cork and chalk board
combination |
The only thing left to make was my bulletin board.
The old brown door had a piece of cork attached that
was used to stick things that were reminders for
appointments, coupons to use, etc. It came in
handy.
I had already bought a package of 4 -
12" cork tiles at Lowe's. I did not know how I
wanted to use them when I bought them. I
thought of making a small cork board that fit on the
door. But now that I had a door that looked
beautiful, I did not want to put anything on it.
I had also seen the new blackboard paint that is
readily available at stores now. I came up
with the idea to create a bulletin board that was
both a cork and chalk board.
In my computer graphics program I designed a custom
bulletin board. I then cut the
bulletin board to the measurements I
had from some scrap plywood.
|
|
I recycled the old moulding I
took off of the kitchen opening and used it for the
frame. The chalk board section was painted
with the black board paint I bought. I added a
little ledge to hold the eraser and chalk from scrap
moulding. The rest of the board was painted
white. The cork was glued on and is actually
two cork tiles thick, which makes it level with the
moulding. Because it is not square, I used two
hanging hooks to secure it firmly against the wall.
The other part of this project that morphed into
more work, was the painting of the outside of the
front entrance. |
|

Newly painted front entrance |
The
front entrance was an orange terra cotta
color that matched the bricks. I am
changing the color of the outside to match
the vinyl which is on the new windows to the
left. The window on the right has not been
replaced yet.
Since the house is a two story, I will need
to rent a scaffold or boom to get to the
roof soffits and other high spots not safely
reached by a ladder.
Some of the wood on the exterior is in
pretty bad shape. When I start working
on that, I will add those projects to this
website.
Hmmm... in looking at this picture, I think
I may add some moulding along the bottom of
the bricks.
The flooring used on the front cement patio
is rubber tiles. I have fallen so many
times out here, these rubber tiles now help
cushion my knees and hips when I trip. |
|
|
And if you are beginning to
wonder if we live in a high crime area, with all of
the wrought iron, we do not. In El Paso, the
wrought iron is used a lot for decoration. On
the other hand, if our neighborhood ever becomes a
high crime area or if there is a zombie apocalypse,
no one or thing will be able to get into the house
easily. And if they do, the dogs will eat them
;) |

