|
File Cabinet
Vintage, Retro, Rustic, or
Industrial Looking
4 Drawer
File Cabinet
On Wheels
- That I Designed and Made
February
3,
2019 -
February 18, 2019
|
 |
On this page I will provide the
instructions for building a four drawer file cabinet
that matches my
Rolling DVD Storage Cabinet. (see
this here....)
Why am I building a file cabinet instead of buying
one? For the same reason I built the
Rolling DVD Storage Cabinet.....I could
not find a ready made file cabinet in the style,
quality, and price that I wanted.
I did actually find a few ready-made file cabinet that
I liked. However, I would of had to retrofit
the bottom of them with plywood so that I could
attach casters. They were also made with
particle board. ack!
Also, all of them had issues with the cabinet
falling over, if more than one drawer was open.
I have no issues attaching a tall cabinet to
a wall to prevent it from falling over, like my
Rolling DVD Storage Cabinet. But I
do have an issue with attaching a low cabinet to a
wall.
Having a low cabinet tipping over when the drawers
are open, is just poor design. If the weight
of the file cabinet is sufficient and the base is
wide enough, there should be no tipping over, unless
you have a child climbing it.
Also, what is the point of having a low cabinet if
you can not sit or stand on it, if needed?
Whaaaaaat?!?! Come on now! Who hasn't
rested their butt on a low cabinet or stood on a
piece of furniture when you were too lazy to get a
ladder?
I do not plan on sitting or standing on the cabinet.
However, if someone does......the four casters on it will hold at least
400 lbs. I will however, store items on top of
the file cabinet. |
Criteria for this File Cabinet
1) The file cabinet must be on wheels, so it
can be moved around easily when needed.
2) The cabinet will be similar in size to a
two drawer lateral file.
3) There will be
four drawers instead of two drawers that are used in
the traditional lateral file. These files
though, will be accessed face forward in the drawer,
not sideways.
4 ) There can be no areas of the furniture that a
dog can chew on. There must be metal legs and
edges on the furniture. No exposed wood edges.
Which means.... industrial style furniture.
5) The stain/paint that will be used will be a
dark walnut color to match the wood throughout the
house.
6) The drawers will accommodate
hanging files. |
7) This file cabinet will follow the design of the
Rolling DVD Storage Cabinet. The
drawer fronts will have the same reclaimed wood as
the DVD Cabinet and the same hardware.
8) After designing, purchasing, and cutting the main
cabinet pieces, I made a big design change.
Fold-down shelves on the sides. I'll explain
below, why I decided to add these.
With my graphic design software, I then designed the
file cabinet. See image at right. |

Proposed file cabinet design |
|
Material Purchases
Some of the items
purchased for this project were bought at Lowe's.
These items were: plywood, whitewood, Minwax paint,
aluminum angles, aluminum flat bar, screws, spray
paint, and misc supplies.
Other items were purchased online at either
Amazon.com or Build.com .
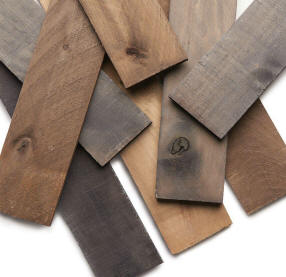
The design elements that are the same as the items
used on the
Rolling DVD Storage Cabinet
are: The aluminum
angles, the faux rivets (upholstery tacks), the
style of cabinet pull for the drawers, the corner
brackets, the metal corner protectors, and the
distressed wood on the drawer fronts. |
|
|
Corners
For the corners of the cabinet, I wanted a
metal bumper or guard to cover the edges of
the aluminum angles on the edges. Easier said
than done. I did finally settle on the
one pictured to the right. However, it
was not my first choice after 3 days of
searching.
These corners are easy enough to find for a
small box or a trunk, but not for large
furniture. I needed to find a corner
that was more than an inch from left to
right and up and down so the corner of the
aluminum angle will be covered. |

Antrader 8pcs Metal Box
Corner Protector Edge Safety Bumpers
Furniture Corner Guard Bronze Tone 2.8" x
2.8" x 1.2"
https://www.amazon.com/gp/product/
B07CV625R7/ref=
oh_aui_detailpage_o01_s00?ie=UTF8&psc=1 |
|
Faux
Rivets
I actually wanted smaller nails or tacks for
the rivet look on the edges of the aluminum
corner angles. However, I could not readily
find them and I wanted something more
decorative looking than a regular nail or
screw.
What I did find a lot of, were upholstery
tacks. All kinds of tacks in different
colors and styles. BUT the one
consistent size was 7/16". So I had a
choice between smaller less decorative nails
or larger upholstery tacks. I went
with the tacks.
There was no way that these tacks could be
hammered through 16 gauge aluminum. So
I needed something that would punch a hole
through my aluminum angles before I put the
tacks on. So I found a hole punch for
metal up to 16 gauge steel. |
|
|
|
Casters
For the
Rolling DVD Storage Cabinet
I used heavy duty metal casters that I had
purchase b-e-f-o-r-e I designed the cabinet.
Before I bought the new house. Before I
realized that metal wheels on ceramic floors
are not a good idea. Those wheels were
covered with some Flex-Tape to protect the
floors.
For this file cabinet, I found black
polyurethane casters with a retro look
instead of metal. Now I will not have
to worry about the floors.
Each caster can support 100lb.
Headbourne 8276E Designer Casters 3 inch
Polyurethane Black Mag Designer Caster, 4 Pack
https://www.amazon.com/gp/
product/B076FGP5H1 |
 |
|
|
|
|
|
|
https://www.lowes.com/pd/Steelworks-6-ft-x-0-5-in-Aluminum-Metal-Flat-Bar/3053573 |
|
Material Costs for File Cabinet |
| |
|
|
2 -- 4'
x 8' sheets of 3/4" Oak HPVA Plywood |
$95.36 |
|
2 -- 8 foot
long - 1" x 3" whitewood (.75 x 2.25
actual) |
7.98 |
|
1 - 32 oz can
Minwax Polyshade Satin finish - Espresso |
11.95 |
|
1 - 32 oz can
Minwax Polyshade Satin finish - Pecan |
11.95 |
|
1 -
Wood Flat Phillips #
8 x 1 3/4 in. (Bubble pack of 75
screws) |
5.22 |
|
1 -
Wood Flat Phillips #
10 x 1 3/4 in. (Bubble pack of 75
screws) |
4.00 |
|
1 - Headbourne
8276E Designer Casters 3 inch
Polyurethane Black Mag Designer Caster,
4 Pack |
45.34 |
|
3 - 6 foot
long - 1" wide aluminum corner angles |
35.07 |
|
1 - 8 foot
long - 1" wide aluminum corner angles |
12.32 |
|
1 - 11oz spray can Rust-Oleum Oil Rubbed
Bronze |
5.56 |
|
200 -
Decotacks Upholstery Nails 7/16" width
(2 packs of 100 at $9.90) |
19.80 |
|
8 - Antrader
8pcs Metal Corner Protectors Bronze Tone 2.8" x
2.8" x 1.2" |
14.69 |
|
8 - 4-29/32"
Long Traditional Corner Brackets for
Barn Doors |
44.39 |
|
2 -
YUMORE Folding Shelf Brackets 12”, Max Load: 330lb
Heavy Duty Stainless Steel - Pack
of 2 at $28.30 x 2 |
56.60 |
|
3 - Severe
Weather (Common: 1-in X 2-in x 8-ft;
Actual: 0.625-in x 1.375-in x 8-ft) #1
Treated Lumber - Used as trim
around cabinet drawer front |
6.12 |
|
part of 1 box
- Weaber Weathered Hardwood Boards - 8
boards in package measuring - 1/2" x 4"
x 48" - 10.5 sq ft for $24.98.
Had left over from last project.
Probably used 1/3 of box |
8.32 |
|
4 - Ironcraft
4 inch Center to Center Cabinet Pull |
14.84 |
|
2 - 6 foot
long, 1/8" thick, 1/2" wide aluminum
flat bar - to hold hanging files |
13.28 |
|
Misc -
Sandpaper, Glue, Paint Brush, Caulk,
Brush Cleaner, Finishing Nails |
40.00 |
| |
|
|
Total |
$452.79 |
|
Putting It All Together
Since I am designing the details of this file
cabinet on the fly, some details and wood
measurements are unknown when I begin. For
more accurate cuts, I prefer to cut some pieces
after some sections are assembled.
What I did know, were the sizes of the big sections.
I needed these measurements before I went to the
hardware store because I needed the plywood sheets
cut so they would fit in my SUV. I had Lowes
rip one board twice at 17.5". The second
board was just ripped in half. I did the
smaller cuts at home.
Pieces that I knew the measurements for and will
be cut before the rest of the pieces:
2 - 39" x 17.5" for the top and the bottom of
cabinet
3 - 17.5" x 27.25" for the sides and center
2 - whitewood trim cut to 28.75" - vertical
trim on left and right side
2 - whitewood trim cut to 34" - horizontal
trim at top of cabinet and between the upper and
lower drawers
The measurements for the completed file cabinet
will be:
- 39" wide
- 28.75" tall (not counting the casters, which
will raise the cabinet about 4")
- 17.5" + .75" thickness of whitewood trim + .5"
thickness of plywood back = 18.75" |
The 9 pieces I knew the dimensions of were cut,
given a sanding, and then painted.
Painting
Process - Colors Used and How Many Coats
For this piece of
furniture, I will be using two colors of paint.
The first coat is the Minwax Polyshade Satin Finish
Espresso, which you can see below, is v-e-r-y dark.
It is a coffee brown with black undertones. If
you use 2 coats of this paint, you will cover the
wood grain......which I want to see. So I only
use one coat of this paint.
After the one coat of Espresso has dried, I sand it
with 320 grit sand paper until the sheen is gone and
it is ashy looking. This is done for all wood
surfaces.
After the cabinet is assembled I finish off the
cabinet with a coat of Minwax Polyshade Satin Finish
Pecan. 2 coats if needed. This adds a
little orange/gold tone to the Espresso. |
|

First nine pieces of the file cabinet cut and being
painted |
Why do I paint b-e-f-o-r-e I assemble the pieces?
It is just easier for me to paint pieces on a flat
surface, than an assembled piece.
The edges will be covered with the aluminum angles,
so they don't really need to be painted.
Folding Shelf Idea
Good thing I painted first. In the 2 days I
was waiting for paint to dry, I came up with the
idea of the fold-down shelves on the side of the
cabinet. |
What had been nagging me,
was the 1.75 inches of dead space on the
design of the outer sides of the file
cabinet.
I am copying the style of the Rolling DVD
Cabinet and needed the 2.5" of trim to place
the aluminum angle on the edge and the
corner brackets.
For the rolling DVD cabinet, there was no
dead space. The area behind the trim
was being used by the shelves. |

2.5" of trim on the left front of Rolling
DVD Cabinet
showing 1.75" behind trim piece |
|
The
other thing I decided upon, were the type of drawer slides that were mounted on the side of
the drawers. Which means, I would have to add
wood to bring in the sides of the cabinet for these
particular slides. The area would still
technically be dead space.
Better to move-in the sides 1.75", than to
try to build up the area with wood and
shims.
But what could I fill in this 1.75" space
with?
|

Aluminum angle on edge and corner
bracket on Rolling DVD Cabinet |
|
Then it came to me.....what about
folding shelves? The shelves would come in
handy when a flat surface was needed to set a box
on. The shelves could also be used as a small
temporary desk area.
The wood is .75" thick
and I found a folding shelf bracket that was
only 1" deep. For a total of 1.75".
Perfect. |
Assembly
Begins
After the paint had dried on the first 9
file cabinet pieces, they were assembled
using the #8 1-3/4" wood screws.
4 screws for each board, top and bottom.
For the top of the the file cabinet (the top
shelf), I countersunk the screws so that I
could add some hole filler.
Holes were pre-drilled before I put the
screws in.
After the main file cabinet pieces were
screwed together, I placed the casters on. |

Top, bottom, sides, and center pieces
assembly |
|
This
would make it easier to move around
while I was working on the cabinet.
The trim pieces were then ready to put on.
However, before all of the trim pieces could
be added, I needed to cut a few more pieces
of wood. I needed:
1) 2 small wood squares to support the
edges of the center horizontal trim.
2) 4 wood pieces to attach to the center
support board for the drawer slides and
vertical trim pieces
|

Top, bottom, sides, and center
pieces assembled |
|
3) 2
vertical trim pieces for the middle.
4) 2 horizontal pieces of wood for the
bottom shelf
5) A piece of plywood for the back of the
file cabinet.
6) 2 horizontal pieces to add to side along
piece of wood attached to the back of the
cabinet. |

Assembly diagram, front view, for first 9
file cabinet pieces |
|
Referring to item #1 above.
On the side of the file cabinet, I needed to
have something to support the edges of the
middle horizontal trim piece. This was
not a problem on the Rolling DVD Cabinet
because there was a shelf in the middle to
nail the trim to.
2 little squares of scrap lumber were cut.
They were screwed and glued onto the side
exactly in the center. |

Squares of scrap lumber were cut and placed
on the side to support middle
horizontal
trim piece. |
|
The exact center of the cabinet
ended up allowing 11-3/8" height on the top and the
bottom openings for the drawers. On the bottom
shelf, there will be an aluminum angle going
horizontal. It is 1", 1/4" over the edge of
the wood. Because of this, what was originally
11.5" height in the design for each opening, changed
to 11-3/8".
The middle horizontal trim piece was nailed into
place with finishing nails. |
Before attaching the vertical trim pieces, I needed
to add the wood to the center piece for the drawer
slides (Item #2 mentioned
above).
4 pieces were cut from the 3/4"
plywood 17.5" long and 4" high. They were
attached with glue and screws to the center board in the middle of where
the drawer slides will be attached.
(Item #3 mentioned above)
So that the 2 vertical trim pieces on the front were
flush with the drawer slide wood just attached, I
needed to take off 1/4" from the trim. |

Four
4" high boards attached to the center
board.
These
will support the drawer slides and the
vertical trim being added to the front.
Along the bottom shelf, two .75 x .75 pieces of wood
added. |
|
This is because the trim is 2.5"
wide. The center board and the 2 pieces of
wood added for the slide were .75 x 3 = 2.25".
I was having a hard time finding something that was
only 1/8" to add on each side. It was just
easier to shave off 1/4" from the width, which will
hardly be noticeable and will still fit the corner
brackets.
After trimming off the 1/4", I cut one piece that
was 11 3/8" long and the other was 12 1/8" long.
They were then nailed to the front with finishing
nails.
For item #5 mentioned above.
Two pieces of trim board were ripped to a width of
.75" and were trimmed to fit along the edge of the
bottom shelf. They were nailed on with
finishing nails. |
(For item #6 mentioned
above) I used scrap pieces of 1/2" or
15/32" (to be exact) plywood that I had on-hand. I did have a single piece of
plywood that would have fit. However, I
wanted to get rid of some of these smaller
pieces of plywood I had sitting around.
I pre-painted the side of the plywood that
would be on the inside of the cabinet. I then
attached the 2 pieces of plywood to the back
of the file cabinet with finishing nails. |

Back of the cabinet covered with 2
scrap
pieces of 1/2" plywood |
|
|

Trim on the front of the file cabinet complete.
Cabinet also ready for drawer
slides. Added trim ready for paint. |
For
the last pieces of trim mentioned above as
#7, I needed to rip some of the trim
board at a width of 1/4".
On the outer sides of the cabinet where the
1/2 plywood on the back overlapped into the
recessed area that will hold the fold-up
shelves, I needed to add some wood.
This way the aluminum angle when attached,
has something to attach to, on this
particular edge.
Now this edge matches the rest of the 3/4"
edges in this recessed area. |

1/4"
piece of scrap wood
glued and nailed with brads
along edge of plywood
attached to the back. |

With the scrap wood added,
the aluminum angle can now be added to the
edge |
|
The newer unpainted trim and back
of the cabinet were then given one coat of Espresso
paint.
The screw holes on the top of the cabinet and
countersunk nail holes on the trim, were filled with
wood filler.
Two more pieces of wood needed to be cut for the
fold-up shelves. After I received the folding
shelf brackets in the mail, I played around in the
space to see what size shelf would fit in the
recessed area. I wanted it to almost fill the
space with room around the edges that would allow me
to grab the shelf and pull it up to open it.
The recessed area measures 17 1/4" x 27 1/4".
I decided on a shelf size of 16" x 25". |

Fold-up
shelf being fitted into recessed area on
file cabinet side |
|
Aluminum Angle Edge Trim and Faux Rivets
For the
decorative and protective trim along the edges, the
aluminum angles were used. First they needed
to be cut to size with a hacksaw. I needed the
following cuts:
3 - 36" - for for horizontal top front, top back,
bottom front.
4 - 26" - for all four vertical edges of cabinet.
4 - 16.5" - for horizontal edges on the sides, top
and bottom
Of note....the angles did not need to be the exact
edge dimensions of the cabinet because the corner
protectors will be installed on top of the angles.
See this in photos below. So I cut pieces
shorter than the cabinet edges.
I also decided not to place an angle on the bottom
back edge.
After they were cut, I punched holes in the aluminum
every 3", starting in the center, and measuring
towards the end. |
Only the
edges that would be visible, excluding the
top, had holes
punched. So the edges that are under
the cabinet or on the back, will not have the
faux rivets (upholstery tacks).
The aluminum angles were then given a few
coats of Rust-Oleum Oil Rubbed Bronze spray
paint.
The
Antrader Metal Corner
Protectors were also painted so they would
match the angles. |

Aluminum angles cut, holes punched, and
painted. |
|
After
the second coat of paint on the cabinet had
dried, it was time to install the aluminum
edges.
I started with the bottom of the cabinet
first after flipping the cabinet upside down
on a blanket.
To hold the angles in-place, I used clear
caulk. Why clear caulk? It is
less runny than glue. Also, if I miss
wiping off some excess caulk, it will dry
clear.
The center hole on the angle was placed in
the center of the cabinet side.
Upholstery tacks were then nailed in along
the front bottom and the 2 sides at the
bottom.
The cabinet was then moved so that one side
faced up.
Two of the vertical angles were placed on
the cabinet side. After this was done,
I placed the corner protector on the bottom
corners.
The corner protector was placed on top of
the edges of the aluminum angles. |

Angles being placed along edges
on the bottom of the cabinet. |
|
For the
corner protectors, I used screws in the
areas that are not seen, on the back and the
bottom.
For the areas that will be seen, I used the
upholstery tacks.
For the top, I used the tiny nails that came
with the protectors.
In order to get the upholstery tacks and the
screws in through the angle underneath the
corner protector, I needed to punch a hole
through with brute force using a hammer and
an awl. |

Corner protector placed on corner over the
aluminum angles.
Screws used on hidden areas and upholstery
tacks
used on the areas that can be seen. |
|
I did
not punch these holes earlier in the
aluminum angle because I did not know where
they would be needed until I placed the
corner protector on.
You can also see why I painted the corner
protectors the same color as the aluminum
angles (see photo above) By painting
it the same color, the corner protector and
angles have the "look" of welded steel. |
|

Back of the cabinet after aluminum sides and corner
protectors installed.
Yes, It would have looked nicer with a full sheet of
plywood but
remember, I was using scrap pieces of lumber.
Also, it will rarely be seen against a wall. |
Folding Shelves Installed
After the
aluminum edges and the corner protectors
were installed, I could install the folding
shelves on the sides.
The brackets were easy to install with
screws on the shelves and the cabinet sides.
The manufacturer claims that the folding
shelf brackets can hold 330 lbs. I
would never place this much on this shelf
because the cabinet would tip over.
With both shelves
extended, the cabinet top surface is about 7
feet long. |

One of the cabinet sides with aluminum
angles, tacks,
and corner protectors
installed.
Recessed area is where
folding table will be installed. |
|

Folding shelf in open position.
Grabbing the little levers popping
out underneath and pushing them in
unlocks the shelf.
Photo on the right shows shelf in
closed position. Shelf is
flush
with the edges of the cabinet
and out of the way. |
 |
|
|

Both folding shelves opened up on file
cabinet.
And in a magical world of wizards and
dragons
these are the wings of my magical flying
cabinet. |
|
Drawers
The
drawers are nothing more than a simple box. I
used the 3/4" plywood for the sides and 1/4" plywood
for the bottom of the drawers.
For the drawer slides I am using, you need to allow
.5" on each side. So the width of the drawer
must be exactly 1 inch shorter than the drawer
opening which is -15 7/8"
The outside measurements for these drawers is 14
-7/8" wide x 17.75" deep x 11" high.
The drawers will be screwed together on the side
into the front and back. So the sides will
measure the full depth of 17.75". The front
and back will be 1.5" shorter than 14 - 7/8" for a
width of 13 - 3/8"
For 4 drawers, the following drawer pieces were cut:
8 sides - 17.75" x 11"
8 front and backs - 13 - 3/8" x 11
4 bottoms - 13- 7/8" x 16.75"
For the bottoms, I added 1/2" to the inside drawer
dimensions of 13-3/8" x 16.25". This is
because I made dados in the the drawer sides,
fronts, and back to slide the bottoms into.
I made the dado in the drawer sides with my table
saw making a couple passes until it was the width of
the bottoms' thickness. The height of the dado
was 5/16".
Hanging File Notches
Because I will be using hanging files, I also made
the notches on the top of the back and front drawer
pieces. This notch will hold the aluminum flat
bar cut to the drawer length. The files will
be hanging from the flat bar. The notches made
were 1.25" long (or 1.25" from top to bottom).
This will allow the files to hang freely without
dragging on the bottom of the drawer or the top file
tabs from hitting the front trim along the top of
the drawer.
The aluminum flat bar was cut with a hacksaw about
1/2 way through. Then the bar was bent along
the cut gently back and forth until it snapped in
half. Using a metal file, I smoothed out any
rough edges. |
|

Drawer pieces ready for assembly. Dado made
one inch up from the bottom
on all side pieces so the
bottom of the drawer will slide in.
Along the top edge of the front and back pieces
1.25" notches were placed at the top
edge for the aluminum flat bars that will support the hanging files. |
The drawers were put together by first
sliding in one of the drawer sides and then
a back or front piece.
The remaining two sides were slid into
place.
When I had the drawers square, I pre-drilled
holes on the side and screwed them in.
No glue was used. The only thing
holding these drawers together are the
screws. Why?
These are drawers for hanging files.
No weight will ever sit on the drawer
bottoms. If there was, I would have
used glue plus the screws.
|

Drawer bottom being slid into dados on sides |
|
|

Drawer held together with 1-3/4" screws on
sides |

Aluminum flat bar inserted into slots at top
of
drawer front and back to make sure hanging
file slides easily. |
|
After the drawers were assembled and sanded
down, they were painted on all of the sides except
for the front.
The drawer slides were then installed on the
drawers. I used 16" slides because the drawers
are only 17 3/4" long. Drawer slides come in
2" increments. They were installed dead center
at 5.5" on the side of the 11" high shelves.
|
Decorative Drawer Fronts
For these drawers, I took the most difficult
path for a drawer front.
Usually
drawer fronts are either flush or the front
has an additional piece that attaches on the
front that overlaps the edges.
These drawer fronts have elements of both
styles. Flush with the added trim and
overlapping the slides in the front with the
trim.
|

Drawers installed on cabinet. Drawer
slides are visible on the sides
of the flush mounted drawers. To cover
this up, pine trim is cut to fit
each drawer individually allowing about 1/8"
clearance on each
side and covering up most of the drawer slide. See lower left
drawer. |
|
First problem was
the drawer slides I wanted to use. They
require .5 inches on each side. So on a flush
mount drawer, you will see the drawer slides on the
side of the drawers.
See the photo above.
But I wanted this style of slide because it can
handle the weight of a file drawer.
Second issue was the style of the
Rolling DVD
Cabinet. The cabinet doors were
flush mounts. I wanted to copy this style.
If I used an
overlapping drawer front it would cover the
decorative corner brackets. So the drawers
needed to be flush mounted.
With all of this in mind, I made the drawers only
17.75" deep instead of 18.25" (inside
depth of cabinet). The 1/2" would be used for
the decorative front on the drawers which would then
make the drawers flush.
After installing the drawer glides, I laid the file
cabinet on it's back with the drawers installed.
With the cabinet and drawers laying flat, I could
then cut the pine trim I would be using on the edge
of each drawer.
Each piece of the pine trim around the edges of each
drawer was custom cut so there would only be a 1/8"
space between the edge of the drawer and drawer
opening edge. This way only a little of the
drawer slide would show. The mitered pine trim
was then glued and nailed in-place with the drawer
sitting in the cabinet.
To pull the drawer back out, I needed to attach a
temporary screw in the center so I had something to
grab.
Decorative Drawer
Pull Plaque
(Raised Area in Center)
I decided at the last minute to create a sort of
plaque or raised area to add to the middle of the
drawer front for the drawer pull.
I used a scrap piece of 3/4" whitewood. I cut
four rectangles 6" x 4". I then made a 1"
diagonal cut on the corners, for an octagon. |
The
octagon was then nailed onto the center of
the drawer front.
I then measured and drilled holes for the 4"
pulls I would be installing.
The entire drawer front was then painted the
Espresso color. |

Decorative octagon plaque added to center of
drawer.
Holes drilled for 4" drawer pulls. The
entire drawer front painted. |
|
After
giving the painted drawer front a light
sanding, the weather wood boards were added
to the front of the drawers.
After doing some measurements, I decided on
2 boards on each side of the octagon.
They measured 1 3/4" wide. |

Cut weathered board being glued in-place on
the front of the drawer |
|
The shorter
pieces on top and below the octagon in the corners
were cut carefully to follow the shape. These
small pieces were also 1 3/4" wide.
For the small center pieces above and below the
octagon needed a wider piece 2.5" wide. One
wider piece looked better than 2 narrower pieces.
After dry fitting all of the weathered board
in-place on all 4 drawers, the weathered pieces were
glued on with wood glue.
The entire drawer fronts were then painted the Pecan
color.
To make the shiny silver sliver of the drawer slides
less visible in the front, I took a black permanent
marker and colored over the chrome facing the front,
making it black.
After the paint dried, the drawer pulls were screwed
in and the drawers placed back in the cabinet.
The aluminum flat bars for the hanging files were
put in place. |
|

Completed file cabinet |
|

Completed file cabinet |

Drawers open on file cabinet |

Drawers open on file cabinet |
|
After completing
this cabinet, I realized...... it is really a b-i-g
cabinet. It barely fits in the office space I
originally intended for it to go into (took photos
in the more spacious living room).
I should have gone with 4" wheels on the casters.
I may switch it out later and use the 3" wheels on
something else. For right now the 3" wheels
work fine but need to be pushed harder on a carpeted
surface.
The drawers are 16.25" long in the inside.
Therefore, 65" of files can be stored in the four
drawers. These drawers can be retrofitted for
legal size folders by placing the slots on the sides
of the drawer for the aluminum flat bar, instead of
the front and back.
Remove the hanging folder flat bars and you have a
regular drawer.
See the End Table / Cabinet in
this style on this page..... |
|
|
|
All images on this page are
copyrighted |
|
|
|
|