Vintage Look - Industrial Style
Rolling Cabinet
Cabinet I designed and made to store DVD's and to hide
the cord mess along one wall in the Living
Room.
December 5, 2018 - January 5, 2019 |
 |
|
Against
one short 52" wide wall in our living room,
are three outlets. A standard electrical
outlet, a cable jack, and a surround sound
wiring system. The first two, are
outlets that are common on an inside wall.
The third, is just stupid. This
surround sound system has about 10 cables
sticking out from a hole in the wall....
left by the building contractor. Like
we were going to immediately call a surround
sound contractor to install speakers around
the house, when we moved in June 2018. Fat chance of
that e-v-e-r happening.
There are too many cables to poke into the
wall cavity. I could just cut all of
the cables off at the wall and slap on a
blank wall plate. Which I may do eventually.
In the meantime, I bought one of those cable
organizer boxes and squished them inside.
End result? Still looks stupid, but it is
orderly looking. |

Empty wall |
Why Am I Building A Cabinet?
1) This wall just looks empty. A
cabinet would fill the space nicely and store my
husband's large DVD collection, books, or whatever
else needs to be stored.
2) To hide all of the outlets and wiring
mentioned above.3)
Searching the web, I could not find a ready made cabinet that
was the size and style that I wanted.
4) I have been wanting to try my hand at
making a decent piece of furniture. |

Surround sound cable mess |
Design
Considerations
1) The cabinet must be on wheels so it can be
moved around when needed.
2) The cabinet will be over 6 feet tall and 4
feet wide.
3) The cabinet will have doors to keep dust
off the contents except for one section, that will
have open shelves for a lamp or decor.
4) The shelves will be adjustable except for
the center shelf, which will be fixed to provide
support.
5) The stain/paint that will be used will be a
dark walnut color to match the wood throughout the
house.
6) All furniture, that I have been purchasing
for the open areas of house, needs to be dog proof.
There can be no areas of the furniture that a dog
can chew on. There must be metal legs and
edges on the furniture. No exposed wood edges.
Which means.... industrial style furniture. |
Cabinet Plans
Before buying any
supplies, I went to my graphics program to design
the shelf. Because this cabinet will be in the
house, I wanted wood that did not need a whole lot of
sanding, like plywood does.
So at the same time, I went
online with a hardware store website. I needed
the actual measurements of the wood to do my design.The cheapest
pre-cut wood, I could get
from the local Lowes, was whitewood (Think SPF wood,
Spruce, Pine, or Fir). I would
be using 1" x 12" wood boards which actually measure
.75" x 11.25". They had the 4, 6, and 8 foot
boards I would need. Knowing this, I created the
basic frame for the cabinet. |
|
 |
 |
|
Three 6-foot boards
(green) attached with screws to 4-foot boards
(purple) at top
and bottom. Center 4-foot board will
be cut to fit in-between vertical 6-foot
boards |
On the
front of the cabinet 1" x 3" whitewood will
be used to finish off the edges. Shown
above in light gray. |
|
I will
then add 1" x 3" whiteboard as trim on the
front.
With the frame done, I then went on to
complete the overall design of the cabinet.
See image at right.
The doors of the cabinet will have some type
of pattern made from reclaimed
wood.
Around the edges of the cabinet, there will
be aluminum corner pieces painted oil-rubbed
bronze. Every 3" there will be a
"rivet". The rivets are actually
upholstery tacks. It will have the
look of a
steel frame. I am using 16 gauge
aluminum angles instead of steel because of
all of the holes I will need to make.
Aluminum is just softer to punch through.
The casters will be the metal type seen on
industrial furniture. However, I will
need to cover the metal wheels to protect my
ceramic tile floors.
Each closed cabinet area will have 3
shelves. The shelves will be
adjustable using straight 5mm shelf pins. |

Proposed cabinet design
|
|
I had some black hammered butt
or H hinges on-hand that I will use on the cabinet doors.
The cabinet will have decorative right angled
corner pieces for support and decoration. |
Material Purchases
With my design done, I could create my shopping list
for the hardware store. Because I am making
a piece of furniture where I care about the wood.
I went in person vs. an online purchase to select the
wood.
The whitewood board and most of the other wood, aluminum corner angles, paint,
screws, finishing nails, and Flex-Tape were
purchased in-person at Lowes. The rest of the items were
bought on the internet. |
Casters
I actually purchased the casters a few months
ago. I saw them on Overstock.com. back
in June 2018. I had no immediate plans
for them, other than to use them on a piece
of furniture...eventually.
The problem with heavy metal casters like
this?.....the metal. If you have a
carpeted floor, no problem. However,
if you have hardwood or ceramic tile
floors, you risk damaging the floor rolling
this wheel over it. Best to use
casters with some type of plastic or poly
cover on hard floors.
However, I really wanted to use these
casters. This cabinet will rarely be
moved. I could place a small throw rug
or towel under the wheels when I needed to
move it. OR, I could place something
over the wheels, like rubber, to provide
protection to the floors. I thought of
painting on a rubber surface. There
are a few of these products on the market.
Then I saw the Flex-tape at the store.
Same rubber as the paint but much neater to
apply. Placing the Flex-Tape over the wheels
will provide the floor protection I need.
(Note - every time I
look at these casters on the website, the
name changes. As of 1/8/2019 it
changed to "Porch & Den Newport" from "Gray
Barn Brick House". They were "Haven
Home" when I bought them 6/14/2018.) |
|
|
Faux
Rivets
I actually wanted smaller nails or tacks for
the rivet look on the edges of the aluminum
corner angles. However, I could not readily
find them and I wanted something more
decorative looking than a regular nail or
screw.
What I did find a lot of, were upholstery
tacks. All kinds of tacks in different
colors and styles. BUT the one
consistent size was 7/16". So I had a
choice between smaller less decorative nails
or larger upholstery tacks. I went
with the tacks.
There was no way that these tacks could be
hammered through 16 gauge aluminum. So
I needed something that would punch a hole
through my aluminum angles before I put the
tacks on. So I found a hole punch for
metal up to 16 gauge steel. |
|
|
Corners
For the corners of the cabinet, I wanted a
metal bumper or guard to cover the edges of
the aluminum angles on the edges. Easier said
than done. I did finally settle on the
one pictured to the right. However, it
was not my first choice after 3 days of
searching.
These corners are easy enough to find for a
small box or a trunk, but not for large
furniture. I needed to find a corner
that was more than an inch from left to
right and up and down so the corner of the
aluminum angle will be covered. |

Antrader 8pcs Metal Box
Corner Protector Edge Safety Bumpers
Furniture Corner Guard Bronze Tone 2.8" x
2.8" x 1.2"
https://www.amazon.com/gp/product/
B07CV625R7/ref=
oh_aui_detailpage_o01_s00?ie=UTF8&psc=1 |
|
Shelf
Pins
For the adjustable shelves, I wanted
something simple. Straight pins with a
little vinyl sleeve were all that I wanted.
The pins will be hard to see with a black
sleeve on them. The sleeve will also
keep the shelves in place.
(I just love the names
of these items, where the seller uses as
many keywords possible to describe the
item.) |
|
|
|
|
|
|
|
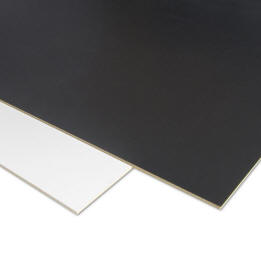
Backing on Cabinet
Instead of
wood on the back of the cabinet, I used dry erase / chalk board
material for the back of the cabinet.
It just happened to fit the size of this
cabinet, was cheaper, and did not need to be
painted.
Ihttps://www.lowes.com/pd/23-85-in-W-x-0-118-in-H-Dry-Erase-Board-Chalkboard/1000458191 |
Cabinet
Door Hinges

Colonial Style H or butt cabinet hinges 3.5"
x 1.5" Matte Black Finish - pack of 2 hinges
- bought about 3 years ago at Lowes (no
longer sold there)
Item 0229484, Model
#32155PKXLGLW2000009-012016. Distributed by
L G Sourcing, Inc. |
|
 |
|
|
|
|
Material Costs for Rolling Cabinet |
| |
|
|
3 -- 4
foot long - 1 x 12 whitewood (.75
x 11.25 actual) |
$26.85 |
|
3 -- 6
foot long - 1 x 12 whitewood (.75 x
11.25 actual) |
43.83 |
|
3 -- 8 foot
long - 1 x 12 whitewood (.75 x
11.25 actual) - for shelves |
55.11 |
|
4 -- 8 foot
long - 1 x 3 whitewood (.75 x 2.25
actual) |
15.96 |
|
1 - 32 oz can
Minwax Polyshade Satin finish - Espresso |
11.95 |
|
1 - 32 oz can
Minwax Polyshade Satin finish - Pecan |
11.95 |
|
1 -
Wood Flat Phillips #
8 x 1 3/4 in. (Bubble pack of 75
screws) |
5.22 |
|
1 - Set of 4 -
Large Metal Casters approx 5" high |
63.34 |
|
1 - Roll of
black Flex-Tape 4" wide, 5 feet long (to
place on casters) |
11.69 |
|
4 - 6 foot
long - 1" aluminum corner angles - for
vertical edges |
46.76 |
|
2 - 8 foot
long - 1" aluminum corner angles - to cut
for horizontal edges |
24.64 |
|
1 - Neiko
Multi-Purpose Power Hole Punch Kit
(to punch through aluminum angles |
24.45 |
|
1 - 11oz spray can Rust-Oleum Oil Rubbed
Bronze |
5.56 |
|
300 -
Decotacks Upholstery Nails 7/16" width
(3 packs of 100 at $7.90) |
23.70 |
|
8 - Antrader
8pcs Metal Corner Protectors Bronze Tone 2.8" x
2.8" x 1.2" |
14.69 |
|
50 - Glarks 5
x 25mm Stainless Steel Shelf Pins |
8.84 |
|
100 - Jocon
PVC Flexible Vinyl Round End Caps
Inner dimension 5mm (For shelf pins) |
6.99 |
|
8 - 4-29/32"
Long Traditional Corner Brackets for
Barn Doors |
43.84 |
|
4 - Chalk /
Dry Erase Boards 23.85" x 35.5"
(for back of cabinet |
21.80 |
|
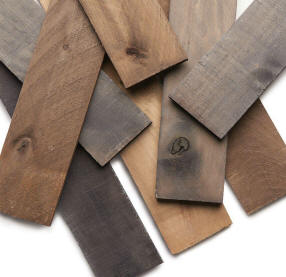
1 - Bundle of
severe weathered lath 1.5" width x 6
feet long, .375 thick. 10 pieces - used for background
of exposed shelf area of cabinet |
8.63 |
|
3 - 1/4" Maple
plywood 1.98' x 3.98' |
39.09 |
|
4 - Severe
Weather (Common: 1-in X 2-in x 8-ft;
Actual: 0.625-in x 1.375-in x 8-ft) #1
Treated Lumber - Used as trim
around cabinet doors |
8.16 |
|
2 boxes
- Weaber Weathered Hardwood Boards - 8
boards in package measuring - 1/2" x 4"
x 48" - 10.5 sq ft for $24.98 x 2
boxes (Had
2/3 of one box left over) |
49.96 |
|
6 each -
Colonial Style H or butt hinges 3.5" x
1.5" Matte Black Finish - pack of 2
hinges - bought about 3 years ago at
Lowes (no longer sold there) Item
0229484, Model
#32155PKXLGLW2000009-012016. Distributed
by L G Sourcing, Inc. |
9.00 |
|
3 - Ironcraft
3 inch Center to Center Cabinet Pull |
12.15 |
|
Misc -
Sandpaper, Glue, Paint Brush, Caulk,
Brush Cleaner, Finishing Nails |
40.00 |
| |
|
|
Total |
$634.16 |
|
Cutting Costs
If you are making this
cabinet and you want to cut costs, the biggest
savings would be on the wood used. If you
switch from whitewood boards to pine plywood, that
you have to cut, this will cut down on the costs.
You could also use a thinner wood than 3/4".
However, if you do this, you should use a full sheet
of plywood on the back to stabilize the cabinet,
instead of dry erase board.
If you have access to weathered wood, without having
to purchase it, that will save another $50 or so. |
Putting It All Together
Most folks would assemble the cabinet and then
paint it. After years of doing this and being
less physically flexible now, I have switched around
some of the tasks to make it easier on my back and
hips.
The first thing I did was to start the painting
process. I knew each piece of the furniture
would need at least two coats of paint. Why
paint first? Because it is easier to sand and
paint a level piece of wood on a workhorse than to
contort myself to paint upside down and all around
on an assembled piece. |
|
The first piece I painted was the bottom of the
cabinet. Why am I painting the bottom where no
one will see it? To seal the wood from
moisture. If the wood is sealed, there will be
less moisture damage if there is a flood or if one
of the dogs decide to mark their territory.
Remember.....dog proof.
The next thing I dealt with were the casters.
Get the Flex-Tape wrapped on the wheels before they
were attached to the furniture base. The
Flex-Tape was 4" wide and the wheels were 2".
So I cut the tape in half. Length was 12" to
cover the wheel. In retrospect, black duct
tape wrapped around 2 or 3 times would also work.
Then
I attached the casters to the base. WHAT???
Why not install the casters last? It is
because of the weight of the casters. These
puppies are heavy. Easier to install the
wheels now, when upside down is easily done on a
counter top. The caster will then be covered
with plastic during the rest of the assembly. |
|

Flex-Tape going on wheel |
|

Flex-Tape on wheel |
|
To
attach the hex bolts the caster manufacturer
had provided, I needed to pre-drill the
holes just shy of the bolt size. They were
the perfect length for 3/4" thick lumber.
All four casters were attached. I noticed
that a couple of the wheels were mounted a
little crooked, so I adjusted the caster so
it would roll straight.
The 2 casters without the lock are rigid.
The 2 casters with the lock, swivel. |

Caster being attached to cabinet bottom |
|
|
|

Caster now attached to cabinet piece |
The next thing to tackle were the holes for
adjustable shelf pins. Four sides of the 6
foot vertical boards needed to have the 240 (60 on
each side) holes drilled.
Get Jig-gy With It -- It would just be silly
to mark measurements for the holes on the wood and
drill 240 times. So I made a jig out of a
scrap piece of decking board I had. Any piece
of scrap lumber will do or peg board. I wanted
a sufficient number of holes for the shelves so the
shelving will be more flexible. I measured so
that 4 rows of DVD cases can be stored. Then I
added a couple of holes above and below and another
hole in-between those. So 15 holes X 2 for
each section, upper and lower.
Of note, for the jig measurements, I used the metric
system. Working with 16th and 32nd's of an
inch is just mentally exhausting, particularly when
trying to divide 35.625" into 4 equal sections minus
(.75 x 3 - shelf thickness). It was just
easier to use millimeters.
First I marked on my jig the three major
measurements (for the DVD storage). From the
bottom, the first hole is at 211mm. The second
hole at 441mm then the third hole at 671mm.
Then I went back to the first hole at 211mm and made
2 more hole above it 25mm apart (about an inch).
Then went to the second and third holes and made two
more holes above and below each hole. Then two
more holes between the 3rd and 2nd hole group and
the 1st and 2nd hole group. |
|

Lower half of shelf pin holes being drilled.
One set done. Jig clamped on other side ready
for the drill. |
Once the measurements on the jig were marked, I
carefully drilled the holes in the jig with a 5mm
drill bit (the width of the shelf pins). To
keep the drill bit from skating around the surface,
messing up my jig, I started with a smaller drill
bit and worked my way up to the 5mm.
To keep the drill bit from going all the way through
the wood, I created a stop with masking tape.
I just wrapped masking tape around the drill bit
where I needed it to stop. About half way
through the wood. The tape stayed in place for all 240
holes. So no need to make a stop with scrap
lumber.
With my completed jig, all I needed to do was clamp
the jig in place and drill the holes on the four
sections of each board. I set the holes 2
inches from the sides for the left, center left, and
right pieces of wood. For the center right, I
went to about 1.5 inches so the holes would not
drill through to the holes on the center left, since
this is the same piece of wood.
After drilling the holes, I sanded the rough spots
down and sanded the whole boards in preparation for
the paint. |
Painting - No pictures of
doing this. Because it is painting.....boring.
I will explain what process I used to
get the finish I wanted.
The first coat of paint was the Espresso.
Which is a blackish brown. I discovered
quickly that 2 coats of Espresso would almost cover
any wood grain. I wanted the wood grain to
show. However, I liked the darkness of the
stain for giving the wood a weathered or distressed
almost burnt look. Which is what I am going for. So
after applying the first coat of Espresso and
sanding with 320 grit sandpaper, I then did a 2nd
coat with a lighter stain. I chose the Pecan
color using the same type of Polyshade. |
Assembly -
After most of the wood was painted and sanded, I
assembled the shelf before applying the final coat
of paint.
While I was painting, I had pre-drilled the holes
where I would be inserting the screws. So it
was just a matter of laying everything on the ground
and screwing everything together. The screws I
used were Wood Flat Phillips # 8 x 1 3/4 in. 4
screws were used for each area attached.
Which was the bottom and top to left, right, and
center pieces. Center shelves on the side.
Left center shelf onto center piece. Right
center shelf has just one screw in the center
holding onto the scrap wood attached to center piece
to support it.
The 1 x 3 trim board was attached to the sides,
center, top, and center shelves with 1 1/2"
finishing nails.
The whole shelf is very strong and sturdy. No
wobbling at all.
Of note: Some edges were not painted because
they will be covered with the painted
aluminum angles. |

Cabinet assembled.
Needs some sanding and the final coat of
paint. |
|
|
Shelves - The 8 foot long whiteboards
were used to make the shelves. Cheaper
to buy 8 foot long boards to cut into
shelves than shorter boards. Each
whiteboard made 4 shelves with a little left
over. |

Twelve shelves cut and being painted |
|
The shelves were originally 11.75
inches deep (the width of the board). However,
I trimmed off around 1/4" to allow for the depth of
the cabinet doors which would be thicker than 3/4"
(the thickness of the wood).
Then the shelves were painted the two coats of paint
on both sides. |
Faux Steel and Rivet Trim
Around Edges of Cabinet - To get the look of
steel trim and rivets, I used the aluminum angles
and the upholstery tacks.
First I needed to sand the aluminum angles to
"rough" them up a little so they would take the paint
better.
I then cleaned them well to get off any oil or
sticker adhesive.
Then I needed to punch all of the holes. After
marking the aluminum every 3", I punched the holes
with the power punch using the 3/32" width.
Since I was going through 16 gauge aluminum, it was
not easy. Trying to hold the puncher with 2
hands was difficult for me and I kept slamming my
hands together or into other body parts when the
punch finally made it through the metal. I
ended up sitting on the garage floor using the floor
as leverage and just pushed down on the top handle.
Much easier!!! |
 |
|
Of note:
I DID NOT punch
holes or place upholstery tacks on the parts of the
angles that are not seen. There are no tacks
used on the back, top, and underneath.
For the shorter aluminum pieces, that go
horizontally on the cabinet, I cut them with a
hacksaw first, then punched the holes.
After waiting for a day with a temperature above 40
degrees and no winds, I was able to spray paint the
aluminum pieces outside. I used by ole
favorite paint that I have used on dozens of
projects.....Rust-Oleum Metallic Oil Rubbed Bronze.
Of note: They have this same
color in another style of can with a fancy top.
Don't buy it. The nozzle clogs up and cannot
be cleaned easily or the stylized fancy spray
trigger breaks. You get more bang for your
buck with the standard spray can. |
|

Aluminum angles with holes punched, painted, and
ready to install on cabinet.
Shorter piece has clear (white when wet) caulk
setting inside corner of angle. |
With the
aluminum painted, I was ready to install
some of the pieces.
To install all of the vertical 6" long
pieces, I would need to put on the back of
the cabinet first. I had not bought this
yet. So I just installed the front
vertical and all of the horizontal pieces.
The upholstery tacks were easy to hammer
through the whiteboard with a rubber mallet.
3-4 light taps were all that were needed
since I was not going through metal.
To hold the angle in-place until all of the
tacks were hammered in, I used my stand-by
adhesive......clear paint-able caulk.
Why caulk and not glue? Glue is too
runny. Caulk is cheaper. Clear dries clear,
incase it oozes out somewhere.
First I put the caulk on each surface and
let it set for 15-20 minutes. At this
point, the caulk has dried out a bit and is
just tacky enough. I then firmly press the
angle in place. |

Aluminum
angle glued in place with clear caulk.
Then upholstery tacks inserted in holes and
hammered in with rubber mallet. |
|
For the
eight corner barn door brackets that I was
just going to use for decoration, they now
have a function. The brackets now help
support the horizontal trim pieces attached
on the top and middle shelf of the cabinet.
When attaching these pieces of trim to the
cabinet frame, I realized that there was
nothing holding the trim on at the lower end
of the trim. I thought about buying
some small brackets and screwing them on the
inside of the cabinet. Then I realized
that I had already purchased the decorative
brackets, so I used them to support the
corners. Now form follows function. |
|

Corner brackets supporting trim
piece nailed
onto middle shelf front |
|

Getting ready to attach aluminum bar at the
top and the corner brackets to support trim.
Clear caulk setting. |
|
Before I could finish up
installing the last 2 vertical aluminum angles on
the rear side corners, I needed to put the back of
the cabinet on.
Back Panels -
When purchasing the materials for
this cabinet, I did not buy what I needed for the
back of the cabinet and the doors. So I needed
to make another trip to the hardware store.
For the back of the cabinet, the simplest thing to
do was to buy a piece of plywood, cut off around
22.5 inches and nail it on the back.
Problem....only needed thin plywood, around 1/4".
If I was worried about the stability of this
cabinet, I would go thicker. However, it is
solid without any additional support
BUT......My SUV cannot fit a full sheet of plywood and
something this thin will snap in half, if you try to
tie it on top. Lowes does cut lumber, however,
the rough blade they use would destroy a thin piece of
plywood. Sooooooo I opted for pre-cut pieces
that measure 2 x 4 feet. BUT while I was
looking at these boards in the store, I noticed some
chalk / dry erase boards shelved in the same area.
Black on one side and white on the other. Wood
was around $14. Dry erase board $6. |
I went with the cheaper dry erase / chalk
boards. The white side would face the
wall. The black side would be inside
the cabinet. After the cabinet is full
and the doors are on, you won't be able to
see the black background.
I needed at least 36" to cover each section
of the back. However, the boards were
just shy of this height. So I
carefully aligned the bottom level of the
board to the top of the shelf. Since
there was no way to nail it along this edge,
I taped it with white duct tape.
I measured the height of the wall outlets
and cut out the board to accommodate the
outlets and anything plugged in them when
the cabinet was against the wall.
Lath Background -
For the open shelf area....the upper left
quarter with no door....I decided to make a
background.
During my initial shopping trip for the
cabinet materials I came across this really
nasty bundle of lath. I grabbed it,
thinking I may use it for the cabinet doors.
They were so rough, I scrapped that idea.
But, they would work as an interesting
backdrop. |

2 panels attached to the left side.
Hole cut out for the 2 outlets and cables. |
|
The dry
erase board in the back of this section was
the last to install. I taped the
board in place on the back of the cabinet.
Then traced the outer edges on the inside.
This way I would know where to glue the lath
on the board.
I first cut the lath to the length needed,
35.5", until I had enough going across the
width.
|

Rough lath boards cut to length, 35.5" |
|
The lath
wood was then stained 4 different colors.
After the stain dried, I glued the lath onto
the black side of the board with wood glue.
When the lath glue dried, the decorated dry
erase board was nailed in place on the
cabinet.
After the back was nailed on, I installed
the last 2 pieces of vertical aluminum
angles and hammered in the upholstery tacks. |

Stained lath being glued onto chalk board side of
board |
|
The metal
corner protectors were then added to
the corners of the cabinet over the
aluminum corner angles.
I like the idea of having 4 separate
panels on the back instead of one.
If the cabinet is moved to another
area and needs different access,
just one panel can be taken off and
replaced if needed, instead of the
entire back.
At this point the cabinet is just
about complete. Time to roll
it inside to keep the garage dust
off it.
Before moving it in, I found the
stud in the wall at the top of where
the cabinet would be. I would
be attaching a bracket to hold the
shelf against the wall.
|
|
The
cabinet is solid, but it is
narrow and tall. If one of
our large dogs jumped up
onto a shelf, they could tip
the cabinet over.
Better to anchor it to a
wall to be safe. |

Bracket attached at top of
wall to anchor cabinet |
|
|

Back of cabinet complete. Aluminum
angles and upholstery tacks added to edges.
Corner protectors added. Large hole in
back is for outlets and plugs. Small hole is
for the light plug to go through. |
|
|
The only thing you need to secure
a piece of furniture to a wall is a simple L-shaped
bracket and some screws long enough to go through
drywall to a stud behind it. The bracket
absolutely needs to be attached to a stud on the
wall. Then you attach a shorter screw into the
top of the furniture. This method works great
for a tall piece of furniture where you do not see
the top. If I need to move the cabinet, I just
take out the screw on top of the cabinet. |
|

Cabinet in place in living room.
Shelves installed. Cables and a surge
protector
tucked into bottom shelf. |

Cabinet in place in living room.
Shelves installed. Cables and a surge
protector
tucked into bottom shelf. |
|
For the
lamp, a hole was drilled into the back of
the middle shelf. The cord goes
through the hole then in back of the shelves
in the lower left side. The cord then
exits out of a tiny hole in the back then
into the big hole in the back to the
surge protector.
Close-up of lath background is shown at the
right. What looks like white between
the lath in the center is actually the
camera flash bouncing off the glossy black
board. In normal light, all you see is
lath.
All that is left to do, are the doors to the
three sections of the cabinet.
|

Close-up of lath background. What
looks like white between the lath in the
center is actually the flash bouncing off
the glossy black board. In normal
light, all you see is lath. |
|
Cabinet Doors
For the cabinet doors, I bought pre-cut 2 x 4 feet
maple boards. 1/4 inch thick. I
needed to go thin because there would be a lot glued
onto the front.
For the frame of the doors, I used the treated
yellow pine lumber 1 x 2 x 8 feet. I came
across this wood when I was walking around the
lumber section. It is a little rougher than
the fancier moulding but a whole hell of a lot
cheaper. At about $2 for 8 feet, it is a deal.
I will probably use this specific lumber again for some future
projects.
The yellow pine was cut with mitered corners for
each door.
The trim was then glued onto the three maple boards.
When the glue set, the doors were sanded down and
painted the first coat of paint. |
|

Yellow pine trim glued onto 1/4" maple board edges |
While the paint was drying on the
cabinet door, I got started on cutting the weather
wood wall planks. I had one day to get all of
these cut outdoors with my table saw before some bad
weather came. No sawing allowed in the garage
where we park our cars.
I first ripped the 4" planks to 1/2 their width.
I then cut them to size to fit half of the face of
the door. |
|

Weathered wood planks and spray painted center being
glued onto front of painted door |
For the
horizontal center piece of the doors, I cut
some scrap lumber to a 1" width, to match
the size of the aluminum angles. I then spray
painted the wood with the oil rubbed bronze
paint. I nailed in upholstery tacks
every 3" again, to mimic the look of the
edges of the cabinet.
Everything was then glued onto the front of
the door.
After the glue had dried, the whole door was
painted a coat of the Pecan paint.
After the paint dried, I was ready to
install the doors. |

Weathered wood planks and spray painted
center
being glued onto front of painted door |
|
The
cabinet doors ended up being fairly heavy.
I was not sure the hinges I was going to
use, would support the door. I had
enough hinges to put 3 hinges on each door
if needed.
I worried for nothing. The 2 hinges
worked just fine. In fact, the doors
open with great ease and close flush without
any mechanism to hold them closed.
I did stick a little cabinet door bumper
onto a shelf inside each compartment so it
won't bang when it is closed.
The final step was installing the door
pulls.
The completed cabinet is shown to the right.
Sorry for the watermark. It is only a
matter of time before a bunch of bozos
ignore copyright laws and copy this image
and post it all over the internet like it
was their's. Including the foreign
companies who will eventually manufacture a
cheap particle board knock-off of my
cabinet.
|

Completed cabinet |
|
|
|
|
All images on this page are
copyrighted |
|
|