|
The Stair Door |
|
Prior to remodeling the lower
level of the house and the stairs, there was a wrought
iron gate that closed over the third step of the
lower stairway. I had removed this gate which
was attached to a banister to place wallpaper on the
wall it was attached to.
I decided to get rid of the wrought iron and built a
continuation of the wall down to the bottom level so
the stair handrail would go all the way to the end
of the stairs instead of stopping at the end of the
wall. So now there was no way to close off the
two levels of the house. Or lock the dogs
downstairs.
The other reason I thought about creating a door to
block off the lower level was a bad freeze we had in
El Paso in February of 2011. During the winter
we do have overnight hard freezes but it
warms during the day. So we do not stay below
freezing very long. We cover delicate plants
and worry little about outdoor water pipes freezing.
February 2011 was a different story. We had several
consecutive days of a hard freeze that stayed below
freezing during the day. Which means, if you
had unprotected pipes outside, they froze. The City
also lost about half of it's plants and we don't
have much to begin with. During this freeze,
the power company had trouble keeping the power on.
We had rolling blackouts which meant bye-bye heater.
To contain the heat to the upper portion of the
home, I blocked the downstairs vents and put plastic
sheeting over the stair opening to block the two
levels of the house. With a couple of extra
sweaters on, we were OK. Yep, I had a pipe
outside that burst (along with the rest of the city)
and half of my 30 year old plants died.
|
|

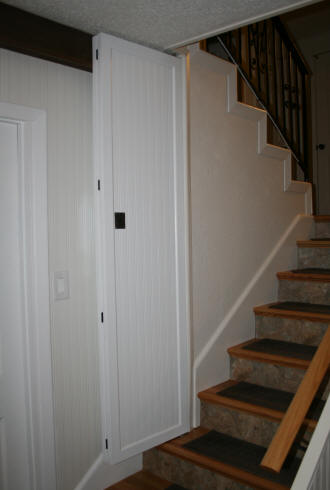
Stair door will be
installed on top of third stair and will
fold-up in the recessed area on the left |
I wanted a door that would
go across the opening on top of the third
stair.
So I went searching around on the internet
for door ideas for a stair.
I found doors at the top of stairs like for a
basement stair opening. Doors under stairs
like for a under stair closet. I however
did not find any doors that actually
went across a set of stairs.
I guess I am the only one in the world that
wanted to do this.
I did come across some
fire codes that would prohibit building a
door in the middle of the stairway. Which
makes sense.
|
|
In my case, there are windows and three
doors leading outside on the upper levels.
This stair door was not going to be
something so massive you could not kick it
out if needed.
I also intended to use the recessed section
you see on the left side of the photograph
to store the door most of the time. So the
door is rarely used but is there in case we
need to.
I quickly determined after doing measurements, that
the door would need to be a folding door or it would
block the laundry room door. I looked at
pre-made doors for closets, but the exact size I
needed was not a common size. So I decided to make
the folding door from scratch.
The other thing to consider was how to hang it.
After spending so much time repairing this little
corner of the wall from extensive dog damage, the
last thing I wanted to do was to slap two or three
hinges onto the wall, like in a regular door frame.
I decided on pivot hinges. If your not sure
what these look like, look at the heavy glass doors
in an office or store. You can also find these
on cabinet doors. All I would need to do is
drill a hole in the stair tread and another hole in
the ceiling.
I went to the local big box stores looking for pivot
hinges. The staff looked at me as if I was
speaking gibberish when I asked if they had any.
For the most part, you can find them in the folding
door replacement part section of furniture hardware
sections. But they are wimpy. I needed
two pivots made from sturdy pieces of metal.
You can also find commercial websites which sell the
pivots for the large glass door. In my case this
was overkill and very expensive. Again, I searched for days on
the internet, using different search terms and
looking at 1000's of photographs for the perfect
pivots. |
| I finally found them on
Amazon from a company in Hong Kong,
and yes, I had to wait a few weeks before
they arrived to be sure they were the pivots
I needed. They were! The pivot
section was 12mm (approx 1/2") across and
the flat portion where the screws go through
was good and strong enough to support the
weight of the wood. |

Amico 12mm Diameter Rectangular Plate
Flush Mount Floor Pivot Door Fittings |
|
I purchased a sheet of 1/2"
blondewood at the hardware store and cut two pieces
to size for the panels. I placed molding around the
edges on both sides. The moulding around the edges
helped make the two door panels an inch thick so
that the pivot hinges would be flush to the wood at
the top and bottom.
I had to make a cut in one section of the door to
allow it to pass over the stair handrail. This
took some experimentation to make sure the hole was
large enough.
I finished the wood panels off by placing the
beadboard wallpaper I used in the
downstairs den walls and painting them
white.
I purchased some plastic grommets to place in the
the holes I needed to drill for the pivots. I
drilled the holes in the stair tread and ceiling.
Placed the grommets in with wood glue and in the
case of the ceiling hole, a whole lot of caulk.
It took several days for the ceiling hole to set.
It was not easy getting the pivots in the holes and
the door not fall out. I ended up putting a metal
washer on the bottom pivot, straighten the door into
place, put the upper pivot into the hole and THEN
screwing in the top pivot to the door. If I
had spring action pivots I would not have had to do
this.
Yes, the door was placed up and taken down many
times before I got it to work properly. There
was also a problem with the opening around the
stairs. The stair rail side was one inch lower than
the other side. So I placed a thin wood wedge
between the bottom pivot and the door bottom to make
sure it hung at a very slight angle to compensate
for the lower edge. In addition, I had to
remove the corner molding on the ceiling and shave
the ceiling down a little. Believe it or not this
one inch difference is not even noticeable until you
pull out your measuring tape. |
| All that
was left to do was to get the rest of the
hardware I needed for the door. For the
hinges, I just didn't want regular door
hinges...boring. So I looked for
something a little more decorative but I was
not going to pay big bucks per hinge.
I came across these butterfly hinges on
Amazon from B&M Hardware. I
ordered 2 sets of 2 to see if they would
work on my door. They were not as
large or as sturdy as I had hoped they would
be and are really more suited for furniture
doors. I went ahead and tried them out
on the two door panels to see if they would
work and they did. I used all four. |

Black Lacquer
Colonial Butterfly Hinges |
I wanted something to pull the door out of
the recess without touching the wood every
time. But I did not want a knob that
stuck out on the door. I wanted the
door to be flat against the wall when not in
use with nothing to catch on clothes if
someone was going down the stairs. I
decided on the recessed door pull from
Signature Hardware.
I bought two planning to use them on both
sides of the door but ended up only using
one. I carved the space in the wood
for the pull before I put on the wall paper
and paint. |

Large
Rectangular Recessed
Ring Pull - Oil Rubbed Bronze |
|

Sash lock and
strike |
One piece of hardware I
also needed was something to hold the two
panels of wood rigid on the side opposite of
the hinges . If not, the door would be
easily pushed open if pushed on in the
center. Something the dogs could easily
figure out if locked in upstairs.
I went to the hardware store looking for
something that would work. I did not
know what it would be but would know it when
I saw it. I saw it! A sash lock
and strike which is normally used for
windows.
The sash lock and strike keeps the two
panels rigid and keeps the door from opening
all the way on the other side of the door.
Which means when it is locked, you cannot
get upstairs. |

Gatehouse
4-in Oil-Rubbed Bronze
Slide Bolt Entry Door Chain Guard |
I also needed to be able to bolt the door
closed so I purchased a slide bolt entry
door chain guard. Both pieces of hardware
were purchased at Lowes and are part of
their Gatehouse line. The bolt slides
into the moulding on the corner of the wall. |
|
|
The
Completed Stair Door |
|
|
|
The photo on the left shows the door in the recessed
part of the wall. The photo on the right shows
the door at the bottom of the stairs locked straight
and partially open. When the door is straight
like this, it will not open all the way. The stair
handrail stops it. To store the door away, you have to fold the door in half
and then push it into the recess. |
|
|
|
From the top of the stairs
looking down upon the door. When the door is
in the recess, it does not block the stairs. The
door can also be opened in half if we want.
The fit for the door was so tight at the bottom, the
carpet tread has to be removed to operate the door. |
 |
The view
of the door from above when locked in place.
Yes, there is a 4" gap at the top of the
door. The door was not meant to be air
tight. For the dogs, it keeps them
downstairs and allows us to peak in at them.
If there is another bad freeze, all I have
to do is place a folded towel or blanket on
top of the gap and around the stair
handrail. |
|
|
https://laurellynn.com/KidsZone/ |