|
Treadmill Table - Vintage Style
aka Standing Table / Desk,
Exercise Bike Table, Mobile
Workstation,
Laptop / Computer Station
June - July
5, 2020 |
|
Beginning back in 2017 I started
walking for exercise again....it had been years since I had done
so.. My weight and blood pressure were
rising....so the weight had to go. I worked my
way to 3-4 miles easy in my first couple of weeks
walking around the neighborhood. Then the
inevitable happened....pollen and my allergies. My
nose and eyes swelled-up to painful levels.
And yes, I do take antihistamines daily.
Plan B. Buy a treadmill. This way I can
walk, no matter the weather or pollen level.
I bought a walking treadmill with long handles on
the sides, so I would not fall on my face.
The first thing I discovered about a treadmill.....IT
IS THE MOST BORING FORM OF EXERCISE E-V-E-R.
At least with outdoor walking, you have the outdoor
scenery to entertain your mind.
In order for me to loose weight by walking, I needed
to be able to walk for hours, to burn the calories I
needed to burn. I needed something to do on
the treadmill, that would engage my mind for hours
on end.
Besides binge watching TV shows or movies, the most
productive thing to do is, work on my laptop
AND walk for miles on a treadmill.
With my first and second treadmills I had long
handles and jerry-rigged a shelf with a piece of
plywood and bungee cords on top of the handles and
set my laptop on it. When I write an article
for my web site, like I am doing right now, or do
genealogical research, the hours just melt away and
I now average 12+ miles of walking a day. Yes,
everyday!!! I am now out of the obese range
and am now just overweight. I7 more pounds to
go, to be in my normal weight range. So
walking to loose weight does work, if you walk
enough miles consistently along with smarter food
choices.
However, if you walk an excessive amount on a cheap
treadmill, say the $300 - $400 range, you will wear
them out quickly by burning out the motor or wearing
out the belt. Which is why I am now on my
third treadmill in as many years.
June 2020 - what happened between Nov 2018 when I
bought my 2nd treadmill with the long handles and
trying to buy the same treadmill in June
2020...............the damn Covid-19 coronavirus.
All of these people self-quarantining with nothing
to do, NOW wanted to exercise. So every
treadmill I looked at with long handles (which us
old farts need to keep balance) and inexpensive
treadmills with decent reviews were OUT OF STOCK.
Well that just sucked!! |
|
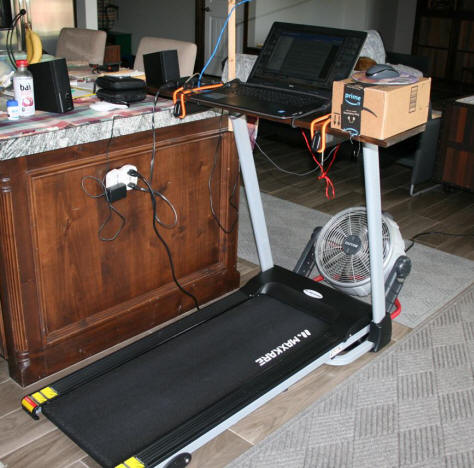
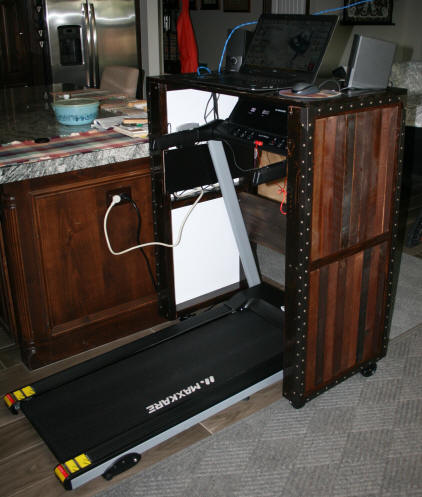
New treadmill with laptop shelf jerry-rigged
onto treadmill handles. |
I did end up finding a decently priced treadmill,
however it did not have the long handles on the side
that I so desired.
After receiving and setting
up this treadmill, I set up my jerry-rigged laptop
shelf on top of the stubby handles.
Problems
with this treadmill is that the shelf is now too low
and the mouse is not comfortable to use unless
raised about 6".
And the biggy....there is now
nothing to hold onto. If I loose my balance,
there I go flying onto the floor. |
|
|

Jerry-rigged shelf showing orange bungee cords
securing shelf to treadmill. One long black
bungee wraps
around the hinge area of the laptop and then around the back of the shelf
and brought to the front
and then hooked on the sides of the laptop. The box raises the mouse
up to a level that is
comfortably for me.
|
A better solution to all of this
jerry-rigging would be a rolling table that
will hold my laptop and roll into place over the
treadmill. This would free-up the handles on the
treadmill and give me something to grab on to, if I loose
my balance.
However, in my world, I can never find what I
am looking for, even after I spend hours looking at
everything available on the internet. So what
happens? I end up having to make what I need,
because what I want does not exist in the
marketplace at a reasonable price.
For instance. There are treadmill tables.
However, they come with the treadmill for $1200 -
$3500 and more. Forget that!!!! There are
standing tables, but they are 4 feet long. I
only need a table 3 feet long. There is one
type of exercise bike table that would work, but it
is too narrow for most treadmills that are made for
people taller than 5' 6".
Most of these standing type tables are made out of
metal and look very institutional or office drab. If you want a nice wood top, you pay
extra. There are NO tables on the market that
are 3 feet wide. Zero, Zilch, Nada. This
was the deal breaker for me. Again, I will just need
to make my own. |
Criteria for This Treadmill Desk
1) When I buy more treadmills in the future (and I
inevitably will), this
desk will need to fit over the other treadmills.
If it is not wide enough, I will need to modify the
existing desk, not make a new one.
2) There needs to be a place to store and manage
cords and power strips underneath the work surface.
Why do I have cords? We do have wi-fi, but I
am old school when it comes to security. I run
a cable to my laptop from the router / modem. Wi-fi
on my laptop is turned off so no one can get in.
I also have speaker wires for speakers, mouse cord
(if mouse falls, it dangles. Wireless mice
fall and break), cables for my external hard drives,
power cords, etc.
3) Needs to be on wheels. I make all my furniture
with wheels. Too old and tired to drag around
furniture.
4) Matches the current vintage look furniture I have
already made. See my
DVD cabinet,
file
cabinet, and
end tables to see what I am talking
about.
Design and Material Selection of the Treadmill Table
When selecting materials for this desk, I wanted
something sturdy. Sometimes when I am typing
and walking, I put some weight on top of the shelf
where the laptop is. I decided on good ole
2x4's. They are cheap, have a good rustic look
when painted, and are sturdy.
I then took measurements of the new treadmill.
The width I decided on for my table top was 36". If
you subtract the width of the 2x4's. 3.5" +
3.5". That gives me 29" width between the
table legs. Perfect. The width of the
new treadmill is 26.25". I decided on a height of 47"
for the legs (sides) which includes the wheels.
With the table top on, the treadmill table will be
47-3/4" high. That may seem high, but the treadmill is 4" off the
ground and I am 5' 8" with my athletic shoes on.
The two sides of the table will be designed as
permanent pieces of the table. The wood on the table
top can be swapped out for a wider piece of wood in
the future if a wider treadmill is purchased.
The two table sides will be screwed into the top to
make changing the top easier.
The depth measurement was still pending on what I
found at the hardware store.... What I found was
a project board made of pine or spruce. It was all
sanded and ready to paint. Measurements were
36" long and 20' wide. Boo-yaa.
These are
now my table top measurements. Which means,
the legs I will be making with the 2x4's will be 20"
wide.
As with most of my projects, I work out the final
details in my graphics program and create an image
to work with. The table should look similar to
the table pictured below, before adding the metal
corner and rivet look detail. |
 |
The next thing I do in my graphic software
is to plug the measurements in and do
drawings with the measurements and prepare
cutting guides.
This way I know exactly what I need to buy
and how much.
For this project, based on the dimensions of
my table, I needed three 8-foot long
2 x 4's.
I needed 2 1/2" screws to assemble the
table.
2" screws to attach the table top to the 2 x
4 frame.
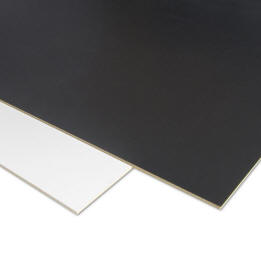
To attach the decorative weathered wood
pieces to the sides, I needed a backing.
You could use thin plywood, peg board, or
any thin flat material. I bought some
dry erase/chalk board to use as the backing
for the decorative wallboards.
The 2x4's will have an area routed out to
slide the board into before final assembly.
The board will then be glued on.
At this point I went online to order the
specific items I did not have on-hand and
are not available at the hardware store like
the casters, upholstery tacks and metal
corners. |
 |
|
The material costs for this
treadmill table are below
- Full Cost - assumes you do not have any of
the supplies listed and want to do exactly
what I did.
- What I Paid - Because I already had some of
the items on-hand.
- Strip Down Version - No fancy wall boards
on side. Nothing but the 2 x 4 frame and a
piece of wood for the table top. Buy the cheapest
casters you can find. Use existing paint you have
sitting around. If you already have 2 x 4's
and plywood sitting around you don't even have to go
to the store. |
|
Material Costs for Treadmill Table |
| |
Full Cost |
What I Paid
Because I Already Had Items |
Strip Down
Version 2x4's Only No Paint |
|
3 -- 2 x
4's - 8
feet long |
$9.51 |
9.51 |
9.51 |
|
1 - 32 oz can
Minwax Polyshade Satin finish - Espresso |
11.95 |
|
|
|
1 - 32 oz can
Minwax Polyshade Satin finish - Pecan |
11.95 |
|
|
|
1 -
#14 - 2 1/2" screws pack of 25 |
4.93 |
4.93 |
4.93 |
|
1 - #12 - 2"
screws pack of 25 |
4.93 |
4.93 |
4.93 |
|
1 - Set of 4 -
locking polyurethane casters |
37.25 |
37.25 |
37.25 |
|
4 - 6 foot
long - 1" aluminum corner angles - for
vertical edges |
48.52 |
48.52 |
|
|
1 - Neiko
Multi-Purpose Power Hole Punch Kit
(to punch through aluminum angles |
24.45 |
|
|
|
1 - 11oz spray can Rust-Oleum Oil Rubbed
Bronze |
5.56 |
5.56 |
|
|
200 -
Decotacks Upholstery Nails 7/16" width
(3 packs of 100 at $9.90) |
19.80 |
19.80 |
|
|
8 - Antrader
8pcs Metal Corner Protectors Bronze Tone 2.8" x
2.8" x 1.2" |
11.99 |
11.99 |
|
|
3 - Chalk /
Dry Erase Boards 23.85" x 35.5" |
16.68 |
16.68 |
|
|
1
- 3/4" thick wood project board |
13.25 |
13.25 |
13.25 |
|
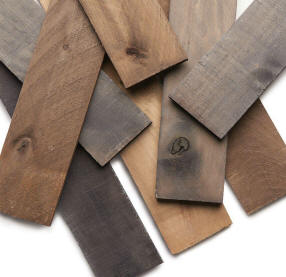
1 box
- Weaber Weathered Hardwood Boards - 8
boards in package measuring - 1/2" x 4"
x 48" - 10.5 sq ft for $24.98 |
27.98 |
|
|
|
Misc -
Sandpaper, Glue, Paint Brush, Caulk,
Brush Cleaner, etc |
40.00 |
|
|
| |
|
|
|
|
Total |
$288.75 |
172.42 |
65.37 |
|
|
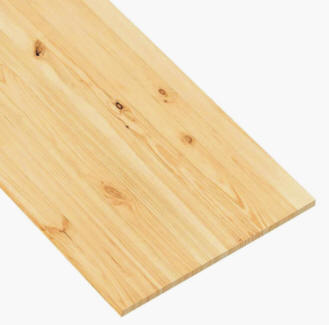 |
Metrie
3/4-in x 20-in x3-ft Spruce Pine Fir Board
Item #151487 Model #151487
Board used for
my table top. Kept in area of store
that has the nicer wood for projects. Not
with the dimensional lumber. This
board was wrapped-up in plastic. Nice
and flat, sanded and ready to stain or
paint.
Unknown exactly what wood species I got. As
the title implies, it is either spruce, pine
or fir
https://www.lowes.com/pd/Metrie-20-in-x-3-ft-Smooth-Natural-Spruce-Wood-Wall-Panel/1000833668 |
|
|
|
|
|
|
Casters
This style of
caster has a retro look, which is why I
liked it. It is similar to the wheels on the
Rolling DVD Storage Cabinet.
It also has polyurethane wheels which are
much better for ceramic tile floors.
Each caster can support 100lb. The
treadmill table will never hold that much.
Headbourne 8276E Designer Casters 3 inch
Polyurethane Black Mag Designer Caster, 4 Pack
https://www.amazon.com/gp/
product/B076FGP5H1 |
 |
|
Faux
Rivets
I actually wanted smaller nails or tacks for
the rivet look on the edges of the aluminum
corner angles. However, I could not readily
find them and I wanted something more
decorative looking than a regular nail or
screw.
What I did find a lot of, were upholstery
tacks. All kinds of tacks in different
colors and styles. BUT the one
consistent size was 7/16". So I had a
choice between smaller less decorative nails
or larger upholstery tacks. I went
with the tacks.
There was no way that these tacks could be
hammered through 16 gauge aluminum. So
I needed something that would punch a hole
through my aluminum angles before I put the
tacks on. So I found a hole punch for
metal up to 16 gauge steel. |
|
|
Corners
For the corners of the table, I wanted a
metal bumper or guard to cover the edges of
the aluminum angles on the edges.
Easier said than done. I did finally
settle on the one pictured to the right.
However, it was not my first choice after 3
days of searching when I made the DVD
cabinet.
These corners are easy enough to find for a
small box or a trunk, but not for large
furniture. I needed to find a corner
that was more than an inch from left to
right and up and down so the corner of the
aluminum angle will be covered. |

Antrader 8pcs Metal Box
Corner Protector Edge Safety Bumpers
Furniture Corner Guard Bronze Tone 2.8" x
2.8" x 1.2"
https://www.amazon.com/gp/product/
B07CV625R7/ref=
oh_aui_detailpage_o01_s00?ie=UTF8&psc=1 |
|
Cutting and Routing
Slots into
the 2 x 4's
If you are making a table with the exact dimensions
of my table, follow the cutting pattern below.
|
|
 |
After cutting the 2 x 4's, I routed out slots to
slide the dry erase board into. I do not have
a router so I did this on my table saw making a
couple of passes to make the slot wide enough.
If you do not have a table saw or router, you could
make these slots
with a small hand held rotor saw. For this you would
need to clamp the wood down really well and use a straight edge.
Be very, very careful with this option. Avoid
any knots in the wood.
I made the slots about 3/4" away from the edge.
For the short piece of 2 x 4 that will go into the
middle of each table side, you will need to route
both the top and bottom. See photo below.
On the table top board, I sawed 2 holes 2" wide for the
cables. |
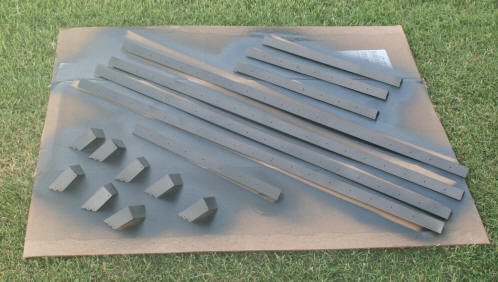
Painting
I paint before I assemble the parts. I
do a neater paint job this way and it is
easier to sand the wood in-between coats.
I am using Minwax Polyshade Satin finish in
both the Espresso and Pecan.
For this project the painting steps are
as follows:
- Sand the 2 x 4's with 60 grit sandpaper.
- Paint both sides of the table top and the
2x4's with Espresso
- Sand with 220 grit
- Paint second coat on table top and 2x4's
with Espresso
- Sand with 220 grit
- Assemble the table sides and glue
decorative weathered board on.
- Paint table legs and weathered board with
one coat of Pecan.
Note: if you are not using the dry erase
board that I am, you may need to paint the
boards you are using. |

Table frame
being assembled. Note
slot routed on side. For this center
piece you will have to route both sides. |
|
Assembly
After the second coat of paint was sanded on
the 2 x 4's, the table frame was assembled.
You will first need to find the center of
the long piece. This is where you will
attach the short piece that has been routed
on both sides.
The three short pieces were then attached to
one of the long pieces with two 2-1/2" #14
screws. I pre-drilled the holes first.
If you do not do this, you will never get
the screws in.
|

Slide the dry
erase / chalk board into place.. Then
attach second long piece of 2 x 4 on the top
with screws. |
|
After
the 3 small pieces were attached to the long
piece, I took the measurements for the dry
erase board and then cut the board to size.
You want to make the board wide and long
enough to fit in the slots and not slide
out.
The boards were then slid into slots
in-between the 2 x 4's.
Then place the 2nd long 2 x 4 piece on top
of the frame making sure the board goes
inside the slot and put the screws in.
At this point, the legs or sides of the
table are complete. Since the blackboard
side is on the outside, you could just draw
pictures and not put the weathered board on. |
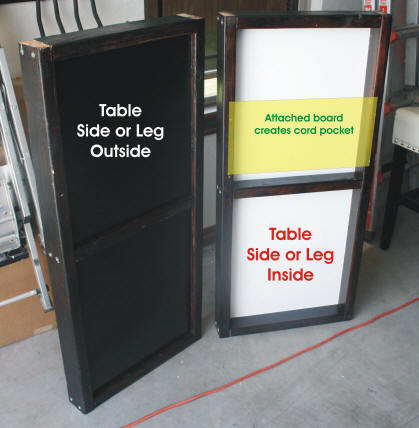
The two table legs (or sides) are now
complete. I will attach the board that
creates the cord pocket after all of the
painting has been done. |
|
The weathered board was then
ripped in half, cut to length, and dry fitted onto
the the black side of the table legs. When I
had a good fit and random color pattern of weathered
boards, I then glued them in place with wood glue.
Of note: I NEVER
cut decorative items like these weathered boards
until I have the main furniture parts assembled.
This is because of the variations in the width of
the weather boards and slight variations in the
measurements of where I am placing the weathered
boards.
|
|

Gluing the weathered board in place |
|

Decorative weathered
boards now glued on. Table side now ready for final
coat of Pecan colored poly stain. |
The legs and the table top then
received a final coat of paint in the Pecan color.
Even the weathered wall boards.
Painting the weathered boards helps by first
protecting the wood (incase I have a dog pee
incident) and covering some of the freshly cut edges
that are visible. Note the photo above on the
left section. Right along the edge of the
blackish and dark brownish board, you can see the
fresh cut edges.
While I was waiting for the paint to dry, I started
work on the aluminum edges.
First they needed to be cut to size with a hack saw.
I then punched the holes in the metal. For
this piece of furniture I punched the holes 2"
apart.
On the longer vertical edges I punched a second row
of holes on the other edge an inch up.
For the shorter aluminum pieces, I only punched
holes on one side because the table top would be
covering one edge and the other edge would be
underneath the table. |
The aluminum corners were then
sanded with 60 grit sandpaper to roughen
them up so the paint adheres better.
Then they were cleaned with some window cleaner to get
off any oil..
The aluminum angles and corner pieces were
then painted with the oil-rubbed bronze
spray paint. |
Aluminum edges and corners being spray
painted with oil-rubbed bronze paint |
|
After all of the paint had dried
on the wood and the aluminum edges, it was time to
attach the aluminum edges.
Even with all of the tacks nailed in on the aluminum
edge, I choose to glue the aluminum edges in
addition to nailing them. This is done quickly
with clear caulk. Why caulk and not glue?
Caulk is thicker and will not run. The caulk I
am using goes on white and dries clear. |
|
 |
Each of
the upholstery tacks were nailed in with a
rubber mallet through the punched holes.
After attaching the aluminum edges, I
screwed on the casters to the bottom of each
leg. Then I put the table top
upside down and screwed two 2" screws into
the legs and into the top of the table.
My old jerry-rigged
shelf became the cross brace at the bottom
back of the table, after removing around
10". |
 |
|
|
 |
|
|
|
|
|
|