|
Tuff Shed
Tuff Shed Installation, Review, and Repairs
Installation -
April 10 - 11, 2019
Repairs done by Tuff Shed - July 12, 2019 (See
below in red)
Hail - April 21, 2020 - Damage and repairs
(Bottom of page) |
|
When we purchased our new home in
June 2018, we had set aside some money to have
concrete slabs poured and to purchase a storage
shed. After waiting for no-freeze days in the
Spring of 2019 we were finally able to get this job
done.
Storage Shed
Placement
After living in our new house for 9 months, I now
had a better idea of where I wanted the concrete
slabs to go. This 9 month delay, could be seen as a blessing.
What had happened during this time period, was rain and
where it pooled in our backyard.
The rain turns a portion of our backyard into a lake during heavy downpours,
right where I had wanted the storage shed to go in
the southeast corner of our backyard. If I had
immediately had a storage shed installed in this
corner when we moved in, it would have been a costly
mistake, even with a cement foundation.
The
second option was the northeast corner, which was
worse. The southwest corner is out of the
question because our septic system is there.
The only corner left in the yard, was the northwest corner of our
yard. |
|

Northeast corner of yard on Dec 26, 2018 during
heavy rain.
After the rain stops, the pond remains for a few
days.
The storage shed WILL NOT go on this side of the
yard. |
I want this storage shed to be as far away from the
house as possible because it is where flammable
materials like gasoline and propane will be stored.
So the northwest corner of the yard is where the
shed will
go. The rain does pool a little in this area
during downpours....but with a 5" slab of concrete
and the raised bottom of the shed, the floor of the
shed will not have water sitting in it after it
rains.
Based on the rain we have had this past
9 months, only a couple inches of rain pools here
until it moves downhill or is soaked into the
ground. |
|

Northwest corner of yard on Dec 26, 2018 during
heavy rain.
After the rain stops, this water disappears. |
|

Northwest corner of yard on Mar 29, 2019.
Ready for cement slab. |
Storage Shed Size
The type of shed I decided to get was a
12' x 16' Tuff Shed.
I needed to balance the size and price.
I needed something big enough for a riding
lawn mower to be rode into AND to store the
yard related junk we have.
It also had to be tall enough for my 6' 2"
husband to walk into without hitting his
head. |

Plan for the storage shed foundation.
May actually move the front of the shed
closer to
the edge of the concrete. |
|
|
A simple 12' x 16' shed was all I
could afford with my budget. The only
additions I added were a 3' x 3' window, vents on 2
walls, and a 6' wide double door. I will be
painting the shed myself and creating the shelving
and hanging system inside. Solar powered barn
lights will provide lighting inside. At this
time, there will be no electricity in this shed.
Storage Shed
Concrete Slab Size
With my shed picked
out, I could then determine the size of the concrete
slab. I decided on a slab that is one foot
wider than the shed. 14' x 18'. This way if
something is leaning against the wall of the
shed, it can rest on the concrete and not the
ground. This will also give us at least 3' of space
between the shed and the fence.
The 252 sq ft of concrete will be 5.5" high. |
|

Foundation forms complete. Ready for concrete. |
|

Foundation concrete being poured |
|

Cement slab ready for shed |
After the foundation for the shed had been poured I
was ready to finalize the purchase of my Tuff Shed.
Why Tuff Shed?
Tuff Sheds cost more than other options.
There are some cheaper sheds at the big box hardware
stores. For those, the price they give you for
this size, is about $1000 less. However, you
have to put it together yourself. If I am
going to do that, I might as well make it from
scratch. There are also a lot of complaints
about these sheds.
You can also opt to have one of their private
contractor installers do it, which will bring it up
to the Tuff Shed price.
I also found some lesser known or family run custom
shed businesses on the internet in this area that
used to be in business. Hmmmm
If there is a warranty, I want to know that there is
someone I can call...... in say 2 or 3 years.
This is why I went with Tuff Shed. They have
been around for a while and the price includes
installation. All I do is stand back, watch,
and take photographs.
Making the Purchase of My Shed
I went online to configure my shed. The
website calls it "Build a Quote".
Last August 2018 I went on their website to do this.
It was a breeze to do and fun.
When I went on the website this March 2019, the
website was now very clunky to use and slow.
I could not find items and the website basically pissed me
off. I had to keep closing the website down
and deleting their internet cookies and then
starting over again with what I wanted, providing I
could find it. Instead of taking me an hour to
do....it took me days.
Because of this website change, I added on less
features than I might have. I wanted the ramp and a
drip edge over the door. I could not find
these items. I just wanted to Build My quote"
and get the hell off the website asap. I'll
add a ramp and drip edge later myself.
After You Build A Quote
After you build your shed on the website and submit
it, you get an e-mail confirming your quote which
does not include tax or any delivery charges they
might want to tack on.
You will then get a phone call from one of their
sales people.
Think car salesman. Where they tell you if you
buy right now, I can take an additional....say
$300....off the price, after I check with my
manager. These sales people, particularly the
ones that have been around a long time, will do or
say anything to make a sale. "Check with my
manager" is bullshit. They have the
authority to make a discount without checking with
anyone.
When I initially built my quote on March 21, 2019, I
spoke with Keith Wells. After a 30 minute
phone call with me asking for the EXACT price of the shed
with tax and delivery minus any promotional savings
I finally got a price of $4649.49.
But to get this price he needed to get approval from
his manager and he would call me back on Monday,
March 25, 2019. He said he could not do it
sooner because he was planning for a Home & Garden
show somewhere in OKC.
Keith Wells did not call me back. I guess they
did well at the Home & Garden show!
I went ahead and got my cement foundation laid,
April 1-3, 2019.
I then called Keith Wells back at the OKC Tuff Shed
office on April 4, 2019 and told him I was ready to
purchase my shed. He then proceeded to tell me
that the price was now in the $4800.00 range.
I said whoa there..... YOU did not call me back when
you said you would. Long story short, I got
the original quote. Jeezzz.. it had only
been a couple of weeks!! I can see jacking up
the price a year later, not 2 weeks later.
What I bought:
Premier Ranch 12' X 16'. Upgrade of a 3' x 3'
window, 2 vents, and a 6' double door opening.
NO PAINT. |
|

Premier Ranch shed I am purchasing |
Installation Day
April 10, 2019
Up until yesterday,
communication with Tuff Shed had been almost daily
via their automation system.
Primarily automated text messages or e-mails telling
me that my shed delivery is on schedule.
The e-mail I received on Tuesday, April 9, 2019 let me know
that my shed would be delivered tomorrow and I would
receive an e-mail with a time range and the name of
the installation crew.
This e-mail never came. Nor did I receive
any phone calls!!!!!!!
At 10:45am " I " made the call to Tuff Shed
in Oklahoma City and spoke with Chris to ask, when
my installation would be.
The responses I received were the basic bullshit
responses you get when a company knows they fu**ed
up:
-"Uh....we had some call-in's"
-"Needed to find another crew"
-"The crew will be leaving shortly and they will
give you a call when they are on their way"
According to the crew of Robert and Morgan, out of
Shawnee, OK they did not receive the call for the
installation job until 11:00 am.
They did not call me on April 10, 2019
until 2:00 pm. This was the first phone call I
received from this crew. What was going on
between 11:00 am - 2:00 pm? Who the hell
knows. Probably a lot of scrambling and the
covering of asses.
The crew did not actually show-up until 3:00 pm.
A whole day wasted, waiting for the Tuff Shed crew
to show-up. I already had a feeling that the
installation would not be completed today.
Oh... and I had came down with a cold the day before.
So I was sick as a dog. This is the time I
should have been laying down and resting my body so
it could
battle the virus. But no....I needed to be up
and ready to go when the crew finally showed up.
If I knew they were coming this late, I would have
stayed in bed resting until at least 2:00 pm. |
|

Shed in pieces on the back of the installer's trailer
when they finally arrived at 3:00 pm |
Installation
The first thing that was put
together was the 2″x 6″ hot-dipped galvanized steel
floor joists on top of the cement slab. Tuff
Shed uses these instead of pressure treated dimensional
lumber.
The one thing I changed about the placement of the
shed was to move it forward on the cement slab so
only 3" of the slab showed in the front. This
makes the cement ledge in the back wider, which is
fine. |
|

2″x 6″ hot-dipped galvanized steel floor joists being
installed on top of the cement slab. |
After the floor joists were
screwed together, they placed cement bricks under
the joists to raise them off the cement. Wood
wedges were also used to level the floor joists.
They then installed the floor boards which is
nothing more than particle board. I would have
preferred 3/4" plywood. |
|

Floor joists assembled and leveled with bricks and
wood wedges |
|

Floor boards attached to floor joists |
The walls had been pre-assembled
at the factory. So they lifted them in place
and attached them to the floor and then to the other
walls. This assembly stage was not easy for them to do
because of the winds we always have at this house.
They needed to brace the edge of these walls because
of this wind.
What they should have done is move all of the walls
to the worksite from the truck first. They
kept going back and forth from the truck to the
corner of the yard with a wall and installing it
before going back to the truck again to get another
wall. I did not allow them to drive on the
grass because of the damage the cement truck had
done. |
|

Two walls up |
|

All four walls up |
|

Roof rafters up |
|

Roof trim on. Adding the roof. |
|

Doors going on |
|

Shingles going on |
Needless to say, they did not
finish the installation by 8:00 pm. It got too
dark to work. There are no street lights where
our house is. Without the moon, it is pitch
black outside.
Before they left, I asked what time they would be
here tomorrow to finish the work. Robert told me 7:00
am. I remarked about how early that was.
They assured me they would be here at 7:00 am. |
Installation
continued
April 11, 2019 |
7:00 am came and went with no
installers. At 9:00 am I called Tuff Shed to
ask where the crew was. Chris at the Oklahoma
City Tuff Shed said he would call the team to find
out where they were. One hour later, I
received a call from Chris telling me that the
installation team would call me.
Robert called a few hours later telling me they were on
the way and that he had truck problems early in the
morning. More
bullshit! If he had problems with his vehicle
in the morning,
he should have called.
They did not show up until 5:00 pm!!!!!
Another day wasted waiting. Oh and I was
feeling sicker than the day before.
By the time the installers finished, it was dark
again.
A lot of time was spent on the double doors.
They had a hard time getting them even and closing
properly. The door on the right side, with the
handle, was not closing flush with the door on the
left. They repositioned the screws about 4
times. I know this because I was watching them and I
had to fill all these holes before I did the
painting.
The Survey I DID NOT fill out
When they were done with the installation, Robert
asked if I would fill out a survey on his phone.
Tuff Shed sends a survey to their installer's phone
using DocuSign. He wanted me to fill out the
survey on his phone standing outside in the dark.
Bullshit! What kind of scam is this????
If Tuff Shed really wants survey answers that
reflect the actual work done, they don't ask you to
fill it out on their installer's cell phone where
they know what your answers are. Also, they
should not be doing this on a phone, because the
type is too small for most folks to read.
Additionally, after the install is the worse time
for a survey because most customers just want the
installers to g-o a-w-a-y after
spending hours disrupting their lives. I had
dogs that needed to use the bathroom after holding
it for hours.
I told Robert I would not being filling out any
survey on his phone because I would not be able to
read it. I told him to tell Tuff Shed to
e-mail the survey to me instead.
The next day I received an e-mail, but it was not
the survey. It was the original documents I
signed when I bought the shed. I tried phoning
Tuff-Shed. It kept going to voice mail.
I suspect they were ignoring my calls which are easy
to spot on caller ID because I have an out-of-state
area code.
I then sent an e-mail to the dimwit in their office
that sent the wrong document, asking where the
survey was and where is a copy of my warranty.
They sent both the survey and warranty to me via
DocuSign. I was unable to fill out the survey.
The document said this was done already.
Again, bullshit. I did not fill out the survey
or sign anything saying the installation was
complete.
Since Tuff Shed obviously does not care about my
experience with their product.....this web page will
be around for many, many years instead.....with the
good, the bad, and the ugly. |
The Tuff Shed
Warranty
Tuff-Shed has a standard 7 year warranty on
materials and workmanship for the Premier Series.
All of their warranties are on this web page:
https://www.tuffshed.com/warranty/
I did not see this warranty until after the shed was
installed. The warranty was supposed to be in
the original contract documents. After
reviewing the documents several times after the
installation, I realized that the warranty was NOT
with the original documents.
Whoever reads this, learn from my mistake.
Make sure the warranty is with your purchase
contract when they e-mail it to you and read it.
What I wish they had told me prior to finalizing my
order, was the painting of the exterior.
According to the warranty:
"In order
for this warranty to be valid, all exposed surfaces
must be painted within ninety-days (90) of
installation, repainted every five years thereafter
(proof of paint purchase required) and properly
maintained."
When I ordered the no paint option, the Tuff Shed
website did not let me know that I would need to
paint the shed within 90 days or my 7 year warranty
would be void. Nor did the salesman say
anything about this. Yes, I know.
The warranty is right there on their website where I
could have read it. It would have been nice to
have been reminded of this.
Why don't they remind you about the 90 days when
you place your non-paint order?????
1) If the shed does not have to be painted, the product moves
faster from the factory
to the consumer's build site.
More profit and less work for Tuff Shed. If
they mention
the 90 days and a void warranty, many
folks may switch to the painted option.
2) They don't tell you about the 90 days because they want
you to NOT paint it.
Al least half of the population will not
get around to painting their shed within
90 days. They are either too lazy or
more important stuff comes up.
Then.....surprise!!!!.....Your warranty is
void.
When I ordered my shed, I ordered the no paint
option because I wanted to paint the shed myself.
In fact, I had already purchased the paint primer
for the shed prior to April 10, 2019 to take
advantage of a sale at Sherwin Williams. And
yes, I have the receipt.
I wanted to paint the shed myself because I knew
that I would do a better job than Tuff Shed. I
am pretty sure their paint job would involve a
single thick coat of a water based paint, sprayed on
each of the assembled pieces. No caulk on
seams. Nail holes not filled. No primer.
As of April 28, 2019 my Tuff Shed has been caulked,
painted with an oil-based primer, and then painted
the final color with Duration by Sherwin Williams.
My shed was painted within 30 days. Receipts
have been placed in a file. Therefore, my
warranty will not be void if there is a problem in
the next 7 years. |
|

Window wall nail holes filled and seams caulked |
There is
good reason why your Tuff Shed needs to be
painted within 90 days.
There are hundreds of nail holes.
I have used this type of siding before.
It is a good product. Even without
paint, there is a finish on it which acts as
a primer. Without paint this siding
will last a long time......
UNLESS.....the finish has been
disturbed in one way or another. Nails
and dings will break the surface.
Water will get into these breaks and start
the deterioration process.
Most of the nails in the siding were
countersunk. Which means water will
sit in each hole every time it rains.
Before painting, I filled each of these
holes. I also caulked every seam I
could find.
|

Back wall nail holes filled and seams
caulked |
|
The primer
that I used was Sherwin Williams
Exterior Oil-Based Wood Primer.
I have a love / hate relationship
with this paint.
I hate it because it is thick and
messy and hard to brush on.
I love it because it is a bad ass
paint that really protects your wood
or siding. This will protect
your outdoor surface longer than a
water-based product.
This is your grandpa's paint
.....minus the lead.
|
|

Sherwin Williams Exterior Oil-Based
Wood Primer |
|

Side wall nail holes filled and seams
caulked |
|
|

Front of shed nail holes filled and seams caulked |
|

Window wall primed. Two empty paint cans
hanging along fence drying out before I toss them. |
| The
primer, fresh out of the can, is white.
I had the store clerk add some black to the
primer to give me a gray.
He was overzealous
with the black so the gray was darker than I
liked. It would be covered anyways, so
it really did not matter.
After the shed was painted with the primer,
I waited a few days for it to dry.
There was a rain day in-between while this
was drying, which does not effect the paint
after 24 hours.
Painting also included the underside of the
siding on the bottom and the visible steel
joists of the foundation.
Sherwin Williams was having another sale at
40% off so I went to purchase the final coat
of paint for the shed. |

Back wall primed. |
|
The
color orange I selected is based on the
bricks of my house. With a bunch of
paint chips, I selected the lightest orange
in our house bricks, SW 0040 Roycroft Adobe.
I used Sherwin Williams Exterior Duration
brand in a satin finish.
The trim color is SW 7038 Tony Taupe.
This is the same color as the trim on our
house. There was about a gallon of
this paint left by the contractor when we
bought the house, so I am using this up.
For the duration of the painting, I used
masking tape on the roof drip edge, hinges,
door handle, and window.
The black wire fencing around the entire
shed is temporary until all of the painting
is done. This is because of the dogs.
Even though all of our male dogs are neutered,
they still pee on any surface that is
vertical.
|

Side wall primed |
|
|

Front of shed primed |
|

Shed painted with Sherwin Williams Roycroft Adobe and Tony
Taupe trim.
Solar porch lights added to the
front. Temporary steps added. |
One
thing I discovered as soon as I started to
work on the shed, the doors needed to be
secured open when not fully closed.
The wind is too strong most of the time.
If the wind blew a door onto me or my
husband it could possibly cause injury.
Also, the door with the handle blows hard
onto the siding when the wind catches it.
To cushion the handle, I screwed on a rubber
furniture floor protector.
To hold the doors open I used a couple of
large screw in eyes and a large carabiner
for each of the doors.
A hook and eye also would have worked but I
could not find a large heavy duty set.
The winds are too strong for a small hook
and eye. |

Furniture floor protector to cushion door
handle and two screw
in eyes plus a carabiner to hold door open |
|
During
the month of May 2019 I worked on the inside
of the shed painting it and building shelves
and hanging spaces.
The floor was painted with an oil-based
primer.
The final coat of paint on the floor was an enamel oil paint for metal.
I wanted a shiny durable floor to make it
easier to sweep and clean. |

2 x 6" nailed on window wall for hanging |
|
|

Heavy equipment hangers made against the long wall.
Small work bench made.
Hurricane ties added to the rafters where they meet
the walls. |
|

Shelving built against short non-window wall with
3/4" plywood and 2 x 4's. |
|

Solar shed light was installed. Light works
day or night by pulling the string |
Problems With
My Tuff Shed or Things I Just Don't Like
Repairs done by Tuff Shed July
19, 2019
During the end of
June 2019 someone in California (as the story goes),
came across this web page. The link for the
web page was transferred to a Tuff Shed corporate
office and then the General Manager of the Oklahoma
City Tuff Shed was contacted and yelled at.
See what happens when they don't let you fill out a
review? The review gets posted someplace out
of their control and all of a sudden heads are
spinning.
I was then contacted via telephone by Scott Valdez,
the General Manager of the Oklahoma City Tuff Shed.
I have to give credit where credit is due.....
Scott bent over backwards to make me happy and try
to fix everything that was wrong with the shed.
After the initial phone call, Scott drove down from
OKC to see my Tuff Shed in person. I went over
everything with him that was wrong with the shed and
the problems I had with the installers (arriving
late in the day, etc) He also brought with him
some 4 foot long ramps to try out on my shed.
In about a week, he contacted me to schedule the day
that his warranty man, Will, would come out to my
shed and fix all of the problems.
For each of the items I had a problem with, I have
addressed the Tuff Shed repair solution below in
RED....
1) Door Latch
The one thing that took the longest on this
installation, were the doors. When they were
installing the doors the right side was not closing
flush to the left side. The problem with this
over time is that the rain and sun will continue to
hit this edge. Causing it to swell up and
shrink over time and be the first part of the door
siding to fail. I pointed this out to the
installers.
Trying to fix this involved them attaching and
removing the door at least four times. My
husband and I watched with great amusement as the
installers tried to figure out the problem with this
door. I had made it clear that they would not
be able to leave until this problem was resolved.
Their
ultimate solution to the right door closing
flush to the left door was to install the
strike plate or the door latch catch to the
farthest extreme of the left door. If
you pull really hard on the door or slam it
really hard, it will "just" catch on the
door latch and hold it closed. Sorry,
not good enough!!!!
I let the idiot installers leave. They
were not able to correctly solve the issue.
I would figure it out and fix the latch. |
|

Door latch barely caught on the strike plate/ridge.
Had to move the strike plate/ridge to the
left on the edge so the door would close. |
Sure enough..... the first rain we had 2
days later swelled the siding up enough that
the latch would not connect on the strike
plate/ridge. The door could not be
closed. So after having to find a star
drill bit for the screws, I removed the strike plate/ridge
and moved it about 1/8" to the left.
Now the door closed easily without slamming
it or pushing hard on it. However, the
right side was not flush with the left.
This is when I looked up and down the edge
of the left door. That is when I found
the reason for the door not closing.
On the left door are the two spring loaded
pole catches. One at the top and one
at the bottom. To attach them to the
door are two long screws. Screws that
are so long, they slightly protrude to the
other side of the doors ledge........keeping
the right door side from closing flush to
the left side. Mystery solved!! |
|

Top of the left door along edge
Screw tips that keep the
right side
of
the door from closing all of the
way.
After painting. They were more
noticeable without the paint |
|

Inside of left door with spring
pole bolts |
|
TUFF SHED
REPAIR - Will, from Tuff Shed, informed me that
the top spring bolt should have been installed more
to the right on the inside of the door. This
way the screws would not have protruded through the
edge of the door. Other than the screws
protruding out, the bolt works fine where it is.
To fix the screw problem, Will took out the screws
and cut off the tip about 1/4" of an inch and
screwed them back in. He did not have shorter
screws. This hack works!
As for the door latch, it is supposed to have some
"spring" to it. There is a screw that tightens
the spring action of the handle making it easier to
operate. In my shed's case the handle was
tightened too much. Will loosened the screw
and the handle now operates like it should. |
2)
Single 2 x 4's on Corners - Tuff Shed Does Not Use Double 2 x
4's on Corners
I have been building closets and sheds for a
number of years now (See any of the following:
El Paso Storage Shed,
El Paso Garage Closet, and
Oklahoma Garage Closet )
I always use double 2 x 4 construction on
free-standing corners (corners that are not against
a wall) In some cases, I just use the double 2
x 4's because it makes for a sturdier structure.
Tuff Shed does not use double 2 x 4's in the
corners. There is only one 2 x 4 in all of the
corners. Hmmm.... at a price of only $2 for a
2 x 4, they could have done better.
TUFF
SHED REPAIR - No repair done. This is how
they make their sheds.
Of note, the basic framing of my shed has been
reinforced on one side with the sturdy 2 x 4 and
plywood shelves on the non-window side of the shed.
The entire shelf structure I designed is strong and
can hold a lot of weight including a 200 lb adult
climbing on it.
The 2 x 6 pieces of wood nailed between the framing
for the hanging system I designed, also reinforces
the basic framing. |
|

Inside of the shed along the west wall. Only a
single 2 x 4 in each corner. The
siding Tuff Shed uses is radiant barrier siding and
roof decking. Which is simply siding and decking
with a foil coating. Whether this will
actually keep the shed warmer or cooler with the
presence of open vents will be tested in the months
to come. |
I guess
Tuff Shed figures that the two pieces of 1 x
4 trim they attached outside on the
corners replaces the need for 2 x 4's on the
inside.
When I build my shelves and hanging system
inside of the shed, I will beef-up the
corners with 2 x 4's.
If there is a storm or tornado, I want to
give the shed a chance to remain standing.
3) No Rafter Brackets
I will also need to purchase rafter
brackets / ties.
The only thing holding the roof rafters on
the shed are the nails at the top of the
walls.
Again, I am worried about a strong storm.
|

1 x 4 trim pieces added on the outside
corners of shed |
|
|
TUFF SHED
REPAIR - None. Not included with
Tuff Shed. However, a shed owner can buy these
rafter brackets or hurricane ties cheaply for $2-3 and
install them in about 30 minutes or less. |
4)
Attaching Trim to Walls ON TOP of Air Vent
Really? I mean.......really? What the
hell!! Who does this??? Tuff Shed!
I went to remove the vents prior to painting and
discovered this.
In order to change these vent covers in the future,
I will have to pry off the trim first.
There are narrower vent covers on the market that
Tuff Shed
could have used. I needed to mask the vent
before painting instead of removing it.
I will cross my fingers and hope that the cover does
not become damaged in the future so I do not have to
replace it.
** 2020 - Hail update at
the bottom of this page regarding these air vent
covers
TUFF
SHED REPAIR - None. At my request. Why?
Because to fix this problem would mean removing all
of the trim. Remember the caulking, the paint
primer, and then the final paint that went onto the
exterior of this shed? I told Scott that I did
not want this fixed because of the work I would have
to do on these areas caulking and repainting it after they fixed it.
He did agree that something was not right about this
and the trim should not have been
placed on top of the vent edges. He commented
about some type of computer design problem.
However, come on.......if all of the sheds are like
this, someone should have noticed this before. |
|

Trim placed over aluminum vent cover |
5)
Unsightly Bottom of Shed as a Result of Leveling
with Cement Blocks and Shims
I will mention this before I begin......Tuff
Shed does point-out the unsightly shimming of the shed
that will be very visible when they level the shed.
Yes, it is very ugly. The shims that are on
the edge will weather and fail eventually from rain
and sun exposure.
In Tuff Shed's "What to Expect" document (see this
document here...), which they send you when you purchase
your shed, they provide pictures of this. They
inform you to consider the appearance.
Not
until the 4th page of this document do they mention
that skirting is available. However, this
skirting is made from the same siding they use on
the shed, which will rot if it is sitting in water
at the base of a shed. The skirting will
also seal-up any ventilation you have under the
shed.
You want
ventilation under the shed to prevent any type of
moisture build-up. |
|

Shims and cement blocks used to level shed |
My shed needed very little
leveling. There was a little more leveling
needed at the back and center of the cement slab.
After it rained, I had noticed this low spot before
the shed was installed. A difference of about
a 1/2".
While painting the shed, I painted the floor joists
at the bottom. I figured they were steel.
Therefore, they would eventually rust. Paint
would provide some protection.
BUT.......I need to cover-up the big gap at the
bottom of the shed. Cover it up.....NOT seal
it up.
I needed to find something to cover this area but
have holes to allow the air in. I needed
something with small holes. There are two
creatures I need to keep away from underneath the
shed........
Snakes and toads / frogs.
There are poisonous snakes mixed in with the
non-poisonous snakes in this area. I don't
want either living under the shed ready to bite me
or the dogs.
Toads
and/or frogs leave stinky poo and drive the
dogs crazy. Don't need the stinky poo
or dogs tearing up the shed trying to get to
a damn frog. Keeping the critters out,
is the name of the game.
The covering also needs to be weather proof.
So wood or steel screens, are a no.
And did I mention inexpensive?
I settled on these 3' x 3' aluminum sheets
from M-D Building Products. There are
other patterns, smaller sizes, and colors of
these aluminum sheets. I settled on
the the 3' x 3' because it was cheaper per
square inch. I liked the Lincane
Pattern because it was a smaller pattern
than the others. I went with the
Venetian bronze color..... just because I
liked it. |

MD Building Products 57015 3-Feet by 3-Feet
Venetian Bronze Lincane Aluminum Sheet
https://www.amazon.com/Building-Products-57015-Venetian-Aluminum/dp/B005GSOHA0 |
The plan is to cut the
aluminum sheets into 6" wide strips 3' long.
To cover-up the bottom of this shed I will need 16'
+ 12' + 12' + (12' - 6' door ramp) = 50 linear feet.
Each sheet will give me 6, 3 foot strips for a total
of 18 feet. So I will need 3 sheets of the 3'
x 3' for a total of 48 linear feet.
At the time of my purchase both Amazon and Home
Depot had this product for the same price of
$32.98 for one sheet. Shipping was free on
both web sites. I went with Amazon
because they ship faster.
The
height of this space between the bottom of
the siding walls and the concrete is 7.5" -
8.25".
So I needed a top and bottom frame to
support the 6" wide strip of aluminum
sheeting.
I thought of pvc lattice. But it would
need to be made narrower and painted.
I also thought of aluminum bars, but they
were costly.
While walking around Lowes I came across
some plastic patio screen connector caps for
$3.66. Which was cheaper than any
wood, pvc, aluminum, 8 foot long object in
the store.
|

Screen Tight Vinyl Frame Connector
https://www.lowes.com/pd/Screen-Tight-Vinyl-Frame-Connector/3024741 |
|
|

Glue aluminum sheet to ridged / back side of plastic |
|
 |
|

Installed bottom of shed ventilated gap cover |
TUFF SHED
REPAIR - None. Scott showed me some
plugs he had for the holes in the metal which does
nothing to address the ugly shims and the gap that
allows critters to get in underneath the shed.
After all of the work that I put into installing the
shed bottom cover, nothing Tuff Shed could offer
would replace it.
|
6) Really Difficult to Install
a Ramp
The only reason I added the double door 6 foot
wide option was to store a riding lawn
mower, that can be ridden INTO the shed on a
ramp.
I looked for a ramp option on the Tuff Shed
website, and could not find it.
The doors are installed hanging below the
front edge of the shed floor. So if
you build a ramp to the lower edge of the
door, there is still a 3" ledge a wheel
would have to go over. Too high to
ride up. Manageable, but bumpy going
down causing damage to the edge over time.
There are the 2 metal removable ramps I
could buy, but I want a permanent ramp.
I am still working on a permanent solution
for this.
The other option is to remove both doors.
Remove the bottom hinges. Remove the
bottom trim. Cut off the bottom of
both doors. Reinstall the the bottom
trim. Reattach bottom hinges.
Re-hang the doors. May sound simple.
But this is a lot of work.
In the mean time, I created some temporary
steps leading up to the shed entrance with
some landscaping blocks I had on-hand.
With a 11" drop, I kept tearing my
inner thigh muscles stepping in and out of
this shed carrying things.
When I install the ramp, I will update this
section of the page.
TUFF
SHED REPAIR - There are two lengths of ramps
that Tuff Shed offers. Neither of which I
could find on the web site when I was purchasing my
shed. 4 feet and 6 feet.
When Scott Valdez initially visited my Tuff Shed he
brought the 4 foot ramps. For my shed, 4 feet
is not long enough because of the height. The
shed was installed on top of concrete. Which
means, it is higher than the ground installed sheds.
What happens with the 4 foot ramp is that the bottom
of the riding mower bottoms out when it hits the top
of the ramp. Scrapping the bottom of the mower
and door threshold.
For my shed, the 6 foot ramps work better.
When Will worked on my shed, he brought the 6 foot
length ramps pictured below.
|
|
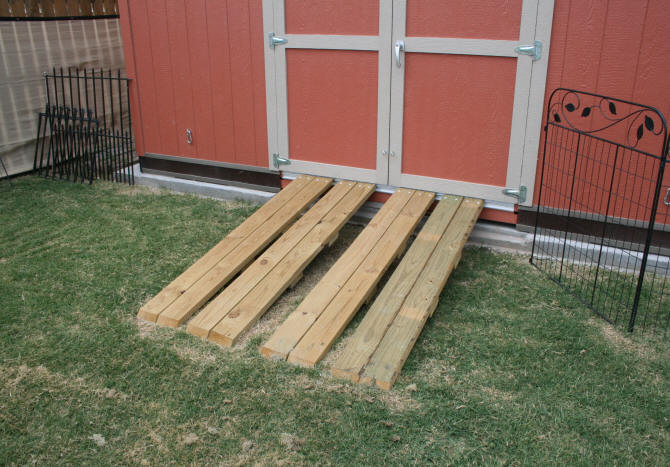
6 foot removable ramps provided by Tuff Shed.
The ramps hook onto the edge
of the shed on a modified L shaped threshold
that hangs over the edge of
the door threshold. When not in use,
the ramps can be removed or hooked
onto the lower ledge of the threshold.
When the ramp needs to be level with
edge, you pick up the ramp and move it to
the upper ledge. |
To install the ramp, Scott needed to remove the
original door threshold and then install the ramp
threshold. The ramp door threshold has an
extra row below the top of the threshold. This
row has a ridge that the ramps hook onto when not in
use. When you want the ramp edges to be level
with the shed floor, you move the edge of the ramp
up to the top edge.
This ramp system is patent pending with Tuff
Shed so you may not be able to purchase it
elsewhere.
|
|
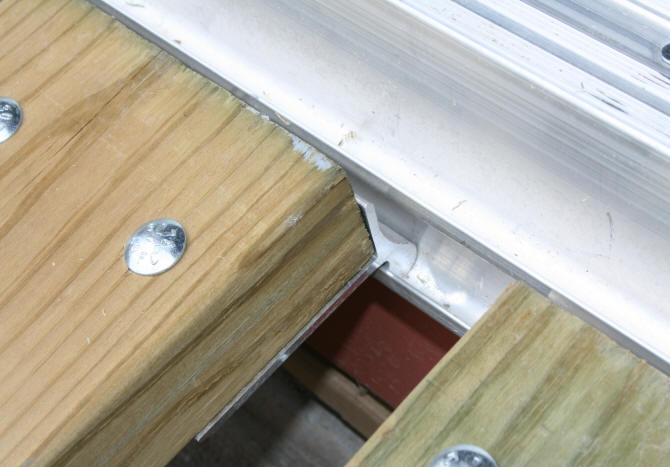
Ramp sitting on lower ledge of threshold |
|

Ramp on left moved to upper ledge of
threshold |
|
|
What I like about this ramp system:
1) Is that it works with the existing doors.
What I don't like:
1) Is that the ramps are heavy for me and hard to
move up and down with bad hips and back.
2) Is that you have to keep moving them up and down
every time we remove the lawn mower. My
husband is now again leaving the mower out of the
shed because it is a hassle to move the ramps up and
down every week he mows the lawn in the summer.
You have to keep moving them up and down because the
doors will not close with the ramp on the upper
ledge.
I would prefer a ramp that is permanent and does not
have to moved up and down all of the time to
accommodate the doors. Better to design a door
that does not hang down so low below the opening.
|
7) Window not set level into the opening which
causes it to leak when it rains
After we had
some heavy rain, I wondered where
some water on the shed floor was
coming from. It ends up that
it was coming from the window.
After looking closely at the window,
I realized that the top portion of
the right side (the side that opens
and closes) was tilted to the left,
leaving a slight gap in the upper
right corner of the window.
Letting the rain in.
To temporarily fix this problem, I
put a couple of pieces of folded
cardboard at the top edge to level
it out. No more water, but the
cardboard looks tacky. |
|

Folded cardboard wedged into top
left
edge to level sliding portion of
window |
|

It is hard to see in the photograph but the
top of the right
side of the window tilts to the left at the
center of the
window. This leaves a slight gap on the upper
right side of the window. The rain come in the
window
in the gap in the
upper right corner. |
|
TUFF
SHED REPAIR - The window pictured above is
warped. Manufacturer defect or it was stored
too long in a hot warehouse.
Will from Tuff Shed took out the warped window and
installed a new window. This window is now
straight. He also centered it in the window
frame better than the initial installers did.
The only problem with replacing the window, is that
all new trim material was used around the window on
the outside. I will now have to paint this
area with primer and the final paint colors again.
I will have to wait until the temperatures drop a
little to do this because 90 degree temperatures can
screw-up a paint job real quick because the paint
dries on the brush before you can get it to the
surface.
|
|
Hail - April 21, 2020 - Damage and Repairs |
On
Tuesday, April
21, 2020 at approximately 9:25 pm our new home was hit bad with large
hail the size of tennis and baseballs. Inside of the
house, all we could do was hope that one of
the pieces of hail would not come crashing
through the roof. The hail storm lasted for
at least 10 minutes and caused significant
damage throughout the area.
The end result of the hail storm on our
property, was a destroyed 2 year old roof,
heavily damaged 10 month old gutters, 3 windows, and
damage to the top of our air conditioner.
Our cars?? Nothing, because we park
them in our garage.
|

Hail the size of tennis and baseballs on
April 21, 2020 |
|
But what about our Tuff Shed?
How did it fair?
I expected at least a few dents on the west
side of the shed. On close inspection
the next morning, I could not find a single
dent or chipped paint in the siding. Like I
mentioned above, when I talk about painting and the
siding, the siding is a good product and will last
decades if cared for properly. My paint job
probably helped.
The
roofing however, needed to be replaced, like the
house.
The air vent cover did NOT fair as well.
|
|

Damaged air vent cover on west side of shed after
hail storm April 21, 2020 |
At this point, I will discuss the
vent covers that Tuff Shed uses on the outside of
their sheds.
These particular vent covers are actually soffit
vent covers that sell for about $2 and are made of
light-weight aluminum. I know this because I
installed about 50 of these on our old house.
I repeat, they are soffit vents, meant to be
used upside down over a soffit vent, underneath
the soffit. Which means, unless a piece of
hail hits the ground and bounces up 8 feet or more
underneath your soffit, these soffit vent covers do
not see much action. Stick them on the outside
of your house during a hail storm, they will get
shredded.
After looking online for louvered vent covers made
out of a more durable material than aluminum, I
settled for some steel (not aluminum) registers that
are actually meant for the inside of a house. About
$10. They are a whole lot stronger than the soffit
vent covers. However, because they are steel,
they will rust. |
To prolong the inevitable from
happening, I spray painted the new vent cover with
some rust brown colored paint that I had on-hand before installing
it.
I also
placed some screen over the opening before
installing the register. AND because this
register was not designed to keep water out, I added
a piece of flashing over the top of the register to
help divert rain water. |

Steel register spray painted brown.
Installed over screen covering hole. A
piece of flashing over register to help
divert rain water. |
|
|
Page last updated August 25, 2020
https://laurellynn.com/KidsZone/ |

