|
Raising the Roof
Garage Roof Replacement
Repair damaged soffit and fascia on main house
Facelift of facade around garage doors
February 23, 2015 - March 12, 2015 - Contractors on
site
March 13, 2015 - August 22, 2015 - Work done only by
me |
|
The one thing that we have been
trying to do for years, is to replace the roof over
our garage.
I am not talking about rolling out new asphalt.
I am talking about tearing off the entire roof and
rebuilding the roof with a pitch steep enough to let
the rain water run off the roof, instead of it
sitting in puddles on the roof until it evaporates.
The current pitch of the garage roof is a sorry 1:12.
Which means it is almost flat. A cracked beam
has created a low spot in one area. There is
also leaking water in several areas in the garage
and under the section of the roof that connects to
the main house roof.
I have climbed on the roof and placed roof tar on
every area I suspected water was getting in, to no
avail. When it rains hard, the water just
keeps coming in.
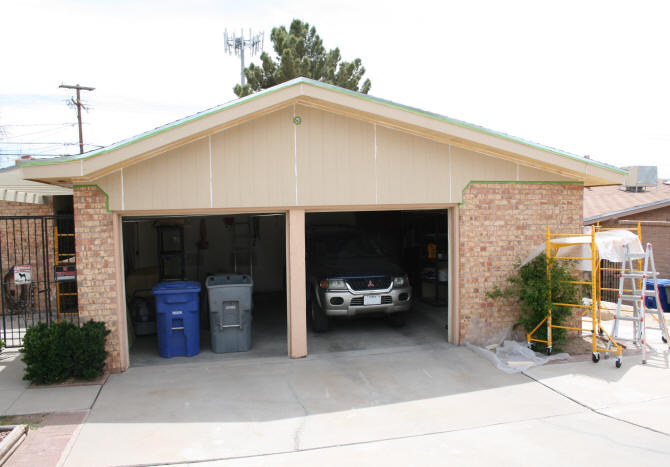
The other thing are the aesthetics of the current
roof. The garage IS the front of our
house. At the garage's current state, the
entire house has zero curb appeal.
Nada. Zilch.
A new garage roof with a higher pitch, new wood work
and trim
around garage doors, and fresh paint will improve
the appearance.... a lot. |
|

Front of
the house with nearly flat garage roof |
|
What you
cannot see in the photo above, is how bad the
soffits and fascia are on the garage roof. We had
done nothing to the garage roof soffits and fascia
because we knew we would be tearing it all
off.....eventually.
When I say that we have been trying for years to
have this work done. We just could not find a
contractor. We would call, they would climb on
the roof, take some measurements, and we would never
hear from them again. They would not return
our calls. Hmm.
In September 2014 I contacted the general contractor I used
for my bathrooms to begin with an estimate. It
is now February 2015 and the details of the job have
been ironed out. Work will now begin.
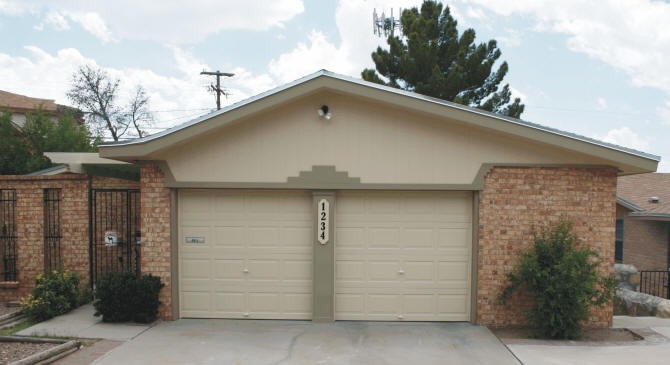
Of note: The other two houses that were built at the
same time, with the same floor plans, both have had
their garage roofs replaced. We were the only
one left that had the original garage roof. |
|

Neighbors' houses with their replaced garage roofs. |
The work that will be done is:
1) Tear off the
entire garage roof and re-frame the roof with a 3:12
pitch. A decent enough pitch to allow rain to
flow off of it, but low enough to safely walk on top
of.
2) The high
point of the roof will be centered above the middle
of the garage doors instead of the center of the
garage. This means the right side
of the garage will have a longer slope diverting
more rain water to the outer side of the house,
rather than the front porch.
3) The
decorative
wood
beams attached to the front patio side of
the roof, that I spent 2 months stripping,
sanding, and painting last summer, will
stay. I told the contractor that they
cannot tolerate the stress of
being moved around. |

Wood beams on front patio |
|
4) The roof section that connects
the main house to the garage will be removed
and re-framed.
|
The new section of roof
will extend beyond the stairs to the
stucco
patio. The roof
currently ends right above the stairs which
means the rain water beats down on the
stairs, damaging them over time.
I just repaired and resurfaced the stairs
with a
faux treatment and did a
facelift of the
wrought iron.
|

Rain hitting stucco patio stairs.
Stucco wall repair in progress last Aug. |
|

Resurfaced faux treatment to stairs
and wrought iron facelift |
|
|
The contractor did suggest
putting the roof over the entire stucco patio
connecting the house and garage entirely on this
part of the house. My husband pointed out that
this would make the two bedrooms on this side very
dark. What I thought of was the summer heat.
It would be trapped under the roof making this side
of the house hotter. I also like to put plants
on this patio. |
5) Replacement of damaged
soffit boards and fascia on main house where
needed. Decorative wood beams
refinished. Overall paint job to new
color that is on stucco walls.
Oval soffit vent covers to be replaced with
aluminum rectangular screw/nail in type.
The white plastic oval vent covers pop out,
get brittle, and are not easy to replace in
high sections of the roof.
I want vent covers that will rarely need to
be replaced. |

Damaged soffit and fascia replaced. Wood
beams
stripped and painted. |
|
6) Replace the vertical
wood work around the garage doors with PVC
sheet material.
Water collects at the bottom and rots the
wood. PVC properly sealed will
permanently fix this problem. The PVC
will last forever unless it is damaged.
To see where I used PVC elsewhere,
see my column wraps here...
Garage door weather strips will also be
replaced with new.
The garage doors will be painted the new
house color of green / beige. Faux
windows will then be painted on garage
doors. I don't want real windows where
people can look in, but I like the look of
windows.
New house numbers will be placed on the
section between garage doors.
All of the work done in this phase
(6), will
be done by me after the roof is done. |

Vertical wood to be replaced with PVC |
|
|
February 23, 2015 --
Today was the start day of the project. The
workers did not show up until after 12 noon.
Today they removed the sheet rock ceiling in the
garage and removed the soffit and fascia on three
sides of the structure. |
|

Sheet rock ceiling being removed |
|

Sheet rock ceiling gone |
|

Soffit and fascia being removed |
February 24, 2015 --
The rest of the garage roof came off today.
The plywood they removed was 3/8". Much
thinner than the requirements now. It is a
wonder that no one fell through this roof.
The garage door openings are being held in place
with some of the lumber they ripped out. The
beams are also being supported on the ends that were
attached to the fascia. |
|

Plywood
being removed |
|

The roof
is all gone now |
|

Decorative beams being supported with scrap lumber |
February 25, 2015 --
The construction workers did not show-up, even though
they said they would be here in the afternoon.
Probably because they were yelled at in the morning for
jerry-rigging the garage door openers in-place.
The jerry-rigged holders for the garage openers did
not work in high winds. At about 5 pm on the
24th, a front came through bringing 40 mph gusts and
rain which had NOT been in the forecast. The
beams holding the motor and tracks did not hold and were
flopping around. I caught the contractor before they
went home at the office. They got hold of a
garage door specialist who came over at dusk and
removed everything.
As for no one showing up, no problem, I got to
finish the last part of a
rock
wall I had been working on without any
interruptions.
February 26, 2015 --
Today the framing of the new garage roof began.
The carpenter and his crew showed up around 8:30 am.
A truck delivered the roof materials and a forklift
placed the materials onto
my driveway. |
|

Materials
being delivered |
|

Ridge
board in place. Ceiling joists being put in. |
|

The rise
and second ridge board being put in place |
|

Trusses
added |
|

Front
view of the garage roof |
|
February 27, 2015 --
Today the workers showed up at 8:30. They
worked on the soffit areas, added additional support
between the ridge boards, and added plywood to the
west side of the roof. |
|

West side
of roof covered with plywood, soffit added |
|

Inside of
roof as of February 27, 2015 |
|
March 2, 2015 -- In my
world, it always rains when I hire a contractor to
do outside work. In a city that averages about
300 sunny days a year, where March and April
statistically are the driest months, you would think that the odds
were on my side. Nope.
Today it started with a few sprinkles and then a
light drizzle in the afternoon.
The workers came at about 8:40 am
and started by getting the rest of the plywood up on
the roof. They then added the fascia boards
and drip edge that will hold the flashing when the
shingles are put on.
Just about the time the rain starting coming down
heavier, the roofer arrived to put the tar/felt
paper on the roof. At least now there is no
more water dripping into the garage. |
|

The rest
of the plywood added to the east side of roof |
|

Fascia
board and wood for roof flashing being attached |
|

Tar /
felt paper being attached |
March 3, 2015 -- Today was
another rain day, so the the workers did not come
today. This day did allow me time to casually
inspect the roof and I found some issues that needed
to be addressed.
One thing I have learned, living and working in this
town for 17 years, is that communication is often
lacking. Sometimes it is a language barrier.
I speak some Spanish, but I am in no way fluent.
Sometimes it is the problem of expressing ideas to
someone who's brain is just wired differently.
Sometimes it is cultural. Sometimes it is
because I am a female.
After a sleepless night, where my mind was working
around the roof issues. I e-mailed and phoned
the contractor the next morning to make sure I had
the fluent English speaking company representative
on-site the next morning with the work crew. |
March 4, 2015 -- One
issue that we covered this morning, before anyone
started working, was the section of the roof above
the patio. It was flat. I did not catch
this until after the trusses were in place and the
sheathing was already put on. My fault for not
looking r-e-a-l close sooner. With the light rain
we had the past two days, the flatness of this
section was evident because of the still standing
water on this section of roof the next morning.
The rain had stopped the previous afternoon.
I had wanted a gable roof. Period. Not a roof where
a section of it went flat over the patio where it
met the decorative beams. When I mentioned
this to the contractor he said that they could not have
done it because of the decorative beams. Wrong! All
they would have had to do was raise the height of
the wall on that side until the trusses were level
with the end of the decorative beams. But I
can be flexible. I told him that it would be unreasonable and
costly to rip-off half of the roof to fix this
problem at this point.
I suggested instead that they elevate this section
of the roof slightly so the water runs off. To
fix this they only had to remove the tar paper and
sheathing on this small section and re-do it by
adding some height to the section where the gable
met the flat section. |
|

Where
rain still sat the morning after it had stopped
raining the afternoon before |
The second issue also concerned
this section of the roof. The problem
was at the front of the house where the
gable section met the flat section.
You have to look at the photo to the right
to see what I mean.
Really? At first they looked at
it and could not figure out what I was
talking about.
My suggestion for this was to just follow the curve
of the roof. Let's cut off a portion of the
section horizontally at the bottom, after they fix the elevation
of the flat section. |

Where
gable and flat roofs "collide" |
|
Another concern I had was the
front of the house on the gable. The plan from the
beginning had been to remove the old orange siding and
place new siding on that would meet up to the new
roof. Since it had not been removed yet I
wanted to make sure this was still going to be done.
We then discussed how the design was to be.
You would think that the supervisor would have
communicated this to the work crew. He did
not. When I heard them working at the front of
the garage later in the afternoon, I caught them
putting the new siding only on the new gable with
the old siding still in place. Good thing I
caught them before they finished. They then
ripped off the old siding and with my instructions,
completed the front siding as it was supposed to be.
To fix the flat section of the roof, the framer put
3 inch wedges on each of the beams then reattached
the sheathing. The roofer then placed new tar
paper back on. There is now a gentle slope on
this section which will now allow rain water off the roof. |
|

Flat
section was raised 3" to create a slight slope by
adding wedges to each beam |
The photo below shows the new
siding on the gable and the corrected corner of the
roof edge.
Please keep in mind that I will be
adding trim and repairing the wood around the garage
doors after the contractors are finished. |
|

Modified
corner section on the left edge of roof and new siding on gable |
March 5, 2015 -- Today the
contractor worked on the soffits, roof extension
over the stucco patio stairs, and started
demo on a badly damaged area on the east
side of the house.
The one thing I had totally forgotten about, was the
siding over the window in the garage. Siding
over windows was not covered in the
contract, so I will be doing this work
myself.
This
morning, when I stopped to take a look at the
window, I realized that I would have a heck of a
time changing the siding and trim above the wrought
iron with the soffit board in place.
I asked the workers to do the soffits on the
other side of the garage while I worked on
the window siding.
One thing I had been doing was dumpster
diving. Any materials I thought I
would need in the future were taken out.
There were some large pieces of siding I
retrieved. It is amazing to see what
the workers just threw away. When
having construction done.....rescue the good
scraps. |

Old orange siding above garage window |
|
The
first thing I did was to remove the
weathered pine trim. When looking at
the old siding, I realized that it was still
in good shape. It stayed. But I
wanted the window siding to match what was
on the gable.
I then removed any old paint and caulk to
level the surface. I then cut a piece
of the new siding to fit over the old.
The piece that I cut was 48" x 15 1/4".
After the new siding was in place, the
workers put up the soffit.
|

New siding and PVC trim above garage window |
|
While
the workers were working on another area, I
went back to do the trim over the window.
The one thing I have discovered about the
above window sidings with this house.
The siding has lasted throughout the years.
The pine trim has not.
Since this window gets a lot of direct
sunlight and is hit by the rain I decided to
use a more durable material for the trim.
PVC
In my pile of purchased moulding, I had a
few pieces of 1" x 4" PVC trim board.
I ripped one in half so I had 1" x 2"
moulding and started with the trim piece
that is above the window.
This window has a little ledge that the new
siding just managed to fit in. The old
trim sat on top of the ledge. I wanted
to prevent any water from getting in on this
ledge. So I cut away a little of the
moulding so it fit over the top of the
ledge. See the graphic at right to see
what I mean.
Caulk placed between the moulding and new
siding will further block any water, along
with the paint.
After I paint the soffit, siding, and trim,
I will place some clear silicone on the trim
that is against the brick to seal this area.
|

How bottom trim went
over top of window frame edge |
|
The
soffit boards were placed on. The soffit vent holes
will be placed on after I tell them where to
cut them.
After all of the snafus on this job, I need
to mark where to cut on the soffit. I
want all of the vent holes evenly spaced,
straight, and centered. If they are
not, it will bother me every time I look at
them.
The next thing they worked on was the
extension over the stairs on the soffit
patio. |

Soffit boards in place |
|
|
They tore off the roof in this
area and and placed on the frame that would extend
this part of the roof about 1-1/2 feet. Well
over the stairs. |
|

Roof
being extended over stucco patio stairs |
After the extension framing was
placed on, the workers left on an errand.
I climbed up the ladder to take a look around.
To my surprise I saw the big ass hole in the stucco
wall that was only visible after the old
roofing material were removed. No wonder we
occasionally had water dripping against the wall in the garage.
This roof section is attached to the garage framing
in this section. The stucco was removed in the
past to get to the garage framing. Instead of
repairing the wall, it had been covered with roofing
material.
Do you think the discovery of this hole was
something that the workers should have pointed out
to me when they uncovered it? They did not.
They did not realize that I do not have a problem
getting on my roof. At the end of the day I
told them that I would be repairing the hole the
next morning with cement. What hole? |
|

Big ass
hole in stucco garage wall |
|

Underside
of roof extension |
The next
area that was worked on was a section of roof on the
east side of the house. There was a shade
cloth attached to the fascia when we moved in back
in 1998.
This cloth stayed there until January this year when I took it
off. We could see the water damage to the
fascia...but not the extent of the damage.
This area receives a lot of rain runoff from the roof.
After the fascia and soffit board were removed, you
could see the extensive damage to the framing.
What look likes burnt wood is all pure rot. |
|

Extensive
damage found on section of house roof on east side
after fascia and soffit boards removed |
March 6, 2015 -- Today I
was expecting four different contractors. The
contractors doing the framing, the roofer, the
garage door specialists, and an electrician (who did not
show up).
My first chore of the morning was patching up the
big ass hole in the garage stucco wall. I
climbed up to this section with my hammer and chisel
to remove any high spots and to generally clean up
the hole. I then used almost an entire 40lb
bag of Quikrete patching material to fill up this
hole all the way behind the wood beams.
The roofer will also be adding flashing to prevent
any leakage in this area. |
|

Big ass
hole in stucco garage wall now patched up with
concrete |
While I
was on the roof, Tony and Jorge from Desert
Garage Door, LLC showed up to reinstall the
garage door tracks and motors that were
removed during the demolition of the old
roof.
We hooked up an extension cord from the
house so they could get the doors working
properly. The electrical cords had
been cut during the demo.
The electrician still has to re-wire the
garage. In the meantime, I can park my SUV in the garage again. I
just open the doors manually. |

Tony (l) and Jorge (r) working on garage
door |
|
|

Garage
door tracks and motors now put back in place |
In the
afternoon, the framing contractors came back to work
on the badly damaged section on the east house roof.
They did further demolition on the area by removing
a section of the roofing and replacing the damaged
wood. The roofer will need to re-shingle this
area also.
I caught them as they were getting ready to cover
the section pictured below with plywood. I
stopped them at this point and pointed out the
damaged end of the wood. I told them that it
would never hold any weight and to add another piece
of 2" x 8" flush against the damaged board on the inside
to add support. Yes, at this point I am
getting tired of catching these little "short cuts".
They did add the extra support as requested. |
|

Damaged
end where I had to tell worker to nail an additional
piece of 2" x 8" board to the beam |
|

East
section of roof fascia and soffit over repaired
framing |
The
roofers from Esperanza Roofing arrived in the
morning to place the shingles on the west side of
the roof.
They did a pretty good job of matching the new
shingles to the shingles we had put on the house in
2009. |
|

Frank and
Fred from Espinoza Roofing placing the shingles of
the west side of garage roof |
March 7, 2015 -- Today is
Saturday. The roofers are the only contractors
coming in today to work on the east side of the
garage roof. On Friday, I called the
contractor about the overflowing dumpster and was
told that a pickup had been scheduled for today.
The garage roof is basically done at this point
except for the caulking and painting I will be
doing. |
|

East side
of garage roof shingles done by Adolfo and Fred from
Espinoza Roofing |
|

Overflowing dumpster waiting for pick-up |
March 9, 2015 -- Today I
started out the morning with a phone call to the
contractor to let them know that the dumpster had
not been picked up on Saturday. It was finally
picked up later this morning.
The other thing I needed to discuss was the section
connecting the garage to the house. There were
a couple of now cracked pieces of wood where workers
had stepped on them and damaged them. Granted,
they were in bad shape to begin with. This is
all framing that should have been removed when the
garage roof was removed. The ceiling had also
not been removed from this section. |
|

Wood that
was damaged by workers |
|
After meeting with the contractor and the carpenter
supervisor to address these issues, two workers and
scaffolding were left behind to do the work.
The first thing they did was tear out the ceiling of
the front entrance area of the house. The
section where the garage and house are connected.
They also replaced the cracked piece of plywood on the
roof and reinforced the broken beam. |
|

Ceiling
removed from front entrance area between garage and
house |
|
As you can see in
the photo above, the wood on the roof over the front
entrance, closest to the house, was in good shape.
As far as I could tell, there had never been any
water damage.
The wood under the fascia boards on a part of the
house over the stucco patio was another story.
After the front entrance was taken care of, the
workers proceeded with removing and replacing the
damaged soffits and fascia on the house. |
|

Water
damage found under fascia and soffit on house roof
over stucco patio |
|

Damage
wood removed |
|
The workers also managed to get
the front entrance ceiling back in-place after a few snafus.
They tried 3 times to get a 4 x 8' piece of plywood
up. Scraping the hell out of the siding walls.
I stopped them and told them to cut the damn board
in half and then put it up. In broken Spanish
I tried to explain that I am going to put ceiling
tiles on this space. Where the seams were, did not
matter. Also, if there was water damage in the
future, only a smaller piece of wood would need to
be removed. I also told them to leave the
moulding at the top of the wall off. I would
put this back later. |
|

Ceiling
put back in place with plywood, replacing damaged
Hardy board |
March 10, 2015 -- Today
the 2 workers I had yesterday came in today on
"a mission". I believe their boss told
them to finish this job up today.
They started on the west side of the house
tearing up the fascia and soffit. The
scaffolding had been put in place.
The one thing I noticed real quick is that I
had yet another window with siding in sad
shape. While the workers were away to
pick up some supplies, I climbed up on the
scaffolding to take a closer look.
What I saw was expected and then I was
pissed off. The bathroom window was
replaced in 2013. I wish the window
installers had bothered to say how bad the
pine trim was at the top of the window.
I would have just given them a new piece.
I always have this type of moulding sitting
around. The bottom piece of old trim
was nailed back on in 3 pieces.
So as quick as I could, I took off the old
trim and scraped down the old siding.
I then used the scrap siding from the garage
and cut 2 pieces to fit over the old siding.
I did not have enough scrap siding material to cut
just one single piece. Again I used
PVC trim board in place of the pine. |

Damaged siding and trim over main bath
window |
|
The
final task the workers did, after replacing
the damaged soffit and fascia on the west
side of the house, was to cut the soffit
vents on the west side of the house and
garage.
On the garage I had already made a template
and carefully drawn out where the cuts were
to go. On the house soffits I gave
them the template and told them where to put
it.
For the cutting, they did not have the right
power tool to do it. Jeeez.....So with
a few instructions I let them use my Dremel
Saw Max.
March 11, 2015 -- Today the
electrician was going to come and reconnect
all the wiring in the garage. I woke up
early so I could get to Lowes when they
opened to buy a cheap fluorescent light
fixture. I also stopped by Sherwin
Williams to pick up my exterior paint that
they have been trying to match since Sunday.
A quick stop at McCoy's Building Supply for
brown concrete color and I was home by
8:00 am. The electrician did not show
up. |

New siding and trim over bathroom window |
|
|

Repaired
fascia and soffit over stucco patio and west side of
house |
The workers did stop by to pick
up their scaffolding at around 8:30. I had
just enough time to climb up and to get some caulk
on the bottom trim piece above the bathroom window, to block out any water in
case it rained before I painted it.
March 12, 2015 -- The electrician came today
and hooked up the electric in the garage. The roofers came
by and finished up the roofing over the repaired
damaged areas. The second dumpster was
removed. I am now officially done with the
contractors.
The rest of the work is now up to me. But how
was I going to get up to the high areas?
Originally, the painting of the decorative beams and
the high areas were going to be done by the
contractor. I decided that I would save money
in the long run if I just bought my own scaffolding
and do it myself. So I bought 12' worth of
scaffolding.
There are also a few fascia boards which need to be
replaced on the back and east side of the house
which I now know how to do. Why didn't the
contractor replace all of the fascia and soffit
around the house? To keep the cost down.
I only had a limited amount of money and I told the
contractor to only replace what was really damaged.
March 14, 2015 -- I am going to spend a week
finishing off my
rock
wall project in the front of the
house and then start all of the painting of the new
wood work on the garage and house. When I
start working on this, I will update this page. |
|

Finished
front of house as of March 14, 2015 |
March 25, 2015 -- I have finished what I
wanted to finish on my
rock
wall project
and I am now going to work on the areas of the house
that need to be painted - post construction.
The first area I am going to work on is the ceiling
area above the front entrance.
Not only do I need to reinstall the light,
I also want to put my rubber floor tiles back down
on the cement. All were removed before
construction. The new plywood ceiling needs to
be painted before I move anything back into this
area.
BUT before I do any painting, I needed to repair and
prep a wood beam and fix a section of the soffit
above the door that leads to the garage.
First I needed to remove a piece of moulding that
was attached to the beam. I had placed the
moulding there to help keep the former Hardie board
ceiling from falling down. No need for this
now. There was also a damaged area of the beam
where a chunk of wood was missing. I used
Bondo to repair the wood. The beam was then
sanded down to remove any old caulk and rough spots. |
|

Wood
beam repaired with Bondo (gray area above hook)
Rough spots on beam sanded down. |
|
The next thing to fix was an area
of the soffit above the garage door. This is
one of those transitional areas that does not make
any sense. It is a section of roof that is not
a roof anymore. I had hoped to have this
section of soffit removed during the demo. But
then again, it is a continuation of the soffit along
the rest of the roof on this side. Ack! |
|

Soffit
area above garage door. Where transitions go
bad. |
OK so I am stuck with this piece.
I can at least make it look better. The
construction workers put some fascia board to close
off the area above the painted flashing. OK
that will keep the birds out but does little for the
aesthetics. And really, what is the flashing
for? To divert rain water off the roof.
But if this area is under a roof, what rain water is
it diverting?
So I removed the flashing.....and all of the fascia
board....and all of the wood the construction
workers put behind their fascia board covering the
top of the soffit. I just tore everything off. |
|

Section
of soffit stripped down |
Now that I had this section
stripped down, I needed to rebuild it water tight.
Rain water can get into this area if the rain is
blowing in from the north.
The plywood on top of the soffit over hung by about
1/4" so I placed a piece of 1/4" plywood on this
section so the long edge would be flush. For
the short side, I cut a piece of plywood that went
up to the ceiling. |
|

Piece of
plywood added to long edge so it would be flush with
top board of soffit and side piece added |
|
The final piece of wood was
nailed on over the long edge of the ceiling going to
the ceiling. It is now just a simple "box". |
|

Final board added to soffit that goes to ceiling |
|
With this last modification made,
it is time to paint all of the new wood. I
will be painting the ceiling with a coat of oil
based primer. |
|

Ceiling
ready for primer |
After
three days, when the paint is completely
dry, I will be placing ceiling tiles on the
ceiling. I am going to try out the
same styrofoam tiles I used on my ceiling
inside the front entrance. (See
these here...)
So far, the tiles inside the house have
stayed put real good. Even with the
humidity from the swamp cooler in the
summer. I have never seen anyone use
these tiles in an outdoor setting. I
plan to use extra mastic to make sure they
stay put in high winds. Since this
area is sheltered I am pretty sure they will
not blow away.
I am painting them before installation.
The color I will be using is the same khaki
/ beigh color I have used on the walls. |

Style of ceiling tile going on ceiling |
|
April 2, 2015 --
After a little over a week I have finally finished
the ceiling over the front entrance. After
priming the plywood, I placed the ceiling tiles on.
I started in the center and then worked outward.
The light fixture is not in center, by the way.
This took around three days for me because of all of
the cuts I had to make on the tiles around the
edges. I also got tired quickly squeezing the
mastic flat on the tiles over my head. Men
have it easier with more upper body strength.
A lot of time was spent on the moulding
around the edges and caulking every seam before
painting. I needed to scrape all of the old
paint and caulking off the top of the two long walls
where the old moulding was. I wanted the new PVC
moulding to lie flat. I also re-painted the walls to cover
up all of the scraping damage done by the
contractors when they were trying to get the plywood
ceilings up.
I added moulding to the areas where the ceiling
meets the brick. Not only did the contractors
knock loose many of the bricks at the top, I lost
some of the mortar. I secured the loose bricks
and filled in the gaps before placing the moulding
on, which was stuck on with a silicone caulk.
The moulding used on the bricks is PVC lattice. |
|

Ceiling
tiles going up on primed plywood |
You have to agree, my ceiling now looks awesome with
the tiles. Maybe a little too monochromatic, but I
can always change that later. I also attached
one of the new soffit vent covers. I might
paint it later, but for now, I'll just leave it
white.
A note on attaching these vent covers. I am
attaching them with white aluminum siding nails.
They were the only white nails that I could find
that were small enough. They do not go
in easily on plywood. I also do not want to
accidentally whack the ceiling tiles, which will
dent easily. I ended up pre-drilling the nail
holes with a bit smaller than the nails. I was
then able to get the nails in without too much
effort. On the rest of the soffits around the house
that are still Hardy board, the nails go in easily
with a few hammer taps. |
|

Ceiling
tiles complete and moulding added at top of brick
wall |
|

Front
entrance ceiling as of April 2, 2015 |
April 3 and 4, 2015 --
I have now switched to the front of the garage.
I had already primed some of the soffits on the left
side of the garage. I then continued the
painting around the corner to the front of the
garage.
I first masked off the areas against the brick and
the new roof flashing. I then caulked all of
the seams with an elastomeric sealant. All of
the new wood and siding was then painted with an oil
based exterior wood primer. |
|
Front of
garage on April 3, 2015 after caulking and masking |
|

Front of
garage after priming on April 4, 2015 |
April 8, 2015 --
I have finished painting the soffit and gable
section on the front of the garage. And yes,
in case anyone is wondering, my paint color was
almost the same color as the unpainted siding.
I placed
ceiling tiles on the underside of the soffit.
It adds a nice touch to the roof.
Unfortunately, the tiles cannot be seen from street
level. The styrofoam will add some
weatherproofing to the wood underneath.
Since
these tiles are originally intended for inside use,
we will see how they hold up to the weather. They
were painted with two coats of exterior latex paint
and all of the edges were sealed with elastomeric
caulk. Extra mastic was used to secure them.
There is no way they will fly off at this point.
If they fall apart in a few years, I will place an
update on this page letting you know that this
experiment was a bust. If you do not see
anything here in a few years....that means the
ceiling tiles are
holding up to the elements just fine. |
|

Front of
garage after painting roof fascia and gable on April
8, 2015. Trim still not put on. |
|

Garage
soffit with ceiling tiles |
The front of the garage still
needs the trim added and the orange painted wood
replaced. I just needed to have the new
construction painted and protected before the
monsoon season arrives. Therefore, I am
concentrating more on painting bare wood. Why
didn't I add the trim and then paint? This is
because I like to put layers of paint on before
adding trim that will get wet from rain. It is
just extra protection in case water gets in the
cracks years down the line.
And yes, as my husband pointed out, the flood lights
are crooked. This is because of where the
mounting light screws go onto the electrical
fixture. To make it straight I will need to
drill two new holes in the light fixture, seal the
original holes and remount it. These lights
are made so you can adjust the angle of light to
where ever you want it. So functionally, the
lights are pointed where I want them to. For
now they will look a little wonky. I may just
leave it this way to bug people. ;) |
April 13, 2015 --
For the past two days we have had rain, so
work has been halted. Prior to this, I
was able to finish placing the ceiling tiles
on the soffit and some fascia on the east
side of the garage which is over the front
entrance patio.
The fascia between the wood beams, which I
had sanded down and fixed up last year when
I worked on the
wood beams,
had taken a beating during construction.
The fascia remained attached to the beams
and remained when the beams were reattached
to the side of the roof.
I had a bunch of 6" pieces of ceiling tile
left over when I had done the ceiling.
So I used these pieces to cover the beat up
fascia between the beams. |

Ceiling tiles placed on the rest of soffit |
|
The fascia between the beams
measured between 20" to 20-1/2". So I could
not use a single piece of the ceiling tile which
measures 19.625" (to be exact). So I cut two
pieces to fit each space individually.
No, I will not be placing ceiling tiles on any more
fascia. I only did it between the beams.
I still need to place my shade cloth back on to the
wood beams. To see how this looked before I removed
the cloth
go here... |
|

View of
ceiling tiles over door going into garage |
|

Completed
soffit and fascia area on east side of garage |
|
The next phase is finishing up
the west side of the garage. I already primed
the wood on the soffit and fascia last week.
After the weather clears, I will be placing the
ceiling tiles up and painting the section. I
will then work on the back of the garage. |
April 14, 2015 --
Since yesterday was a rain day I made a run to the
hardware store. When I got back I decided to
do some demolition on the front of the garage.
First the old garage door seals were removed and
then I removed the damaged wood on the center post
between the garage doors.
I could only remove the wood on the
front. The boards on the sides
are structural and connect to the
cross beams above.
But the wood was damaged along the
bottom. When I looked
underneath I realized that there was
not much holding up the weight of my
new roof.
|
|

All that there is holding up center
of roof front |
|

Center post demolition |
|
In
retrospect, I should have had this center
post replaced by the contractors before the
roof was placed on. I had no idea it
was this bad. I am surprised that the
center of our old garage did not sag or
collapse. Amazingly it did not and the
post measure exactly 7 feet.
So what to do at this point. I cut off
the damaged wood and inserted 2 pieces of
scrap 2 x 4's. I added a piece of
scrap PVC trim board at the bottom front.
At least I know this won't rot.
I then cut some 1/2" plywood to cover up the
front of post. |

Bad wood cut out and 2 x 4's fitted in |
|
|
The post
looked better, but I was still not secure
about my little pieces of 2 x 4's that I had
inserted. This roof is a lot heavier
than the old roof and the existing wood is
old.
After sleeping on this problem I came up
with a solution. Add more support.
So off to the hardware store again to buy
some pressure treated 2 x 4's. My idea
was to add two 2 X 4's on each side of the
post and attaching it to the existing
framework.
After cutting the new 2 x 4's, I nailed them
to the sides.
My whole plan from the beginning had been to
cover the center post with dense PVC to
prevent water damage in the future.
The 4 x 8 sheet I wanted was almost $200 so
I decided instead on a 4 x 8 sheet of 1/8"
thick ABS instead. (Acrylonitrile
butadiene styrene, a material used to make car
parts, cases for computers, Legos, etc.) You
will not get this at a hardware store.
I went to a company called Piedmont
Plastics.
I then cut the pieces I needed of ABS on my
table saw. I nailed these onto the
post with finishing nails.
A few days later I realized that the ABS was a
mistake. Every time direct sunlight hit the
material in the afternoon it would expand, then
shrink back when the sun hit it. So I went
online and purchased the dense PVC sheets I should
have bought to begin with. A day was spent
tearing off the ABS and putting on the PVC sheets.
I will be placing PVC trim on the bottom and PVC
corner moulding after I place the new garage door
seals on. Everything will be sealed with a
silicone sealant, then primed and painted the same
color as the roof fascia.
|
|

Plywood
placed on front |

2 x 4's
added to sides |

ABS cover
on post which was taken off and replaced with PVC |
|
|

Front of
house as of April 14, 2015 |
|
The next step for the front of
the garage are the sides. I will be removing
some more damaged wood here. I also need to
add trim at the top of the garage doors. |
May 2, 2015 -- The front
and the west side of the garage are now complete.
Work on the back of the garage has been going on the
past week.
The work on the front of the garage took awhile.
First, all of the old garage door weather stripping
was removed. |
For the sides of the garage doors
the old damaged wood brick moulding was
removed. The bricks were cleaned with
a paint/rust remover stripper I attached to
my hand drill to remove where sloppy
painting and caulking had been.
When the bricks were cleaned I placed on new
PVC brick moulding. I covered the old wood
with dense PVC. Between the brick
moulding and PVC covered wood, I placed some
quarter round moulding. Caulked and
then painted. Clear caulk was used
this time between the brick and brick
moulding.
For the trim above the top of the garage.
I used 2 pieces of MSDS 1 x 4 trim board.
BUT before I could place this trim board on,
I had to build-up the the space between the
bottom edge of the siding on the gable and
the top of the garage doors. I wanted
the trim to go straight across on the top of
the garage doors.
First I used some scrap lumber to build up
the space and to give me something to attach
the bottom board to. Then the bottom
board was adding extending the width of the
top of the garage doors. The trim
board was then added to the end of the
built-up section and covering the end of the
gable siding.
To attach the trim board to the top of the
garage by myself, I used two ladders and
clamps to hold the trim in place to get the
nails in. Not easy. |

PVC covered wood on side of garage and new
brick moulding |
|
|

Scrap
lumber added to top of garage door to build up top
edge of garage doors |
|

White
board nailed on to the edge of the built-up area
extending the width of the top of garage |
|

Decorative detail on edges of gable |
After
the trim board was put in place above the
garage doors I worked on the design for the
edges of the gable where they met with the
brick. I wanted something more than
just the 45 degree cut that was there.
So I first made my southwestern step design
on cardboard cut to fit and then traced the
design onto some 3/4" scraps of birch that I
had. After priming and painting the
pieces they were attached on top of the trim
board.
I then cut a piece of 1" x 2" trim board to
run across the decorative corner to the edge
of the wall. |
|
Underneath the top of the garage opening I
added more of the ceiling tiles to cover up
the two seams that were now underneath the
extended section.
I had originally just caulked and painted
the seams where the wood met. It
actually looked just fine. But the
ceiling tiles made it look better.
The next step was to paint the garage doors.
This took a few days of lowering the doors
in sections so I could paint the top and
bottoms.
The new garage door weather stripping was
painted to match the trim and doors.
After the weather stripping was placed back
on the garage doors, I was able to finish
making the trim for the center post.
Corner moulding was placed on the edges to
seal the dense PVC covers.
The center post and sides of the garage are
now protected from any future water damage. |

Ceiling tile placed on underside of built-up
extension at the top of the garage doors |
|
|

Center
post |
The center post and sides of the garage are
now protected from any future water damage.
I added
a decorative step pattern above the center
of the garage door with PVC trim board.
I am still deciding about adding the faux
window treatment to the garage doors.
In the meantime, I was also working on the
west side of the garage. The soffit
and fascia were primed and then painted.
The ceiling tiles went on the underside of
the soffit. Then the soffit vent
covers were put on.
For the window, I noticed that all of the
white caulk was hard and chipping off.
I spent half a day removing all of the old
caulk, cleaning the brick up and resealing
the window with clear elastomeric caulk.
I then sanded down the wrought iron.
I covered the wall and soffit area with
plastic and went loose with the spray paint,
giving the wrought iron a good fresh coat of
paint. |
|
|
Finished
front of
house as of May 2, 2015 |
|

Update -
May 2016, After painting faux garage windows |
|
Here is
the "before" picture, so you don't have to scroll to
the top of the page |
|

Completed
west side of garage |
Our
house definitely has some curb appeal now.
However, work continues on the parts of the
house that you cannot see from the
street.
I am almost finished with the backside of
the garage pictured to the right.
This part of the garage is much higher than
the front elevation. This is because
the house is built on a slope. The
high point is about 14 feet off the ground.
I needed to stack my scaffolding to reach
this section.
The old roof used to be at the bottom of the
siding.
In addition to the gable and roof sections I
am re-painting parts of the stucco wall,
that I repaired and painted last year.
The ladders used by the construction workers
scrapped and gouged parts of the wall. |

Priming the back of garage |
|
|

Completed back of garage |
May 4, 2015 -- The back of
the garage is now complete.
The next section I will be working on is the
extension over the stucco stairs that
connects with the main house roof.
This is another area where different roofs
collide.
There is a piece of fascia that was slapped
onto the section between the extension and
house roof by the construction crew.
Not only does this fascia board show below
the decorative wood beam (which is
structural), it was not large enough to
cover the area, the old fascia board is
still visible underneath, and for some
reason they attached a 1 x 2 trim board for
flashing the whole length. |
|
|

Roof
section that was extended over stucco stairs |
|

Back side
of fascia board that extends below beam and has a
gap along the upper left corner
|
|

Front
side of fascia board which shows old fascia board
and has flashing trim board running the full length |
Oh yea, I removed the stupid
piece of fascia board. I am also trying to
remove part of the old fascia board between the
crack. I have to be careful because part of
this board is still on a part of the house roof.
One thing I noticed when I removed everything.
I can see little cracks of light. If I can see
light, there is the possibility of water getting in.
So I will need to further seal some areas on the
roof where this seam is. |
|

New piece
of fascia board removed. Part of old fascia
board removed from inside crack |
May 10, 2015 -- The
extension over the stucco patio stairs is now
complete.
What I did, after I removed the fascia board, was to
cover the gaps on both sides with 1" plywood cut to
fit each side of the roof transition and used a
little moulding. I then added the ceiling
tiles to the ceiling and soffit. Which was
followed by painting everything. |
What I have also started doing, now that I am around
the main house roof, is to pull out the old flashing
/ drip edge which is pretty old and replace it with
new flashing. Lowes does not carry 2-1/2"
flashing, but McCoy's Building Supply does.
I now know why we had such a problem with our fascia
and soffit boards rotting. The darn flashing
was nailed on without using any roofing cement.
Which means, the water works it's way
under the shingles and flashing
and comes down through the nail holes. I am
gluing the new flashing in under the shingles
with roof cement. |

House roof with new flashing on the left and
old flashing on the right |
|
|

Extension
over stucco patio stairs complete |
|

Inside edge of extension area after |
|

Outside
edge of extension area after |
May 14, 2015 -- Work this
past week has continued along the house soffit and
fascia over the stucco patio.
Tiles were placed on the soffit up to the corner. In
case you are wondering, the soffit here measures
between 35-1/2" to 36". For every row of
tiles, I needed to find the center.
Another new piece of flashing was installed along
the next stretch of fascia after painting. I
am painting the pine moulding underneath the drip
edge to protect the wood in case there is any water
touching it in the future. At the corner I
stuck a piece of rigid plastic under the shingles to
divert any rain water until I get the next piece of
flashing in. |
|

House
under roof section over stucco patio as of May 14,
2015 |
I am now getting ready to turn
the corner and work up the west side of the roof.
Before I can put the last two rows of tile on, I
need to work on the first of four decorative wood
beams. If I placed the tiles up before working
on this beam, I would damage them.
For these wood beams, I am following the same
process I used on the long wood beams over the front
patio (see
these repairs here...). Strip
the paint, sand down to fresh wood, fill any damaged
wood areas, prime with oil based paint, then two
coats of exterior latex paint.
What I am doing extra on these beams, is to add a
layer of bondo over the sanded wood to fill in the
wood grooves to smooth out the surface. The
reason I am doing this is because of the difficulty
of working on these beams at this height. The
lowest beam is about 11 feet off the ground.
The highest 17 feet. The more work that is put
into preparing the surface, the less chance the
paint will fail in the future. If there is a
smooth surface, water will glide off.
Of note, I am only doing this extensive prep work on
the heavily weathered ends. The paint on the
beam under the soffit is on there solid. I am
however lightly sanding the surface to smooth it
out. |
|

Corner
section with the 1st of 4 beams to repair. Temporary
plastic under corner shingles to divert water until
next piece of flashing is added coming down the
roof. |
|
To work on this first beam, I am
using my 6" scaffolding on the top level. The
roof is still too low for me to add the next six
foot section of scaffolding and be able to set it up
close to the wall. So to work on top of the
wood beam, I have a sturdy step ladder to get me up
high enough. When I move up the roof around 5
feet, I will be able to stack the scaffolding. |
May 17, 2015 -- The corner
of the house roof is now complete as I continue up
the west side. There is about 16 feet of
soffit and fascia to paint before I get to the next
decorative wood beam which is in worse shape than
the beam I just finished. I need to finish the
roof a few more feet before I attach the piece of
flashing that will cover this corner.
I was now able to stack my scaffolding to continue
working. To get on the top of the scaffolding
I am using a 16' extension ladder. I tie
the top of the ladder to the scaffold with a rope
for stability. I use a rope to lift a bucket
up with my tools. |
|

What a
difference a little work and paint makes on the
decorative beam |
|

Scaffold |

Soffits
are now finished over stucco patio |
|
May 21, 2015 -- This past
week I have continued up the west side of the roof.
About 8' up the roof I stopped removing the old
flashing. The shingles are stuck on real good
and I was damaging the shingles trying to pry
them up to get the flashing out, so I stopped.
I slid the new flashing in under the old and went
around the corner of the roof where I had already
removed the flashing.
I continued installing the ceiling tiles up to where
the second decorative wood beam is. I
sealed all of the siding above the bathroom window
and painted the area. The new soffit vent
covers were installed. While I was up in this
area I removed some unnecessary nails that were in
the brick that were used for cable. I also
sealed any areas where there were holes in the mortar. |
|

First
part of west house roof fascia and soffit complete |
The scaffolding was taken apart
at this point and then set-up for a flat surface.
The previous section of roof was over steps. I
also raised the top platform of the scaffolding to
almost the top level.
After I finish working on the second wood beam, I
will continue up the soffit. The soffit in
this section was not removed because it was still in
good shape. The fascia however is new.
The old vent covers will be removed. I will be
placing the ceiling tiles up over the old soffit
boards after I do a little cleaning up. Except
for the edges between the soffit and fascia, the
paint on the soffit is not flaking.
When I get to the window with the wrought iron, I
will need to work on the siding above it. I
think I have enough scraps from the garage siding to
cover the old siding. I suspect that I will
need to replace some of the old wood trim boards on
the siding. This will be replaced with pvc
trim board. And.....since it is unlikely that
I will ever be up this high again any time soon, the
wrought iron will be given a fresh coat of paint. |
|

Next
section of the west roof fascia and soffit to work
on |
May 25, 2015 -- The second
decorative wood beam was sanded down and painted.
Work is continuing up the soffit.
I can only work a few hours a day on top of the
scaffolding at this height. It is a little
unnerving. There is basically nothing to hold
on to until I get underneath the master bedroom
window wrought iron. Moving very slow and
balancing carefully really wears on you after a
couple of hours. And then there is the
climbing up and down the ladder.
I am now working where the old soffit boards are and
the old vent holes. One thing I did not notice
before the new vent holes were cut in the replaced
soffit boards.....the old soffit holes are
positioned more towards the edge of the roof.
Not in the center as I had them cut on the garage
soffit. If I had caught this when the
contractors were here, I would have had them cut the
new vents so they would line up with the old vents.
To compensate for this, I am moving the edge of the
old vents about an 1-1/2" in. Adjusting the
ceiling tiles accordingly. While the old vents
are not in the center, they don't look as far on the
edge as before. From the street you will not
even notice this.
The other problem with the old soffit board is that
it has bowed downward over time. Fortunately
the ceiling tiles are flexible enough to glue on the
surface following the bowed out soffit board.
In the photo below, you cannot even tell. I
placed extra mastic on to keep the tile in place.
For the third decorative wood beam I can just reach
it with my hand. This is the highest point on
this roof. I may have to bring up my step
ladder to work on this beam. Fortunately only
the very end needs to be sanded down to repair.
The rest of the paint on the beam is in good shape.
The fourth beam needs a little more work. |
|

West
house roof as of May 25, 2015 |
May 30, 2015 -- My
scaffolding has been parked under the window on the
far end of the west roof for a few days while I worked on the third
decorative wood beam, the siding above the window,
the soffit, the fascia, and the wrought iron.
I am so glad that I have now almost finished this
section. The scaffold is about as high as it
goes and I needed to stand on my toes and stretch to
reach all of the high spots.
The end of the third wood beam was stripped, primed
and painted. Scrap siding from the garage
construction was placed over the old siding over the
window and new trim was placed on. The wrought
iron was sanded and the left half painted. I
will paint the rest when I finish the area above the
right side.
To work on the last wood beam I will need to move
the scaffolding half way through a wrought iron gate
into the back yard. I will do this after I
finish working above the right side of the window. |
|

West
house roof area as of May 30, 2015 |
June 5, 2015 --
Today I f-i-n-a-l-l-y finished the west side of the house
roof.
After placing tiles on the soffit up to the fourth
decorative wood beam, I worked on the beam. As
with the three before it, it was sanded down to
fresh wood, Bondo was used to fill the cracks and
smooth it out, and primer was placed on it.
Where the paint was still in good shape, it stayed. |
|

Fourth
wood beam sanded |

Fourth
wood beam Bondo'd and primed |
|
I added the last of the ceiling
tiles, caulked the seams, painted the surrounding
area, and placed the vent covers on.
The spacing of the vent holes between the third and
fourth wood beam is wonky. One of the holes
actually continued over the top of the fourth beam.
I had to dig the old plastic vent cover out.
It appears as if these soffit board vent holes were
manufactured this way and the home builder just
stuck it on to save on materials. So this is why the
one vent cover is against the fourth beam. When
looking at the entire length of the soffit on this
side of the house, you don't really notice this.
I was done....almost.
The one thing that was missing
was the trim moulding that goes against the brick
wall and soffit between the second and fourth beams.
Most of the soffit around the house has the trim
moulding. I can only assume, that this
moulding had fallen off in the past before we bought
the house. Between the first and second
decorative beam, I had the contractor put up the
trim moulding because they had knocked out a lot of
the mortar when they removed the old soffit and it
looked awful.
While I was at the corner I added the short piece of
missing moulding between the window and fourth beam
The problem with this moulding is that:
- it is difficult to attach to the edge of the
soffit. I don't have a nail gun. Even
the contractors had difficulty doing this with mixed
results. They used Liquid Nails were a nail would
not catch.
- the brick surface is uneven. You put a
straight board up and it lays flush in one area and
there are big gaps in other areas.
I needed a material that was light enough to glue in
place and soft enough to carve while perched on top
of the scaffold to shape the moulding around high
and low spots. I opted for some polystyrene
base board moulding. I trimmed off a1/2"on the
narrow end so the moulding was the same width as the
existing moulding.
The distance was a little over eight feet, so I
needed two pieces of moulding to cover this area.
The moulding only came in eight foot lengths.
I stuck it up with Liquid Nails. Even though
the material was light, I still had to stand there
with my hands holding the moulding in place until
the glue was hard enough. There was just no
way to clamp the darn thing. Caulk was then
added to the seam between the moulding and soffit.
I additionally ran a bead of clear caulk on the
underside between the brick and moulding.
I also had to add the moulding around the corners by
the window. |
|

Missing
trim moulding along brick and soffit between 2nd and
3rd wood beam |
|

First
piece of moulding in place against brick and soffit |
|

Trim
moulding now in place |
|

Trim also
placed around brick corners of window |
|

Completed
west side of the house roof June 5, 2015 |
Before breaking down the
scaffolding, I had one more task to do. I
needed to replace the ceiling tile on the corner of
the garage soffit where the west side and back side
meet. Somehow I messed up on the cut and the
tile pattern did not match up correctly. I
needed to remove the tile and put up a new one.
Unless pointed out, no one would have noticed this.
But it would bug me.
While I was moving the scaffolding back up the side
of the house I was not careful while lifting the
scaffolding up a step and the top of the scaffolding
gouged one of the tiles by the first decorative
beam. So now I had two tiles to replace.
Let me tell you....these tiles are not easy to
remove once they are in place and the glue is dried.
Which is why I know that these ceiling tiles will
not be coming off any time soon. You basically
have to scrape them off, breaking off little pieces
of styrofoam until everything is removed.
Is my work done now? Oh, nooooooo. I
still need to work on the east house roof soffit and
fascia. Before I work on this, I will be
adding ceiling tiles to a short section of the front
patio soffit. |
|
June 6, 2015 --
Today I worked on a section of the front patio roof.
I had already repaired and painted this small
section last year. However, this section did
not have the ceiling tiles on the soffit and the
darker green paint I have been using on the fascia.
So before moving on to the east house roof, I
decided to update this section. This way all
of the roof sections facing the street in the front
will be done. |
|

Small
portion of roof over front patio |
Installing the tiles was quick
and easy. Besides painting the fascia the
darker green, there were two small decorative wood
beams on each side of this stretch of roof that also
needed to be painted to match the beams on the west
roof. I had already worked on these two beams
last year so paint was all they needed.
For the trim against the brick and soffit, I went
with some thin screen polystyrene moulding I had
on-hand. I may go back later and place the
wider moulding on over this moulding. I just
wanted to finish this section in one day and did not
want to make a run to the hardware store.
The flashing here is not in the best shape.
Changing it will have to wait until the next time we
replace the roofing. Like what I came across
on the west side, the shingles will become too
damaged if I try to get the old flashing off.
This was a nice little project to start and finish
in one day. I even finished in time to watch
American Pharoah win the Belmont Stakes for the
Triple Crown. Whoo hoo. Finally! |
|

Small
portion of roof over front patio after installing
ceiling tiles, painting fascia, and
putting moulding
on brick under soffit |
The next section is the
east house roof.
While there are some bad sections here, this
side is not as bad as the west side was.
This side receives less sun and the rain
rarely is blown in from the east.
A section in the front was one of the areas
repaired by the construction crews. So
it just needs to be painted and the ceiling
tiles installed. There is also an
electrical cord used for outdoor floodlights
that I need to deal with.
There are three more of the decorative wood
beams that need to be worked on. (And
this is it, for the decorative wood beams)
The fascia just needs to be sanded down to
get rid of the cracked paint before
repainting.
I will also need to cut the branches of our
Arizona Ash tree which is now above the
roof. This tree was only planted about
seven years ago and is now a great little
shade maker. |

East house roof |
|
Moulding will also be
placed along the brick and soffit where needed.
The round plastic soffit vent covers will be
replaced with the aluminum covers. |
|

First
section of east roof to be worked on |
June 11, 2015 --
After priming the bare soffit wood and fascia board,
I needed to work on the siding above the kitchen
window before placing the ceiling tiles in place. The problems with this area were
the big gaps in the corners of the siding and the
electrical wire. When the old soffit was
removed, a lot of the mortar and some moulding were removed.
The electric wire was attached to the underside of
the soffit.
I still had some siding scraps left over from the
garage roof construction. So this will be used here.
What I ended up doing with the electrical wire was
to squeeze it between the brick and the new soffit
board so it it is now behind the brick. Over
the window I removed the small vertical trim boards.
The new piece of siding was placed on top of the
bottom and top trim boards. The electrical
wire is now in the gap between the old and new
siding. |
|

Gap in
corner above window. Electrical wire moved
behind brick and placed in siding gap.
New siding to be placed over entire area on top of
trim boards. |
After the siding was installed, I
placed new trim over the new siding after installing
the ceiling tiles. Yes,
working above and between the wrought iron was a
pain. No nails were used in this area.
There is just no way to swing a hammer in this tight
space. Everything was glued on.
Small pieces of moulding were placed
against the brick in the corner. Clear caulk was
used against the new vertical trim board and the
brick to seal the small crack. |
|

New
siding in place above window. Ceiling tiles in
place above window area. New trim board added on top
of siding and moulding placed along brick in corner. |
|
After I finished installing the
ceiling tiles on the soffit to the right of the window,
moulding was placed under the soffit against the
brick. |
|

Moulding
placed on brick under soffit on the right side of
the window |
I finished installing the ceiling
tiles and painted the fascia on the section above
the kitchen window. At this time, all of the new
construction has now been painted.
The electrical wire is now concealed behind the
brick and siding in this section. In the
corner, I left off the ceiling tile until I finish
dealing with the electrical wire further up the
roof. The moulding below the soffit against
the brick will be added after I deal with the
electrical wire. |
|

Soffit
above window area complete except for corner where
electrical wire is.
Still need to add moulding against brick. |
The next section of the east
roof, up to the first decorative wood beam, needs to
be worked on all at the same time. The wood
beam needs to be finished so the electrical wire can
be reattached and worked down the wall.
Against this section of the wall, the electrical
wire will be placed under the moulding that will
be placed under the soffit against the brick. The
area between the soffit and brick in this area is
too tight for me to squeeze the wire in.
The photo below shows the prep work started on the
soffit and paint stripping on decorative wood beam.
|
|

Prep work
started on east roof section up to the first
decorative beam |
June 14, 2015 --
The soffit section between the kitchen
window and the first decorative wood beam is
now finished.
Four ceiling tiles were added in this area.
The wood beam was sanded down, repaired, and
painted just like the others.
The soffit vent cover was put in place and
the moulding was added under the soffit
against the brick, finally concealing the
electrical wire that used to be attached to
the soffit.
The only place the wire is still visible is
along the wood beam where I reattached it.
It is painted the same color as the beam so
it blends in a little more.
The flood light fixture will be painted
black after I finish the next section. |

Soffit area up to first decorative beam now
complete |
|
|

Next area being worked on. New siding in
place over window and primed |
The next
section I am now working on is the area
between the first and second decorative wood
beam. This includes the area above the
dinning room window.
The old trim was removed on the soffit and
siding. After scrapping down the area,
I cut and installed the new siding over the
old siding.
The new siding above the window was then
painted with primer.
The next steps are to do some sanding of the
fascia, where the paint is cracked, install
the ceiling tiles, install new pvc trim
board to the window siding, and then paint
everything. |
|
June 18, 2015 --
Work on this roof section is now going slowly.
Temperatures are in the upper 90's with 100+ degree
heat forecasted for the next few days. I no
longer have the shade of my ash tree. The sun
hits this side of the house from 8:00 am until 2:00
pm so working out here is brutal. Yes, I am
wearing sun screen, drink plenty of fluids, and pop
inside frequently to cool off.
The section between the first and second beam on the
east roof is now complete. There was a lot of
fascia sanding to remove the cracked paint and to
attempt to feather the edges of the old paint.
The sanded fascia areas were primed and then
painted.
New pvc trim was placed around the edges of the new
siding above the dining room window. While the
scaffolding was next to the window, I painted the
top half of the wrought iron.
The ceiling tiles were installed. Where one of
the vent holes went under the first decorative beam,
I just covered part of the hole with the ceiling
tile and installed the vent cover a couple inches
away from the edge of the beam. I will be
doing the same with the hole by the second beam.
Trim was then placed against the brick wall and the
soffit. The flood light fixture was painted. |
|

Section between the first and second
decorative beam above dining room window complete |
|
For the next section of the roof,
I am now able to stack my scaffold. I will
first finish the wood beam and then the soffit. |
|

Next section of east roof to work on |
|

Section
between second decorative beam and chimney complete
June 21, 2015 |
June 21, 2015 --
The soffit and fascia sections of the east
roof, up to the chimney, are now complete.
The last section of the east roof is in a
awkward corner for a scaffold set-up.
So I had to tear down the scaffolding and
re-set it up over a wall and to a surface
that is one foot lower then the side yard.
This scaffolding set-up can be done by one
strong person. If you are not strong
it takes a lot longer. 2 hours for me
to break down and re-set up. Oh, and
this was done in full sunlight in the 90's.
If I had a helper, it probably would have
just taken 30 minutes.
This corner section of the soffit against
the chimney had some old branches wedged in
between the soffit. These branches
have been there since we moved in.
|

Soffit, fascia, siding, and wood beams up to
chimney done |
|
|

Scaffolding set-up for corner section |
The
cement patio below the chimney was put in in
6/1996 based on a name written in the
cement.
So as far as we could tell, the owners had a
climbing vine against the chimney which was
removed. We never pulled the branches
out because our ladders could not safely
reach this area.
The fascia board on this 79-1/2 inch area is
in bad shape and will be replaced. The
demolition in this area will include the
fascia board, the drip edge trim board, and
the flashing.
The LAST decorative wood
beam is here. I am so tired of working
on these wood beams and am glad it is the
last one. |
|
|

Corner
section of east roof before demolition |
|

Corner
section after demolition.
Fascia board, drip trim moulding, flashing, other
trim, and vent cover removed. |
June 29, 2015 --
The last section of the east roof has been
completed to the last decorative wood beam.
While working on this section, I discovered that the
fascia wood on the corner facing the backyard was
rotten. Since the scaffolding would have to be
torn down and re-setup to repair the corner, I
finished everything up to and including the wood
beam. When attaching the new fascia board to
this section, I made sure I did not drive any nails
into the rotten wood on the very end. When
attaching the new flashing, I only left a 4" piece
that will fold over the corner when it is repaired. |
|

Last part
of east roof finished to wood beam |
|

Corner of
fascia wood damaged. Photo shows wood after some
demolition
to determine extent of damage |
The scaffolding was re-setup over
another awkward area where the elevations drops
about 3 feet. Fascia board was ripped off to
see if the water damage covered the entire board.
Fortunately the damage was only on the end.
The damaged wood was removed and some good wood up
to the point where it met one of the trusses.
Four feet was removed. I then attached some
small pieces of 2 x 6 wood to the trusses at the end
so there was some new wood to attach the new fascia
wood to.
The damaged soffit board on the corner was cut out.
A piece of primed plywood was added to this section.
Since this whole area will be covered with ceiling
tiles, I am not too concerned with how it looks.
It just needs to be level with a flat surface to
hold the tile. |
|

Damaged
wood removed on corner and replaced with new wood.
Damaged soffit board replaced with primed plywood. |
July 7, 2015 --
My husband helped me out this past week with the
soffit and fascia area. As we worked along the
edge of the roof, we found another section of damaged fascia
wood that needed to be cut out. Which we did.
A new piece of lumber was inserted to replace the
damaged.
On the back of the house there is a section with ten
5-foot long windows. The five on the top are
still the old aluminum frame windows. While
old, they all still work fine. The five on the
lower level were replaced about 10 years with vinyl
double glass windows. The five on top will be
replaced when my budget permits it.
We removed the wrought iron that was previously on
these windows. We did this because the trim
around the windows, that the wrought iron was
attached to, needed to be replaced. We have
decided not to place the wrought iron back on these
windows. |
|

Another
section of damaged fascia removed. Wrought
iron removed from upper windows.
|
New fascia board and flashing
were
installed along the rest of the roof edge.
The old trim was removed from the siding above and
below the windows. The old siding was scraped
down to make the surface level. Sloppy paint
and old caulk was removed from the surrounding
brick. New siding was placed on top of the old
siding and new pvc trim board was added. |
|

New
fascia board and flashing added to roof.
New siding and trim added up and below upper windows
and above lower windows. |
Trim still needs to added on to
the siding underneath the soffit before the ceiling
tiles are placed on the soffit.
A slim piece of trim will be added between the brick
and windows on both sides to seal the crack.
There was formally a horrible white caulk job here.
Everything will then be primed and painted the new
colors. The fascia board was painted before it
was attached and only needs some touching up. |
July 14, 2015 --
Finished up the soffit area above the ten windows.
The new siding and trim around the second floor
windows were painted. I added some additional
moulding in the corners of the section between the
two sets of windows to give it a southwest flair and
to match the step detail on the garage front and
storage shed. The trim was then
painted the same color as the fascia.
The old screen was taken out and replaced with new
screen and spline. All areas between the
windows and brick were sealed with clear caulk.
The wrought iron still needs to be sanded and
painted on the first floor windows. There is
also a section under the first floor windows that
needs the new siding and some cement work.
This will be done when I finish the work that
requires scaffolding. |
|

Roof
areas complete. Area around top 5 windows
complete. |
The old
orange soffit and fascia are almost gone
except for one small section of the backyard
roof. See photo on the right.
I will first install the new siding above
the window and get all of the stupid cable
wires under control.
I will then work on the fascia and soffits.
Before I get to this section, I will be
painting the fascia around the edges of the
balcony. And since I have the
scaffolding, removing some dead branches
from the pine tree that are too high to
reach with a ladder.
New siding will also be placed between the
two windows and the wrought iron given a
face lift with fresh paint.
|

Last
section of the roof to work on |
|
July 28, 2015 --
The final section of the main house roof is now
finish.
A lot of time was spent dealing with the stupid
cables that were dangling all over the place.
If you look at the photo to the right, the cables
are now less noticeable.
What I did to cover all of the cable connectors, was
to build a box to hide them. I used scrap fascia
board and pvc trim to build the box. I only
needed four holes on the box for the cables, but
drilled six holes for any future additions.
The holes were made large enough to accommodate the
end of the cable that screws onto the connector.
The cover attaches with four screws. |

Last
section of roof complete |
|
The box
did not need to be water tight, but it
should keep the rain out anyways.
Hell, these cables and connectors have been
here for 15 years exposed to the elements
and they work just fine.
The box was then painted the color of the
fascia. |
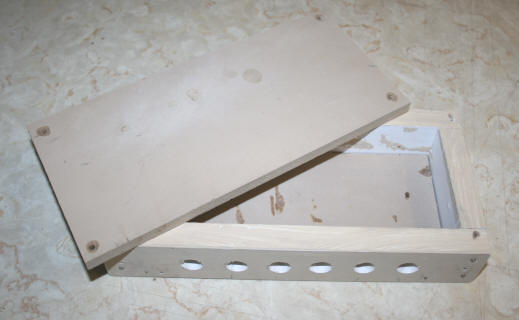
Box
made out of fascia board and pvc trim to
hide cable connectors |
|
|
The box was then mounted
below the drip edge on the fascia. Where
cables crossed a painted area of the fascia or
soffit, they were painted that color to camouflage
them. |
|

Cable box
mounted on fascia. Cables painted to
camouflage them. |
The siding above and below the
top window was covered with the new siding and the
wood trim was replaced with pvc trim. The
southwestern step pattern was added to the siding
between the two windows.
The top window wrought iron was sanded down and
given a fresh coat of paint.
Work is now continuing along the floor edge of the
balcony. I slapped a coat of paint on this
last year but I now want to address some of the
problems with this section which are:
- Some how there are three layers of flashing on the
edge. There only needs to be one.
- The electrical wires were hung nilly willy smack
dab in the middle of the fascia.
Starting on the west side of the balcony floor, I
started removing the flashing. The top two
layers of flashing came off easily after prying out
the short roofing nails.
The bottom, original flashing was a whole different
problem. When plywood was added to the floor
of the balcony, it was placed on top of the
flashing. Which means, there is no way to get
the flashing off without removing the floor of the
balcony. STUPID! |
|

Balcony
floor / roof over lower section - see 3 layers of
flashing on the right side and flood light
electrical cord attached to front of fascia.
Note: bottom flashing is under floor of balcony |
I am installing new flashing so somehow, I need to
get the old flashing off. Basically I just
need to remove the flashing so it is above the drip
edge trim. I first tried cutting the metal
with my Saw Max, but wore down the cutting wheel
real quick. I am now cutting the metal with
tin snips which takes a long time and makes for a
really jagged edge.
For the electrical cord, I am tucking as much as I
can underneath
on the drip edge trim. |
|

Bottom
layer of flashing
cut with great difficulty with tin snips.
Electrical wire moved to bottom of drip edge trim. |
|
I then did not like how the underside would look,
even after painting it. So I added pvc corner
moulding over the edge so all of the ugliness would
not be visible looking up from the ground. |
|

PVC
corner trim attached to edge to cover up electrical
wire and rough cut edges of old flashing. |
The fascia and corner moulding
were then painted the dark green color. The new
flashing I installed I found at McCoy's in an almond
color, which almost matches the light green / beige
color I have been using to paint the house.
Yes I know, the pvc trim shows. But I can live
with the appearance of this as opposed to three
painted layers of old dented flashing and an
electrical cord nailed in the middle of the fascia.
The appearance is a whole lot more cleaner looking. |
|

West side
of balcony floor complete. New flashing
installed on edge. Wrought iron on balcony
west side sanded and given a fresh coat of paint. |
As I work along the balcony floor
edge, I am also working on the balcony wrought iron.
The scaffolding makes this job much easier.
The wood beam under the balcony floor will be
painted the dark green color.
Ceiling tiles will be added to ceiling under
balcony. |
|

Work
to continue along floor edge of balcony.
Ceiling tiles to be added to balcony ceiling.
Wood beam under balcony to be painted dark green |
August 22, 2015
All
roof areas are now complete.
Ceiling tiles
were placed on ceiling of balcony and ceiling under
the balcony. Electrical wiring for flood
lights has been hidden away along balcony edge.
During this time I also worked on wrought
iron on the balcony and backyard windows.
Siding below 5 windows will be done at a
later date. |
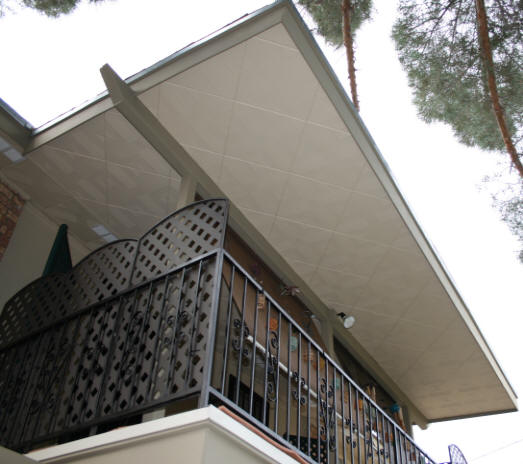
Ceiling tiles placed on balcony ceiling |
|
|

Ceiling
tiles placed on ceiling under balcony.
Electrical wires along fascia hidden away and new
flashing added to balcony edge. |
|
|

